12 - EN
VDA 200 to 560
Disassembly
■
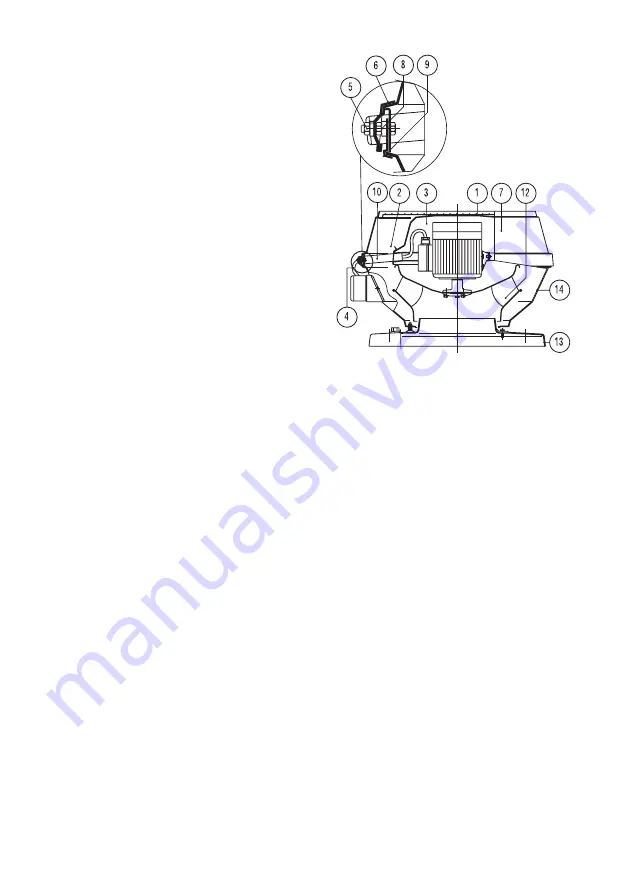
Before starting disassembly of the mo-
tor, isolate the fan from the mains; first
turn off the operating switch, followed
by the mains switch;
■
Disconnect the connection cable(4)
between the motor and external termi-
nal box or mains switch(possibly in the
terminal box);
■
Loosen the nuts(5) and remove the
outer assembly plates(6);
■
Remove the upper casing(7) and the
protective grille(1);
■
Remove the motor cover(3) by pulling
it upwards and pushing the springs(2)
outwards;
■
Loosen the nuts(8) and remove the inner
assembly plates(9);
■
Remove the motor frame(10) with motor
and vane from the fan.
Do not set aside with the vane on the
ground!
■
Assembly is performed in the reverse
order;
■
Check the free rotation of the vane;
■
Check the rotating direction of the vane
(see arrow on fan). Incorrect rotation
may result in the motor burning out;
■
Switch on the fan; first the mains
switch, followed by the operating
switch.
VDA 200 - 560
1a.
Vane disassembly
■
Remove the catch plate from the vane;
■
Remove the vane from the motor;
■
Assembly is performed in the reverse
order;
■
If an alignment mark is present on the
hub plate of the vane, ensure that this
is aligned opposite the key way on the
motor shaft as this is the position in
which the vane was balanced.


