background image

Customer Support: 1-888-999-4215

3

WARNING

: Changes or modifications to this unit not 

expressly approved by the party responsible for compliance 

could void the user’s authority to operate the equipment.

NOTE: This equipment has been tested and found to comply with 

the limits for a Class B digital device, pursuant to Part 15 of the FCC 

Rules. These limits are designed to provide reasonable protection 

against harmful interference in a residential installation. This 

equipment generates, uses, and can radiate radio frequency energy 

and, if not installed and used in accordance with the instructions, 

may cause harmful interference to radio communications. However, 

there is no guarantee that interference will not occur in a particular 

installation. If this equipment does cause harmful interference to 

radio or television reception, which can be determined by turning 

the equipment off and on, the user is encouraged to  try to correct 

the interference by one or more of the following measures:

•  Reorient or relocate the receiving antenna.

•  Increase the separation between the equipment and receiver.

•  Connect the equipment into an outlet on a circuit different 

from that to which the receiver is connected.

•  Consult the dealer or an experienced radio/TV technician for help.

•  The apparatus shall not be exposed to dripping or 

splashing and that no objects filled with liquids, 

such as vases, shall be placed on apparatus.

  L’appareil ne doit pas être exposé aux écoulements 

ou aux éclaboussures et aucun objet ne contenant de 

liquide, tel qu’un vase, ne doit être placé sur l’objet.

•  Battery shall not be exposed to excessive heat 

such as sunshine, fire or the like.


Les piles ne doivent pas être exposées à de forte chaleur, tel qu’à 

la lumière du soleil, au feu ou autres choses de semblable.

•  Caution marking is located at the rear or bottom of the apparatus.

  Attention marquage est situé sur le paneau 

arrière ou inférieur de l’unité.

•  The marking information is located at the 

rear or bottom of apparatus.

  Le marquage est situé sur le paneau arrière ou inférieur de l’unité.

FCC Warnings

Additional Warnings

1.  Read these Instructions.

2. 

Keep these Instructions.

3. 

Heed all Warnings.

4. 

Follow all instructions.

5.  Do not use this apparatus near water.
6.  Clean only with a dry cloth.

7. 

Do not block any ventilation openings. Install in 

accordance with the manufacturer’s instructions.

8. 

Do not install near any heat sources such as 

radiators, heat registers, stoves, or other apparatus 

(including amplifiers) that produce heat.

9. 

Do not defeat the safety purpose of the polarized or 

grounding - type plug. A polarized plug has two blades 

with one wider than the other. A grounding type plug has 

two blades and a third grounding prong. The wide blade 

or the third prong are provided for your safety. When 

the provided plug does not fit into your outlet, consult 

an electrician for replacement of the obsolete outlet.

10.  Protect the power cord from being walked on or 

pinched particularly at plugs, convenience receptacles, 

and the point where they exit from the apparatus.

11.  Only use attachments/accessories 

specified by the manufacturer.

12. 


13.  Unplug this apparatus during lightning storms 

or when unused for long periods of time.

14.  Refer all servicing to qualified service personnel. Servicing 

is required when the apparatus has been damaged in any 

way, such as power-supply cord or plug is damaged, 

liquid has been spilled or objects have fallen into the 

apparatus, the apparatus has been exposed to rain or 

moisture, does not operate normally, or has been dropped.

15.  DO NOT place objects on top of the device, 

as objects may scratch the screen.

16.  DO NOT expose the device to dirty or dusty environments.
17.  DO NOT place the device on an uneven or unstable surface.
18.  DO NOT insert any foreign objects into the device
19.  DO NOT expose the device to strong 

magnetic or electrical field.

20.  DO NOT expose the device to direct sunlight 

as it can damage the LCD Screen.

21.  Keep it away from heat sources.

22. 

The device and the adapter may produce 

some heat during normal operation 

23. 

Clean the touch screen with a soft cloth. If 

needed, dampen the cloth slightly before cleaning. 

Important Safety Instructions

Use only with a cart, stand, tripod, bracket, 

or table specified by the manufacturer, or 

sold with the apparatus. When a cart is used, 

use caution when moving the cart/apparatus 

combination to avoid injury from tip-over.

Never use abrasives or cleaning solutions.

24. 

Disconnect the device from an electrical outlet 

and power off before cleaning the device

25.  DO NOT disassemble the device, only a certified 

service technician should perform repair.

26.  Please select a suitable volume and avoid loud 

sounds while using the headphones

27. 

Only use the original charger supplied with this device.

28. 

Please do not disconnect the device while downloading 

and uploading, or it may cause application errors.

Summary of Contents for TAB803B

Page 1: ...USER S GUIDE V 815 02 For the most up to date version of this User s Guide go to www zekitablet com TAB803B Streaming Media Box...

Page 2: ...daptateur de courant est utilis comme dispositif de d connexion et doit rester accessible pendant l utilisation Pour mettre l appareil hors tension la fiche ou adaptateur de courant doit tre d branch...

Page 3: ...cturer s instructions 8 Do not install near any heat sources such as radiators heat registers stoves or other apparatus including amplifiers that produce heat 9 Do not defeat the safety purpose of the...

Page 4: ...roduction 8 11 Connecting to a TV 12 Connecting with HDMI Best Connecting with AV Good 2 in 1 Remote 13 Connecting the Remote Using the Remote Connecting to the Internet 14 Connecting to Wireless Inte...

Page 5: ...s Removing Apps Connecting Storage Devices 21 Connecting a USB Drive Removing a USB Drive Connecting a SD card Removing a Micro SD card File Explorer 22 Using the File Explorer File Explorer Menu Tran...

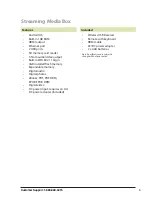
Page 6: ...ash memory Expandable memory Digital audio Digital photos eBooks PDF PDF DRM EPUB EPUB DRM Digital video DC power input requires an AC DC power adapter included Wireless USB Receiver Remote with keybo...

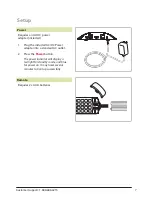
Page 7: ...1 Plug the included AC DC Power adapter into a standard AC outlet 2 Press the Power button The power indicator will display a red light for standby mode and blue for power on It may takes several min...

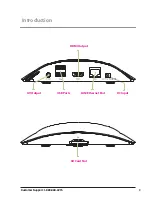
Page 8: ...Customer Support 1 888 999 4215 Introduction Customer Support 1 888 999 4215 8 AV Output USB Ports HDMI Output SD Card Slot LAN Ethernet Port DC Input...

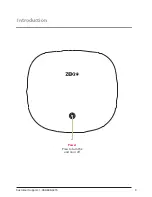
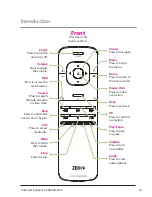
Page 9: ...Customer Support 1 888 999 4215 9 Introduction Power Press to turn the unit on or off...

Page 10: ...the next track or chapter Info Press to access media info Mute Press to mute the volume Stop Press to stop Arrows Press to navigate Menu Press to access the menu Home Press to return to the home scre...

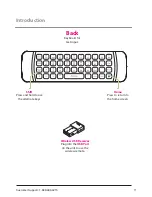
Page 11: ...99 4215 11 Introduction Wireless USB Receiver Plug into the USB Port on the unit to use the wireless remote Home Press to return to the home screen Shift Press and hold to use the alternate keys Back...

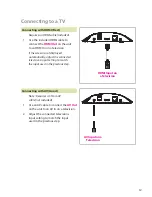
Page 12: ...ut used in the previous step Requires an HDMI cable included 1 Use the included HDMI cable to connect the HDMI Out on the unit to an HDMI In on a television If the screen is not displayed automaticall...

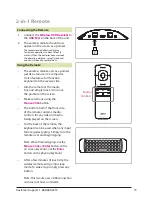
Page 13: ...media box and simply move it to move the pointer on the screen Make selections using the Mouse Click button The bottom half of the front side of the remote contains media controls for any video or me...

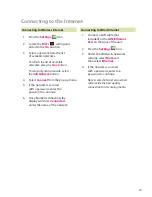
Page 14: ...ith a password enter the password to continue 6 Once finished connecting the display will show Connected under the name of the network 1 Connect a LAN cable not included to the LAN Ethernet Port on th...

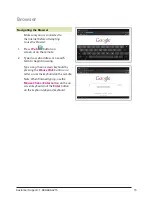
Page 15: ...remote 2 Type in a web address or a search term to begin browsing Type using the on screen keyboard by pressing the Mouse Click button on a letter or use the keyboard on the remote Note When finished...

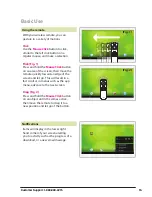
Page 16: ...d an edge of the screen and let go This will result in a fast scroll or in menus such as the app menu advance to the next screen Drag Fig 2 Press and hold the Mouse Click button on an object until it...

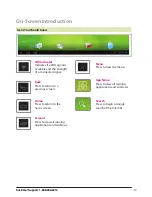
Page 17: ...ch Press to begin a Google search of the internet Wifi Indicator Indicates if a WiFi signal is available and the strength of a connected signal Back Press to return to a previous screen Home Press to...

Page 18: ...ccess to the most important functions of the media box Note These icons cannot be changed Home Menu 18 File Browser Press to enter the file browser Settings Press to access the settings menu Web Press...

Page 19: ...market 1 Press the App Menu button in the upper right hand corner for the App menu to appear 2 Press and hold the Mouse Click Button on an app icon and wait for the screen to appear Drop the icon wher...

Page 20: ...elect Ok 4 The app will be uninstalled Warning The selected app and all related content will be completely removed from the tablet Note The apps pre loaded onto the unit can not be uninstalled 1 Press...

Page 21: ...Storage 4 Remove the card gently Connecting a SD card Removing a Micro SD card SD Customer Support 1 888 999 4215 21 1 Insert a USB Drive into one of the USB Slots on the back of the unit A notificati...

Page 22: ...n option before accessing any files Note To access files on your local network you must have file sharing enabled 3 Select one of these options and a list of available files will appear 1 In the File...

Page 23: ...e accessed without loading an SD card or USB Flashdrive 2 Using the Mouse Click button press and hold an item in the file explorer 3 From the pop up menu select Copy 4 Return to the equipment screen a...

Page 24: ...al basis DPI Inc is making efforts to sustain the environment and improve the recyclability of its products and packaging Focusing on protecting for today and sustaining for tomorrow DPI Inc has commi...

Reviews: