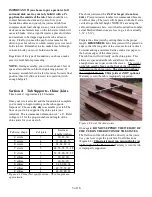
See Figure 4.3 for the proper position. Take care that the
joists do not interfere with the preferred position of the
floor drain. If necessary, move the chine joists slightly. It
is not necessary to glue or nail the chine joists in place.
NOTE: Chine joist spacings are about 16” - 24” apart.
Adjust as necessary. Note the optional 45°end cuts. They
allow for maximum surface contact.
Figure 4.3 Typical placement and orientation of chine
joists, drain, and floor seam. 6’ Round tub, as seen from
below.
Section 5: Drain & Floor Assembly
Time needed: approximately 20 minutes
Drain:
Install the floor drain and drain pipe at this time in the
recessed hole in one of the floor sections. The recess is
on the topside of the floor. Put a medium sized bead of
silicone around the corner of the recessed hole, and a
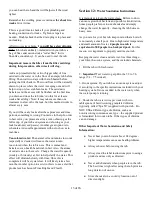
small amount on the threads of the drain (Figure 5.1.)
Press the drain in place with the rubber gasket on the top
side (inside the tub) and tighten the large nut underneath
hand tight. You may need to tap the drain down into place
with a mallet. It is a tight fit. Finish with 1/4 turn past
hand tight with a pipe wrench - do not over tighten! The
floor will swell thicker when filled. Next, thread the
adapter in place. Do not use teflon tape or hardening
sealant. Cement the provided 3” down pipe, 90° elbow,
and 14” drain pipe in place, OR change pipe lengths
and/or install any adapters or fittings you wish for a
custom installation. Use 1” schedule 40 PVC.
Figure 5.1 Drain assembly and silicone bead being
applied to the recessed hole.
Make sure the drain pipe is extending beyond the
perimeter of the tub for easy access. Install the rubber
drain plug inside the tub - press down by hand to achieve
a tight fit.
Tips:
1. You can attach a garden hose adapter fitting to the end
of the drain pipe so that a standard garden hose can be
used to direct the drained water to the desired location.
2. Or you can extend the plumbing with a 1” PVC coupler
and 1” pipe (either flexible or rigid). Use schedule 40.
If you follow the Zen Bathworks sanitation regimen,
water from your tub is safe for watering lawns or other
landscape plants.We do not recommend using it for plants
intended for human consumption.
Floor:
A 1/16” x 1” inch stainless steel spline has been inserted
into the slot on the edge of one half of the floor. Place a
thin 1/8” bead of silicone in the corner on the underside
of this spline in the corner against the wood. Insert the
two dowels in the pre-cut dowel holes below the spline.
The sole purpose of the spline and dowels is to keep the
floor sections aligned with each other.
Place the floor sections upon the chine joists with the
BEVEL SIDE DOWN, nicely sanded side up, so the floor
seam runs perpendicular to (right angle to) the chine
joists. Note: The bevel is the angled corner around the
perimeter of the floor.
4 of 16


