background image

4

FRONT PANEL BUTTONS

MAIN UNIT

k

j

1%

1$

o

1)

s

y

q

e

u

r

t

h

AV-1

d

w

i

f

Summary of Contents for ZE-NC4110 - MOUNTING INSTRUCTIONS FOR SANTA FE

Page 1: ...CAR SPECIFIC NAVICEIVER FOR HYUNDAI SANTA FE MODEL N0 USER MANUAL GERMAN ENGLISH ...

Page 2: ...indicate particular information which is very important for correct operation CONTENTS SAFETY INSTRUCTIONS 3 FRONT PANEL BUTTONS 4 5 REMOTE CONTROL BUTTONS 6 9 BASIC OPERATION 10 11 SETUP MENU AND SETTINGS 12 19 RADIO MODE 20 22 CD DVD MODE 23 CD MP3 WMA MODE 24 SD USB MODE 25 IPOD MODE 26 BLUETOOTH MODE 27 33 NAVIGATION MODE 34 EXTERNAL PLAYING SOURCES 35 GENERAL INFORMATION 36 TROUBLESHOOTING 37...

Page 3: ...he cause for the short circuit Please pay attention to the cables of the power supply If the short circuit doesn t result from a failure of the power supply or wiring you can replace the defective fuse with a new one same values If the short circuit is still existing please contact an authorized ZENEC dealer 7 Be careful not to drain the car battery while using the unit when the car engine is turn...

Page 4: ...4 FRONT PANEL BUTTONS MAIN UNIT k j 1 1 o 1 s y q e u r t h AV 1 d w i f ...

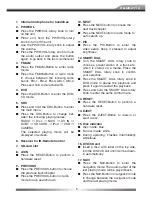
Page 5: ... Press the PREVIOUS button in radio mode to auto search down 10 NEXT Press the NEXT button to choose the next track chapter Press the NEXT button in radio mode to auto search up 11 PIC Press the PIC Button to enter the video setup Keep it pressed to adjust brightness 12 SMART DIAL Turn the SMART DIAL rotary knob to choose a preset station or a track etc which is stored on a media Press the SMART D...

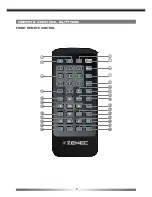
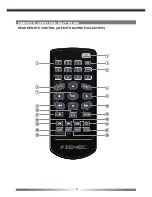
Page 6: ...6 REMOTE CONTROL BUTTONS FRONT REMOTE CONTROL 1 1 1 1 1 o y u i q w e r t 1 1 1 1 1 2 2 2 2 2 2 2 2 2 ...

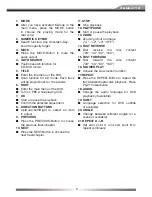
Page 7: ...AT A B Set start point A and end point B to repeat continually 16 OK Start or pause the playback Confirm the selected adjustment 17 DIRECTION BUTTONS Up Down Left Right to select an item to adjust 18 TITLE Enter the title menu of the DVD 19 ROOT Enter the main menu of the DVD Turn on PBC while playing VCD 20 REPEAT Press the REPEAT Button to repeat the track folder chapter disc playback 21 NEXT Pr...

Page 8: ...8 REMOTE CONTROL BUTTONS REAR REMOTE CONTROL AFFECTS M ZONE EXCLUSIVELY EPG TV RADIO P P DTV MENU ROOT MODE SRCH 1 1 1 1 1 o y u i q w e r t 1 1 1 1 1 2 2 ...

Page 9: ...to select an item to adjust 9 PREVIOUS Press the PREVIOUS Button to choose the previous track chapter 10 NEXT Press the NEXT Button to choose the next track chapter 11 STOP Stop playback 12 PLAY PAUSE Start or pause the playback 13 ZOOM Zooming in out an image 1 2 3 OFF 14 FAST REVERSE Fast reverse the disc content 2X 4X 8X 16X 15 FAST FORWARD Fast forward the disc content 2X 4X 8X 16X 16 SLOWER P...

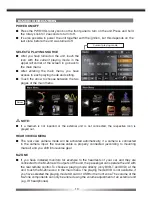
Page 10: ... is not inserted or the external unit is not connected the respective icon is greyed out REAR VIEW CAMERA The rear view camera mode will be activated automatically if a camera is connected to the camera input the reverse cable is properly connected according to mounting manual and you shift into reverse gear M ZONE If you have installed monitors for example to the headrests of your car and they ar...

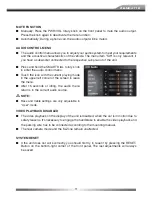
Page 11: ...u Touch the icon with the current playing mode in the upper left corner of the screen to leave the menu After 15 seconds of idling the audio menu returns to the current audio source NOTE Bass and treble settings are only adjustable in User mode VIDEO PLAYBACK DISABLED The video playback on the display of the unit is disabled when the car is in motion due to safety reasons It s necessary to engage ...

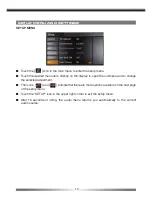
Page 12: ...n the display to open the submenu and to change the selected adjustment The icons and indicate that there are more options available on the next page of the setup menu Touch the SETUP icon in the upper right corner to exit the setup menu After 15 seconds of idling the audio menu returns you automatically to the current audio source ...

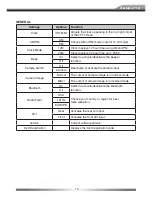
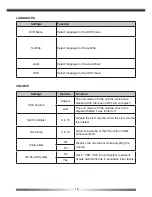
Page 13: ...e the beeper function Off Camera Switch Off Deactivate or activate the camera input Camera Camera Image Normal The output of camera image is in normal mode Mirror The output of camera image is in inverted mode Bluetooth On Select to activate deactivate the Bluetooth function Off Radio Field USA Choose your country or region for best radio reception LATIN EUROPE AV 1 Rear Activates the rear A V inp...

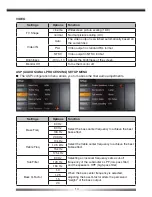
Page 14: ...iguration menu allows you to make some finer audio adjustments Settings Options Function Bass Freq 60 Hz Select the bass center frequency to achieve the best bass effect 80 Hz 100 Hz 200 Hz Treble Freq 10 kHz Select the treble center frequency to achieve the best treble effect 12 5 kHz 15 kHz 17 5 kHz Sub Filter 80 Hz Selecting a crossover frequency sets a cut off frequency of the subwoofer s LPF ...

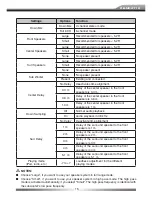
Page 15: ...Delay of the center speaker to the front speakers is 1 m Down Sampling Off Normal audio playback On Audio playback in 48 kHz Surr Delay No Delay Deactivate time alignment 1 m Delay of the surround speaker to the front speakers is 1 m 2 m Delay of the surround speaker to the front speakers is 2 m 3 m Delay of the surround speaker to the front speakers is 3 m 4 m Delay of the surround speaker to the...

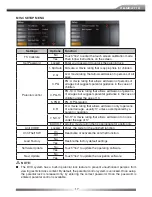
Page 16: ...e which was adjusted with the menu item start vol adjust Last The unit starts with the volume which was adjusted before it was turned off Start Vol Adjust 0 to 10 Adjusts the start volume when the start volume is enabled TA Volume 0 to 10 Adjust the volume of the TA function traffic announcement Volume Bar Off Displays the volume bar while adjusting the volume On OE Sound System No Set to YES if O...

Page 17: ...ie rating that allows admission only to persons of a certain age usually 17 unless accompanied by a parent or guardian 7 NC 17 NC 17 A movie rating that allows admission to no one under the age of 17 8 ADULT Adult A movie rating that is appropriate for adults only Anti CODE Locked Enter the code for the anti theft function Anti Theft SW On Deactivate or activate the anti theft function Off Load Fa...

Page 18: ...theft function 2 Touch the anti theft code icon and use the keypad which appears on screen to enter the four digit anti theft code and confirm your input by entering the same code a second time NOTE The delivery status of the anti theft code with the freshly unpacked unit is deactivated and you must activate it manually Please write down the anti theft code and keep it stored in a safe place If th...

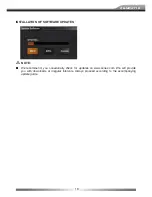
Page 19: ...TE We recommend you ocassionally check for updates on www zenec com We will provide you with downloads at irregular intervals Always proceed according to the accompanying update guide INSTALLATION OF SOFTWARE UPDATES ...

Page 20: ...20 RADIO MODE 1 1 1 1 1 o y u i q w e r t 1 1 1 1 1 2 2 2 2 2 2 2 2 2 2 ...

Page 21: ...ffic announcement is over the current playing source will be resumed 12 Touch to tune forward one step 13 Touch to enter the PTY menu then touch to select a choice in the PTY menu The unit will auto seek the next available PTY by increasing tuning frequency until the program type matches the PTY if no match is found the tuner will return to original radio and None is displayed 14 Touch to seek for...

Page 22: ...mits broadcast station information together with FM programs RDS service is not available in AM broadcasting RDS service availability depends on the FM broadcasting provider To use the RDS features the AF function needs to be enabled Please make sure to activate the AF function if you want to use RDS ...

Page 23: ...o 4X 8X and 16X 6 Touch to play pause 7 Touch to fast forward Keep touching and releasing the button to increase the rate from 2X to 4X 8X and 16X 8 Touch to stop playback 9 Touch to return to DVD main menu Use the touch key areas outlined below Area A Touch to return to main menu Area B Touch to display playing information Area C Touch to select the previous chapter Area D Touch to select the nex...

Page 24: ...irectly access a track 6 Touch to activate deactivate the random mode 7 Touch to play previous track 8 Touch to play pause 9 Touch to play next track 10 Touch to stop playback 11 Touch to return to the previous page 12 Touch to mute 13 Touch to turn to the next page 14 Display track title 15 Elapsed playing time and total time of the track 16 Touch to navigate through the directories folders 17 Op...

Page 25: ...SDHC card as well as on the amount of the stored data USB MODE Insert the USB stick into the USB slot and enter USB mode NOTE The interface and the operation of USB mode is similar to the CD MP3 WMA mode Depending on the folder structure and the content the number of the available folders is limited Please pay attention that the operation is depending on the memory of the USB device and stored dat...

Page 26: ... to scan each file in the current folder for 10 seconds 7 Touch to play previous track 8 Touch to show the available video folder of the iPod Touch it again to show the music folder 9 Touch to play pause 10 Touch to play next track 11 Touch to stop disc playback 12 Touch to return to the previous page 13 Touch to mute the volume 14 Touch to turn to the next page 15 Display track title 16 Elapsed p...

Page 27: ...ne call 12 Hang up Stop a phone call 13 Delete your number input NOTE It s possible to independently set the volume of the Bluetooth mode with the PWR VOL rotary knob during a call The adjusted volume will be saved THE BLUETOOTH ICON If Bluetooth is activated in the setup there is a Bluetooth icon on top of the screen The Bluetooth icon is gray if Bluetooth is activated but no mobile phone is conn...

Page 28: ...it and your mobile phone to On SEARCH FUNCTION FOR PHONE BOOK ENTRIES Touch the icon to open the keypad Enter one or up to 15 letter s to search for the initials of the family name The entries with the respective initial letters will be displayed NOTE The function and the sorting of the entries depend on the mobile phone A list of compatible mobile phones and their supported functions is available...

Page 29: ...hone will be automatically activated and you may operate and control the music player of your mobile phone with the unit PAIRING You have two possibilities to pair a mobile phone with the unit Please pay attention that the Bluetooth mode of the unit must be activated in the setup menu 1 Searching for nearby phones 2 Pairing of your mobile phone ...

Page 30: ...e a second time 5 After pairing between the unit and the mobile phone has been established it might be necessary depending on the mobile phone to acknowledge it to complete the procedure 2 Pairing from your mobile phone 1 Activate the Bluetooth mode on the mobile phone 2 Open the Bluetooth mode of the unit 3 Start the search for Bluetooth units on the mobile phone 4 After the unit is found by the ...

Page 31: ...ROPHONE Choose between internal or external microphone MIC GAIN Adjustment of microphone sensitivity VERSION Display the current Bluetooth software version of the unit NOTE There will be new Bluetooth software updates available at irregular intervals on www zenec com Please follow the instruction manual of the software update to install it ...

Page 32: ... screen instructions to finish the procedure Entries with voice tags are indicated with a voice tag icon If the voice recording does not meet your requirements Choose the entry and delete the voice tag 3 To start a call using a voice tag Touch the icon two times and wait with the speech input until an acoustic beep signal is audible If the speech input meets the recorded voice tag the unit starts ...

Page 33: ... If the synchronisation doesn t work properly disconnect the phone and repeat the pairing process A list with compatible mobile phones and functions is available at www zenec com It s possible to pair up to five mobile phones with the unit It s possible to synchronise and handle up to a thousand phone book entries If automatic phone book synchronisation does not work consult the manual of your mob...

Page 34: ...ust the volume of the navigation voice with the PWR VOL rotary knob during output The adjusted volume will be saved The unit has a splitscreen mode which can be used in the following playing modes Tuner USB audio iPod audio and SD card audio 1 Once you have started a route guidance in the navigation mode you can change to an audio source that is supported by the splitscreen mode by touching the ic...

Page 35: ...uch screen of the unit Please visit www zenec com for compatible DVB T tuner model s AV MODE If you have connected an external device to the unit and want to use it touch the AV IN icon in the main menu Please read the manual of the external device You can set the source via setup and choose between front and rear input CAMERA MODE 1 If you have connected a rear view camera to the unit and want to...

Page 36: ...ina South Korea Indonesia South East Asia Region 4 Australia New Zealand Mid South America South Pacific Thailand Ocean Islands Oceania Region 5 Russia Mongolia India Middle Asia East Europe North Korea North Africa North West Asia Region 6 China Mainland Caution of disc using 1 Do not use irregular shaped discs 2 Use a dry soft cloth to wipe the disc from center to edge Only neutral detergents ca...

Page 37: ...part of car Insulate all speaker wiring connections or replace the speaker cable Mute is activated Turn off the Mute function Poor sound quality or distortion Unauthorized disc is in use Use original disc Speaker power rating not compatible with unit Connect proper speakers Speaker is shorted Check speaker connections TFT MONITOR No image The parking brake is not engaged Stop vehicle in a safe pla...

Page 38: ... Clean disc with soft cloth Unknown Disc Incompatible disc is used Use compatible disc Unknown Disc Disc rating exceeds parental lock rating limit Change parental lock settings to lower restriction Region Error Disc region code is not compatible with unit Use disc with proper region code Bad Disc Disc is inserted upside down Insert disc with label side up Cannot insert disc Disc already inside uni...

Page 39: ... Region code 2 FM Tuner Section Tuning Range 87 5MHz 108MHz Mono Sensitivity 30dB 10dBu Signal to Noise Ratio 1kHz 58dB Image Rejection 60dB Stereo Separation 1kHz 30dB Frequency Response 30Hz 15kHz 3dB AM Tuner Section Tuning Range 522kHz 1629kHz Sensitivity 20dB 20dBu Signal to Noise Ratio 1kHz 50dB Image Rejection 60dB Frequency Response 50Hz 2kHz 3dB Monitor Section Screen Size 16 5 cm 6 5 inc...

Page 40: ...rdnungsgemäße Bedienung äußerst wichtig sind INHALTSVERZEICHNIS SICHERHEITSHINWEISE 41 TASTEN DES BEDIENTEILS 42 43 TASTEN DER FERNBEDIENUNGEN 44 47 GRUNDLEGENDE BEDIENUNG 48 49 SETUPMENÜ UND EINSTELLUNGEN 50 57 RADIO MODUS 58 60 CD DVD MODUS 61 CD MP3 WMA MODUS 62 SD USB MODUS 63 IPOD MODUS 64 BLUETOOTH MODUS 65 71 NAVIGATIONS MODUS 72 ANSCHLUSSMÖGLICHKEITEN FÜR EXTERNE GERÄTE 73 GENERELLE INFORM...

Page 41: ...zschluss war Achten Sie dabei besonders auf die Kabel der Spannungsversorgung Wenn der Kurzschluss nicht durch einen Fehler in der Spannungsversorgung verursacht wurde müssen Sie die defekte Sicherung gegen ein neues Exemplar mit identischen Werten austauschen Sollte der Kurzschluss immer noch vorhanden sein wenden Sie sich bitte an einen autorisierten ZENEC Fachhändler 7 Achten Sie darauf dass be...

Page 42: ...Dreh regler um die Tonwiedergabe manuell zu unterdrücken und drücken Sie die Taste erneut um zur ursprünglichen Lautstärke zurückzukehren 3 FM AM Drücken Sie die FM AM Taste um in den Radio Modus zu wechseln Drücken Sie die FM AM Taste im Radio Modus um zwischen den folgenden Bändern zu wechseln FM 1 FM 2 FM 3 AM 1 AM 2 Halten Sie die Taste gedrückt um TA Traffic Announcements zu de bzw zu aktivie...

Page 43: ... gespeicherten Radiosender oder ein auf einem Medium gespeicherten Track etc auszuwählen DrückenSiedenDrehregler um Ihre Auswahl zu bestätigen Drücken und halten um das Equalizermenü zu öffnen Drücken Sie den Drehregler im DVD Modus um die Wiedergabe zu pausieren und drücken Sie ihn erneut um die Wiedergabe wieder fortzusetzen Drücken und halten Sie den Drehregler um das Audio Control Menü aufzuru...

Page 44: ...44 TASTEN DER FERNBEDIENUNGEN FERNBEDIENUNG FÜR DEN VORDEREN WIEDERGABEBEREICH 1 1 1 1 1 o y u i q w e r t 1 1 1 1 1 2 2 2 2 2 2 2 2 2 ...

Page 45: ...eat Schleife zu setzen 16 OK Startet oder pausiert die Wiedergabe Bestätigt die gewählten Einstellungen 17 RICHTUNGSTASTEN Drücken Sie die Richtungstasten um in den Menüs zu navigieren oder Ein stellungen zu ändern 18 TITLE Öffnet das Titelmenü der DVD 19 ROOT Öffnet das Hauptmenü der DVD Schaltet PBC ein wenn eine VCD abgespielt wird 20 REPEAT Drücken Sie die REPEAT Taste um Titel Ordner Kapitel ...

Page 46: ...RNBEDIENUNG FÜR DEN HINTEREN WIEDERGABEBEREICH BETRIFFT AUSCHLIESSLICH M ZONE EPG TV RADIO P P DTV MENU ROOT 1 1 1 1 1 o y u i q w e r t 1 1 1 1 1 2 2 EPG TV RADIO P P DTV MENU ROOT MODE SRCH 1 1 1 1 1 o y u i q w e r t 1 1 1 1 1 2 2 ...

Page 47: ... Sie die PREVIOUS Taste um zum vorherigen Titel zu gelangen 10 NEXT Drücken Sie die NEXT Taste um zum nächsten Titel zu gelangen 11 STOP Stoppt die Wiedergabe des aktuellen Wiedergabemodus 12 PLAY PAUSE Startet oder pausiert die Wiedergabe 13 ZOOM Vergrössert durch mehrmaliges Drücken den Bildausschnitt in folgenden Schritten 1 2 3 OFF 14 FAST REVERSE Erhöht den Vorlauf durch mehrmaliges Drücken i...

Page 48: ... den beiden Seiten des Hauptmenüs zu wechseln HINWEIS Wenn Sie das entsprechende Medium nicht eingelegt oder das externe Gerät nicht ange schlossen haben so ist das jeweilige Icon je nach Wiedergabemodus abgedunkelt RÜCKFAHRKAMERA Der Rückfahrkamera Modus aktiviert sich automatisch wenn eine Kamera sowie das Reverse Kabel entsprechend der Montageanleitung angeschlossen sind und der Rückwärtsgang e...

Page 49: ...io Control Menü zu gelangen Drücken Sie auf das Feld mit dem aktuellen Wiedergabemodus in der oberen linken Ecke um das Menü zu verlassen Nach 15 Sekunden ohne Eingabe wird das Menü automatisch geschlossen HINWEIS Bass und Höhen sind nur im User Modus einstellbar SPERRE DER VIDEOWIEDERGABE Die Video Wiedergabe auf dem Display des Gerätes ist während der Fahrt aufgrund der Verkehrssicherheit gesper...

Page 50: ...chten Menüpunkt direkt am Display um das Untermenü zu öffnen und den eingestellten Wert zu verändern Die Icons und zeigen an das Optionen auf einer weiteren Seite verfügbar sind Berühren Sie das SETUP Icon in der oberen linken Ecke um das Setup Menü zu verlassen Das Setup Menü schliesst sich automatisch nach 15 Sekunden ohne Eingabe ...

Page 51: ...t deaktiviert die Rückfahrkamera Aus Kamerabild Normal Das Bild wird normal angezeigt Gespiegelt Das Bild wird gespiegelt angezeigt Bluetooth On Aktiviert deaktiviert die Bluetooth Funktion Off Radiogebiet USA Auswahl der Region für optimale Radio empfangseigenschaft LATIN EUROPE AV 1 Hinten Aktiviert den A V Eingang an der Rückseite des Gerätes Vorne Aktiviert den A V Eingang an der Vorderseite d...

Page 52: ...nnen Sie weitere Equalizer Einstellungen vornehmen Einstellung Option Funktion Bass Freq 60Hz Wählt die Scheitelfrequenz des Bassreglers Abhängig von der Wiedergabequelle 80Hz 100Hz 200Hz Höhen Freq 10 kHz Wählt die Scheitelfrequenz des Höhenreglers Abhängig von der Wiedergabequelle 12 5 kHz 15 kHz 17 5 kHz Sub Filter 80Hz Setzt einen Tiefpassfilter für den Subwoofer 120Hz 160Hz Bass Q Factor 1 0 ...

Page 53: ... 0 m Down Sampling Aus Normale Audiowiedergabe Ein Audiowiedergabe in 48 kHz Surr Verzögerung Verzögerung aus Keine Laufzeitkorrektur 1 m Laufzeitkorrektur in Relation zu den Frontlautsprechern beträgt 1 m 2 m Laufzeitkorrektur in Relation zu den Frontlautsprechern beträgt 2 m 3 m Laufzeitkorrektur in Relation zu den Frontlautsprechern beträgt 3 m 4 m Laufzeitkorrektur in Relation zu den Frontlaut...

Page 54: ...rgestellt werden soll LAUTSTÄRKE Einstellung Option Funktion Startlautstärke Einstellen Stellt beim Start des Gerätes automatisch die in diesem Menü ausgewählte Lautstärke ein Zuletzt Wählt die vor dem letzten Ausschalten des Gerätes gewählte Lautstärke aus Einstellung 0 bis 10 Stellen Sie hier die gewünschte Lautstärke beim Start des Gerätes ein TA Lautstärke 0 bis 10 Stellen Sie hier die Lautstä...

Page 55: ... Altersgruppe geeignet Meistens ab dem 17ten Lebensjahr es sei denn ein Erziehungsberechtigter begleitet den Jugendlichen während des Films 7 NC 17 NC 17 Es ist nicht gestattet den Inhalt Jugendlichen unter 17 Jahren zu zeigen 8 ADULT Adult Der Inhalt ist nur für Erwachsene geeignet Diebstahlschutzcode Gesperrt Eingabe des Codes für die Diebstahlschutzfunktion Diebstahlschutz software Ein Aktivier...

Page 56: ... des Sicherheitscodes 2 Berühren Sie das Diebstahlschutzcode Icon und geben Sie mit dem auf dem Bildschirm erscheinenden numerischen Tastenfeld einen vierstelligen Sicherheitscode ein und bestätigen Sie die Eingabe durch eine wiederholte Eingabe HINWEIS Die Eingabe eines Sicherheitscodes nachdem das Gerät von der Spannungsquelle getrennt wurde ist im Auslieferungszustand deaktiviert und muss manue...

Page 57: ... com werden in unregelmäßigen Abständen Software Updates bereit gestellt Befolgen Sie bitte die Anweisungen der dem jeweiligen Update beiliegenden Installationsanleitung um die Software zu installieren DURCHFÜHREN EINES SOFTWARE UPDATES ...

Page 58: ...58 RADIO MODUS 1 1 1 1 1 o y u i q w e r t 1 1 1 1 1 2 2 2 2 2 2 2 2 2 2 ...

Page 59: ...bzw aktivieren Bei aktivierter TA Funktion schaltet das Gerät automatisch auf einen Radiosender um welcher gerade eine Verkehrsdurchsage sendet und zwar unabhängig vom Wiedergabemodus 12 Manuelles Suchen durch Erhöhen der Frequenz 13 Berühren Sie das gewünschte PTY Icon Das Gerät startet automatisch mit der Suche Mit Hilfe der PTY Funktion kann das Gerät gezielt nach Sendern mit bestimmten Program...

Page 60: ...Verwendung hängt vom jeweiligen Radiosender und dessen Empfangsqualität ab Die RDS Funktion steht nicht im AM Frequenzband zur Verfügung Um RDS nutzen zu können muss die AF Funktion aktiv sein Im Auslieferungszustand ist die AF Funktion deaktiviert Achten Sie bei der ersten Inbetriebnahme darauf die AF Funktion zu aktivieren Die Einstellung bleibt anschließend gespeichert ...

Page 61: ...Bildschirm des Gerätes ist in verschiedene Bereiche aufgeteilt um die Bedienung per Touchscreen zu erleichtern Bereich A Berühren Sie Bereich A um das Hauptmenü des Gerätes aufzurufen Bereich B Berühren Sie Bereich B um die Wiedergabeinformationen einer DVD aufzurufen Bereich C Berühren Sie Bereich C um das vorherige Kapitel einer DVD auszuwählen Bereich D Berühren Sie Bereich D um das nächste Kap...

Page 62: ...ner in zufälliger Reihenfolge ab 7 Berühren um zum vorherigen Titel zu gelangen 8 Startet oder pausiert die Wiedergabe 9 Berühren um zum nächsten Titel zu gelangen 10 Stoppt die Wiedergabe 11 Berühren um zur vorhergehenden Seite zu gelangen 12 MUTE schaltet das Gerät stumm Deaktivieren Nochmal drücken oder lauter stellen 13 Berühren um zur nächsten Seite zu gelangen 14 Name des Titels 15 Vergangen...

Page 63: ...hen Datenmenge abhängt USB MODUS Stecken Sie einen USB Stick in den USB Port des Gerätes oder der Media Link Box und wählen Sie den Wiedergabemodus USB HINWEIS Die Menüführung ist identisch zur Menüführung des CD MP3 WMA Modus Achten Sie darauf dass die verwendeten USB Speichermedien FAT32 kompatibel sind und nicht mehr als 400 mA max zulässiger Strom aufnehmen Andernfalls können sie nicht verwend...

Page 64: ...tel Ordner Nach der Auswahl des Videotitels erfolgt die Anzeige des Videos auf dem Display Berühren Sie das Display um in das iPod Menü zurückzukehren Die Wiedergabe wird hierbei nicht pausiert 9 Startet oder pausiert die Wiedergabe 10 Berühren um zum nächsten Titel zu gelangen 11 Stoppt die Wiedergabe 12 Berühren um zur vorhergehenden Seite zu gelangen 13 MUTE schaltet das Gerät stumm 14 Berühren...

Page 65: ...s Telefonanrufs 13 Löschen einer eingegebenen Ziffer HINWEIS Die Lautstärke der Freisprecheinrichtung lässt sich von der Wiedergabequelle unabhängig mit dem PWR VOL Regler während des Gesprächs einstellen Die eingestellte Lautstärke bleibt gespeichert Die Bluetooth Systemlautstärke ist je nach Mobiltelefon abhängig von der Mobiltelefon Systemlautstärke DAS BLUETOOTH ICON Wenn Sie Bluetooth im Setu...

Page 66: ...wie am Gerät zu aktivieren SUCHFUNKTION FÜR TELEFONBUCHEINTRÄGE Berühren Sie das Icon um die Tastatur aufzurufen Mit der Eingabe von bis zu 15 Buchstaben können Sie nach den Anfangsbuchstaben des Nachnamens suchen Die Einträge mit den entsprechenden Anfangsbuchstaben werden direkt angezeigt HINWEIS Diese Funktion und die Sortierung der Einträge sind abhängig vom verwendeten Mobiltelefon Eine Liste...

Page 67: ...ät Der Musikplayer des Mobiltelefons wird auto matisch aktiviert und kann über das Gerät ferngesteuert werden PAIRING Sie haben zwei Möglichkeiten ein Mobiltelefon mit dem Gerät zu koppeln Beachten Sie hier dass der Bluetooth Modus des Gerätes aktiviert sein muss 1 Suchen nach einem Mobiltelefon in Ihrer Nähe 2 Suchen über Ihr Mobiltelefon ...

Page 68: ...nnschlüssel eingegeben werden 5 Nachdem die Kopplung zwischen dem Gerät und dem Mobiltelefon abgeschlossen ist werden Sie je nach Mobiltelefon noch einmal aufgefordert die Kopplung zu bestätigen um den Vorgang zu beenden 2 SUCHEN ÜBER IHR MOBILTELEFON 1 Aktivieren Sie den Bluetooth Modus des Mobiltelefons 2 Wählen Sie den Bluetooth Modus des Gerätes aus 3 Starten Sie die Suche nach Bluetooth Gerät...

Page 69: ...ekoppelten Mobiltelefon PIN NUMMER Änderung des Pairing Codes Auslieferungszustand 1234 MIKROFON Wählen Sie ob die Einstellung für das interne oder das externe Mikrofon verwendet werden soll LAUTSTÄRKE Änderung der Mikrofonempfindlichkeit VERSION Anzeige der aktuellen Bluetooth Software Version des Gerätes ...

Page 70: ... mit bereits aufgenommenem Sprachbefehl sind mit einem Add Voice Tag Icon gekennzeichnet Nachdem ein Sprachbefehl aufgenommen wurde besteht die Möglichkeit die einzelnen Sprachbefehle wieder zu löschen Wählen Sie dazu den entsprechenden Eintrag aus und löschen ihn 3 Um einen Eintrag mit zuvor aufgenommenen Sprachbefehl anzurufen berühren Sie zweimal hintereinander das Icon und warten Sie mit der S...

Page 71: ... nicht oder fehlerhaft funktionieren sollte die Verbindung zwischen dem Gerät und dem Mobiltelefon getrennt und wieder hergestellt werden Eine Liste mit den kompatiblen Mobiltelefonen und den unterstützten Funktionen finden Sie unter www zenec com Es ist möglich bis zu 5 Mobiltelefone mit dem Gerät zu koppeln Es können bis zu 1000 Telefonbucheinträge synchronisiert werden Achten Sie darauf das die...

Page 72: ...sst mit dem PWR VOL Regler während der Navigationsdurchsage einstellen Die eingestellte Lautstärke bleibt gespeichert Das Gerät verfügt zusätzlich über einen Splitscreen Modus der in den folgenden Wiedergabemodi verfügbar ist Tuner USB Audio iPod Audio und SD Karte Audio 1 Wenn Sie im Navigationsmodus eine Zielführung gestartet haben und in einen Wieder gabemodus wechseln welcher den Splitscreenmo...

Page 73: ...er den Touchscreen des Gerätes steuern Nähere Informationen zu geeigneten DVB T Tunern finden Sie unter www zenec com AV MODUS Wenn Sie am AV Anschluss ein geeignetes Gerät angeschlossen haben und verwenden möchten berühren Sie im Hauptmenü das AV Icon Sie können mittels Setup zwischen dem vorderen und dem hinteren AV Eingang hin und herschalten Für die Bedienung des AV Gerätes lesen sie dessen Be...

Page 74: ...Region 5 Russland Mongolei Indien Zentral Asien Ost Europa Nordkorea Nordafrika Nordwest Asien Region 6 Chinesisches Festland Beim Gebrauch einer Disk ist zu beachten 1 Verwenden Sie keine Disk deren Form nicht der Norm entspricht 2 Benutzen Sie ein trockenes und weiches Tuch um eine Disk zu reinigen und wischen Sie von Innen nach Aussen Benutzen Sie dazu nur neutrale Reinigungsmittel 3 Eine neue ...

Page 75: ...gmasse Isolieren Sie die blanke Stelle oder tauschen Sie das Laut sprecherkabel Die Audiowiedergabe Mute wurde am Gerät stummgeschaltet Schalten Sie die Audiowiedergabe am Gerät wieder ein Schlechte Audioqualität oder Verzerrungen Sie benutzen eine Raubkopie Benutzen Sie keine Raubkopien Der Leistungsbedarf der Lautsprecher paßt nicht zur Ausgangsleistung des Gerätes Verwenden Sie passende Laut sp...

Page 76: ...k kann nicht abgespielt werden Die Disk ist zerkratzt Verwenden Sie eine andere Disk Die Disk ist zu verschmutzt oder feucht Reinigen Sie die Disk Die Disk ist nicht kompatibel Verwenden Sie eine andere Disk Die Jugendschutzfunktion ist zu hoch eingestellt Ändern Sie die Einstellung der Jugendschutzfunktion Der Regional Code ist falsch Verwenden Sie eine Disk mit dem richtigen Regional Code Die Di...

Page 77: ...bereich 87 5MHz 108MHz Mono Empfindlichkeit 30dB 10dBu Rauschabstand 1kHz 58dB Spiegelfrequenzunterdrückung 60dB Stereo Empfindlichkeit 1kHz 30dB Frequenzgang 30Hz 15kHz 3dB MW Tuner Frequenzbereich 522kHz 1629kHz Empfindlichkeit 20dB 20dBu Rauschabstand 1kHz 50dB Spiegelfrequenzunterdrückung 60dB Frequenzgang 50Hz 2kHz 3dB Display Bildschirmdiagonale 16 5 cm 6 5 Zoll Display TFT Liquid Crystal Di...

Page 78: ... date and dealer stamp together with the original sales slip 2 JAHRE GARANTIE Sehr geehrter Kunde Vielen Dank dass Sie sich zum Kauf dieses Produktes von ZENEC entschlossen haben Wir bitten Sie die Originalverpackung aufzuheben z B für den Transport bei einem Garantiefall Wenn Sie Garantie Leistungen für dieses ZENEC Produkt beanspruchen wenden Sie sich bitte direkt an den Händler bei dem das Gerä...

Page 79: ... Please recycle where facilities exist Check with your Local Authority or retailer for recycling advice Waste Electrical and Electronic Equipment Directive Sollten Sie dieses Gerät eines Tages entsorgen müssen beachten Sie bitte dass elektrische Geräte nicht mit dem Haushaltsmüll entsorgt werden sollten Führen Sie das Gerät wenn möglich dem Recycling zu Ihre lokalen Behörden oder Ihr Händler könne...

Page 80: ...ZENEC by ACR AG Bohrturmweg 1 Bad Zurzach Switzerland JL Ver 1 01 ...

Reviews: