background image

ZENIT-122                                                                                                                                             User manual, 1992 year 


– 2 – 

Do  not  remove  the  camera  from  its  case  the  moment  it  is  brought  indoors  from  cold  to  avoid 

sweating of its parts, especially the optical ones. 

Do not touch the surfaces of the optical parts with fingers since it may damage their coatings. Clean 

the  optical  coated  lens  surfaces  with  a  clean  soft  cloth  or  cotton  wool  wad  slightly  moistened  with 
rectified alcohol or ether. The surfaces of the mirror and the focusing device may be cleaned only if 
absolutely necessary with a dry soft brush but in no case with humid cleaning agents. 

Keep the camera closed in its case with the cap put on the lens. 
Do  not  remove  the  lens  from  the  camera  without  need  to  prevent  dirt  and  dust  from  getting  both 

onto the surfaces of the lens optical parts and into the camera itself. 

If you don’t use your camera for some period of time (a month and more) remove the batteries from 

the camera. Keep the batteries separately in places inaccessible for children. 

Load  and  unload  your  camera  either  indoors  or  in  shade  protecting  it  against  direct  sun  light  and 

bright artificial light. 

Always cock the shutter as far as it will go to avoid blank exposures. 
Do not keep the camera with the shutter cocked for a long period of time since it is likely to impair 

the shutter operation. 

Do not try to rotate the shutter speed dial with the index moving along its short section from 

“500” to “B”. Do not  rotate shutter speed dial when self-timer is  running and when setting the 
release button in “T” position.

 When taking pictures in frosty weather, keep the camera under your 

street-clothes but not. in the open air and take it out only for the moment of picture taking. 

Since the camera is a complex instrument, its repair and adjustment should be performed in repair 

shops only. 
 

3. Specifications 

Frame size, mm, — 24x36 
Film used — 35 mm, perforated 
Length of film in cassette, m — 1,65 
Number of frames — 36 Shutter speeds, s — from 1/30 to 1/500, “

В

” (by hand) and long exposure 


One of the lenses: 

HELIOS-44M-4MC 

MC HELIOS-44M-4 

HELIOS-44M-5 

MC HELIOS-44M-5 

HELIOS-44M-6 

MC HELIOS-44M-7  

HELIOS-77M-4 

Focal length, mm — 

58 

52 

Maximum relative aperture — 

f/2 

f/1,8 

Aperture scale — 

from 2 to 16 

from 1,8 to 16 

Distance scale, m — 

from 0,5 to 


from 0,45 to 


Lens fitting — M42x1 
Light filter fitting — M52x0,75 
Sun shade fitting, mm — Ø54 
Viewfinder field of view, mm — 20x28 
Eyepiece magnification — 4.3

x


Flange/film distance, mm — 45,5 
Tripod bush thread — 1/4

ʺ


Overall dimensions (without case), mm — 142x97x99 
Power supply voltage, V — 3 (2x1,5) 
Power supply — from 2 batteries of Mallory D 386, Seiko SB-B8, 

СЦ

-32, 

МЦ

0.105 types. 

Mass, kg — 0,82 


Certificates of Authorship: 
No 102683, No 150360; No 153652; No 178682; No 366447; No 476534; No 1015330; No 1247817. 

Summary of Contents for Zenit 122

Page 1: ...ter operation fully open diaphragm ensures maximum brightness of the image in the view finder which is very important for viewing and focusing composite focusing device provides excellent image sharpness in various conditions of shooting speedy exposure setting simplified film loading procedure and frame counter automatically re setting to 0 upon pressing the film rewind button reduce the time req...

Page 2: ... it is likely to impair the shutter operation Do not try to rotate the shutter speed dial with the index moving along its short section from 500 to B Do not rotate shutter speed dial when self timer is running and when setting the release button in T position When taking pictures in frosty weather keep the camera under your street clothes but not in the open air and take it out only for the moment...

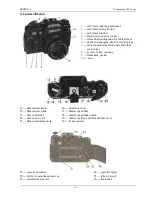
Page 3: ...or mounting flash units and other accessories 8 eyelet of strap securing 9 film check pocket 10 lens 11 film rewind knob 12 film rewind crank 13 film speed dial 14 film speed scale 15 film speed index mark 16 protective strip 17 shutter speed dial 18 shutter speed index mark 19 shutter cocking and film advance lever 20 frame counter 21 cassette chamber 22 battery compartment end cap 23 viewfinder ...

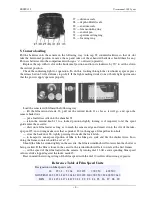
Page 4: ... the chamber 21 return the rewind knob 11 to a locked position slightly turning it if required to let the spool guide enter the cassette draw out a film leader as long as to reach the camera edge and insert it into the slot of the take up spool 25 in so doing make sure that a sprocket 24 tooth engage a film perforation hole close the back door 26 tightly pressing it to make the lock latch to trans...

Page 5: ...ng wedges to match the upper and lower parts of the split image The best sharpness is obtained when focusing is done at full aperture It should be noted that the focusing wedges and microprism collar ensuring the best possible focusing are of no use when low speed interchangeable lenses are used and focusing is done at apertures more than 4 In these cases as well as in photomicrography and macroph...

Page 6: ...de to the other you may select one of these values In such a case the exposure will be still acceptably correct 9 2 Exposure setting in cameras with three diode indication Lighting of the upper red diode indicates over exposure and of the lower red one under exposure Turn the aperture setting ring 32 and shutter speed dial 17 till the moment when the middle green diode is lighting continuously It ...

Page 7: ...chanism is not cocked green light indicates that it is cocked press the self timer release button 2 and take your place in front of the lens The shutter will operate no sooner than in 7 seconds after pressing the button self timer operation over return button 5 to its home position 13 Taking flash pictures The camera shutter is synchronized for use with electronic flashes To connect a flash unit w...

Page 8: ...bes without control pins should be used with the lenses in which the aperture is set manually the diaphragm mode selector switch should be set to M 15 Interchangeable Lenses Lens name focal length in mm relative aperture angle of field of view minimum focusing distance in m Mir 20M MC Mir 20M 20 f 3 5 96 0 18 Mir 10A 28 f 3 75 0 20 MC Mir 24M 35 f 2 66 0 30 MC Industar 61 50 f 2 8 45 0 30 Helios 4...

Reviews: