


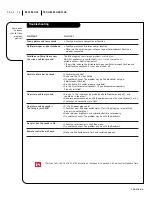

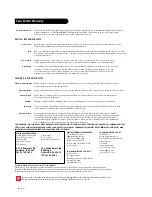


Your Zenith Warranty
Direct-View Color TV
Welcome to the Zenith family! We believe that you will be pleased with your new Zenith Entertainment Machine. Please read this
warranty carefully, it is a “LIMITED WARRANTY” as defined under Federal Law. This warranty gives you specific legal rights,
and you may also have other rights that vary from state to state within the U.S.A.
ZENITH RESPONSIBILITY
Service Labor
During a period of 90 days from effective warranty date, Zenith will provide service labor by a Zenith authorized service center
when needed as determined by Zenith, as a result of manufacturing defects.
Parts
New or remanufactured replacements for factory-defective parts will be supplied by a Zenith authorized service center for one year
from effective warranty date (color picture tube — two years). Such replacement parts are warranted for the remaining portion of the
original warranty period.
Home Service
Warranty service for 21” diagonal (U.S.A.) or larger screen size models is provided in the home in most cases. (Some
repairs may require the unit to be taken by the servicer to the repair facility and returned, at no additional charge.)
Not Covered
This warranty covers manufacturing defects and does not cover installation, adjustment of customer controls in the home,
installation or repair of home antenna systems, cable converters or cable company-supplied equipment; it also does
not cover damage due to misuse, abuse, negligence, acts of God or other causes beyond the control of Zenith. Any
alteration of the product after manufacture voids this warranty in its entirety.
OWNER’S RESPONSIBILITY
Effective Warranty Date
Warranty begins on the date of original consumer installation. For your convenience, keep the dealer’s dated bill of sale or
delivery ticket as evidence of the purchase date.
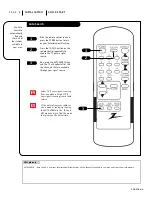
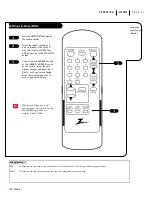
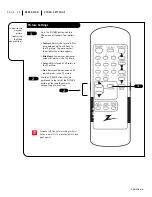
Operating Guide
Read your Operating Guide carefully so that you will understand the operation of your set and how to adjust the customer controls.
Carry-In Service
Models under 21” diagonal (U.S.A.) screen size must be taken to a Zenith authorized service center for warranty service
and must be picked up by the owner.
Antenna
Reception problems caused by inadequate home antenna or faulty antenna connections are the owner’s responsibility.
Important
Product Registration—Please fill out and mail your Product Registration Card. It is imperative that Zenith know how to reach
you promptly if we should discover a safety problem that could affect you.
Warranty Service
For warranty service information, contact any Zenith authorized service center. Parts and service labor that are Zenith’s
responsibility (see above) will be provided without charge. Other service is at the owner’s expense. If you have any problem
in obtaining satisfactory warranty service, call or write the Zenith Response Center. You must provide the model number,
serial number and date of purchase or date of original installation. Before you ask for warranty service, read “Maintenance
And Troubleshooting” in your operating guide. You might avoid a service call.
THIS WARRANTY IS IN LIEU OF ANY OTHER WARRANTY, EXPRESS OR IMPLIED, INCLUDING WITHOUT LIMITATION, ANY WARRANTY OF MERCHANTIBILITY OR
FITNESS FOR A PARTICULAR PURPOSE, AND ZENITH SHALL NOT BE LIABLE FOR ANY CONSEQUENTIAL, INDIRECT, OR INCIDENTAL DAMAGES OF ANY KIND,
INCLUDING LOST REVENUES OR PROFITS IN CONNECTION WITH THE PRODUCT.
Additional Zenith Picture Tube Protection Plan Available
Zenith offers you the opportunity to obtain additional long-term protection against failure of the picture tube in your new television.
Our Picture Tube Protection Plan enables you to avoid any unexpected picture tube repair expenses and keep your television in top condition.
It guarantees you a genuine Zenith replacement picture tube and service from a Zenith authorized service center.
Be sure to send in the Product Registration Card. We will send you and application for the Protection Plan near the expiration of the
two-year manufacturer’s warranty on the picture tube. For additional information call (847) 391-8757.
ZENITH ELECTRONICS CORPORATION
Zenith Response Center
1000 Milwaukee Avenue
Glenview, IL 60025-2493
Telephone (847)391-8752
Mon-Fri, 7:00 a.m.-8:00 p.m. CST
www.zenith.com
IN CANADA,WRITE OR CALL US AT:
LG Electronics
235 Superior Blvd.
Mississauga, Ontario, Canada LST-2L6
tel: (905)795-6240,
fax:(905) 670-2379
IN MEXICO,WRITE OR CALL US
LG Electronics
Av. San Andres Atoto,No 8
Col. San Andres Atoto, Naucalpan
Estado de Mexico,
C.P. 53500
tel: 01 (800) 50 481
y en el D.F. 359 43 55
fax 01 (800) 50 733
y en el D.F. 357 17 56
206-3366-o
ZENITH CONSUMER SERVICE
Factory Owned Service Center
Home & Carry-in Service
Television/VCR
Parts and Accessories
PTV/Computer
801 E. Roosevelt Rd
Lombard, IL 60148
(630) 705-2830
Service Hours:
M-F 8-6, Sat 9-2
Will accept UPS shipments
201 James Record Rd.
Building 4
Huntsville, AL 35824
(205) 461-8583
Summary of Contents for A09A02X
Page 23: ...206 3366 o...