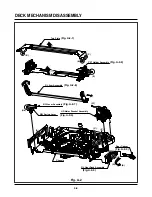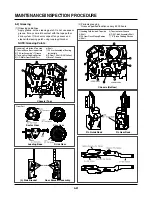
DECK MECHANISM DISASSEMBLY
4-9
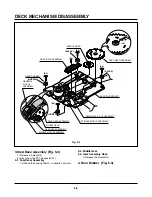
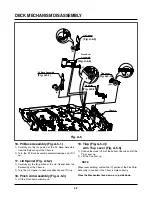
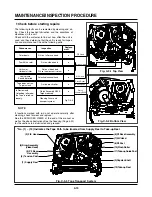
Drive Gear
Washer (W2)
Cam Gear
Slider Plate
Tension Lever
Spring Lever
Loading Base
Sector Gear
(L3)
(H15)
(H16)
(H14)
(A)
Chassis
Drive Gear Hole(C)
Cam Gear Hole(B)
Drive Gear Hole(A)
Fig. A-7
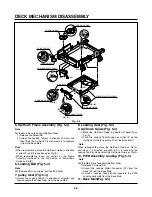
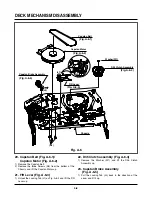
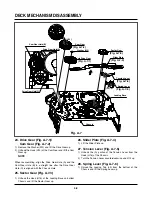
24. Drive Gear (Fig. A-7-1)/
Cam Gear (Fig. A-7-2)
1) Remove the Washer (W2) and lift the Drive Gear up.
2) Unhook the Hook (H14) of the Cam Gear and lift the Cam
Gear up.
When reassembling, align the Drive Gear Hole (A) and the
Cam Gear Hole (B) in a straight line after the Drive Gear
Hole (C) is aligned with the Chassis Hole.
25. Sector Gear (Fig. A-7-3)
1) Unhook the Hook (H15) of the Loading Base on bottom
Chassis and lift the Sector Gear up.
26. Slider Plate (Fig. A-7-4)
1) Lift the Slider Plate up.
27. Tension Lever (Fig. A-7-5)
1) Unhook the (A) portion of the Tension Lever from the
Hook (H16) of the Chassis.
2) Turn the Tension Lever counterclockwise and lift it up.
28. Spring Lever (Fig. A-7-6)
1) Unlock the Locking Tab (L3) from the bottom of the
Chassis and lift the Spring Lever up.
(Fig. A-7-4)
(Fig. A-7-5)
(Fig. A-7-6)
(Fig. A-7-1)
(Fig. A-7-2)
(Fig. A-7-3)
NOTE
Summary of Contents for ABV341 Series
Page 2: ......
Page 36: ...3 34 3 35 2 TU IF CIRCUIT DIAGRAM PB REC...
Page 39: ...3 40 3 41 5 JACK CIRCUIT DIAGRAM...
Page 41: ...3 44 3 45 7 TIMER CIRCUIT DIAGRAM XBV343...
Page 42: ...3 46 3 47 8 TIMER CIRCUIT DIAGRAM XBV342...
Page 45: ...3 52 3 53 PRINTED CIRCUIT DIAGRAMS 1 MAIN P C BOARD LOCATION GUIDE...
Page 65: ...02 12 04 R17149A ZENITH DAP202K 3 80 3 81 6 JACK CIRCUIT DIAGRAM...
Page 70: ...LOCATION GUIDE 3 90 3 91 PRINTED CIRCUIT DIAGRAMS 1 MAIN P C BOARD TOP VIEW...
Page 71: ...LOCATION GUIDE 3 92 3 93 2 MAIN P C BOARD BOTTOM VIEW...
Page 99: ...3 123 3 124 3 AUDIO CIRCUIT DIAGRAM COMBI SCART MTK 03 3 25 SR17447A...
Page 100: ...3 125 3 126 4 AV JACK CIRCUIT DIAGRAM COMBI SCART MTK 03 3 25 SR17446A...
Page 103: ...3 131 3 132 PRINTED CIRCUIT DIAGRAMS 1 MAIN P C BOARD LOCATION GUIDE...
Page 134: ...4 22 GEAR F R GEAR AY P2 P3 F R Lever Tension Base Boss CAM...

