


15 <
11
EN
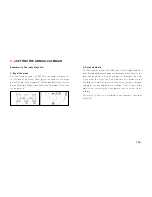
Dates of the full moon between 2010 and 2020
J
F
M A
M J
J
A
S
O N D
2010 30 28 30 28 27 26 26 24 23 23 21 21
2011 19 18 19 18 17 15 15 13 12 12 10 10
2012 1 7 8 6 6 4 3 2/31 30 29 28 28
2013 27 25 27 25 25 23 22 21 19 18 17 17
2014 16 14 16 15 14 13 12 10 9 8 6 6
2015 5 3 5 4 4 2 2/31 29 28 27 25 25
2016 24 22 23 22 21 20 19 18 16 16 14 14
2017 5 11 12 11 10 9 9 7 6 5 4 3
2018 2/31
2/31 30 29 28 27 26 25 24 23 22
2019 21 19 21 19 18 17 16 15 14 13 12 12
2020 10 9 9 8 7 5 5 3 2 1/31 30 30
11
EN
Dates of the full moon between 2010 and 2020
J
F
M A
M J
J
A
S
O N D
2010 30 28 30 28 27 26 26 24 23 23 21 21
2011 19 18 19 18 17 15 15 13 12 12 10 10
2012 1 7 8 6 6 4 3 2/31 30 29 28 28
2013 27 25 27 25 25 23 22 21 19 18 17 17
2014 16 14 16 15 14 13 12 10 9 8 6 6
2015 5 3 5 4 4 2 2/31 29 28 27 25 25
2016 24 22 23 22 21 20 19 18 16 16 14 14
2017 5 11 12 11 10 9 9 7 6 5 4 3
2018 2/31
2/31 30 29 28 27 26 25 24 23 22
2019 21 19 21 19 18 17 16 15 14 13 12 12
2020 10 9 9 8 7 5 5 3 2 1/31 30 30
(X)
(X)
(Y)
12
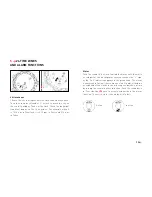
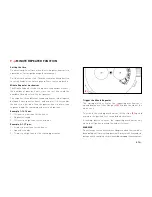
Example : it’s Thursday, the 26th of May.
1. Day of the Week
Pull the crown out one click (1). Turn the hands clock-
wise to set the day of the week. Then, place the hands
in the lower part of the dial (for example at 7.25) the
day before the one you desire (Example: Wednesday if
you want Thursday). Press the crown back in.
2. Date and Month
Pull the crown out two clicks (2) and scroll through
the dates until the required month appears (Exam-
ple: May) then set the date one day before the one you
desire (Example: the 25th if you want the 26th). The final
adjustment is made through the hands by setting the
time clockwise. Once you pass through midnight, the
day and date will change. Finally, you will be able to set
correctly the time before (a.m.) or after (p.m.) midday.
The watch is now set according to our example: Thurs-
day, the 26th of May.
7
Setting
the annual calendar
(1)
(2)
10
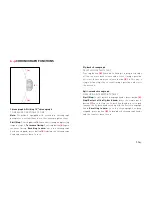
Day phase
The day phase, shown by the picture of the sun for day
time and the night sky for night time, is linked to the
time of day. It can therefore be set in the same way as
the time after pulling the crown out one click (1).
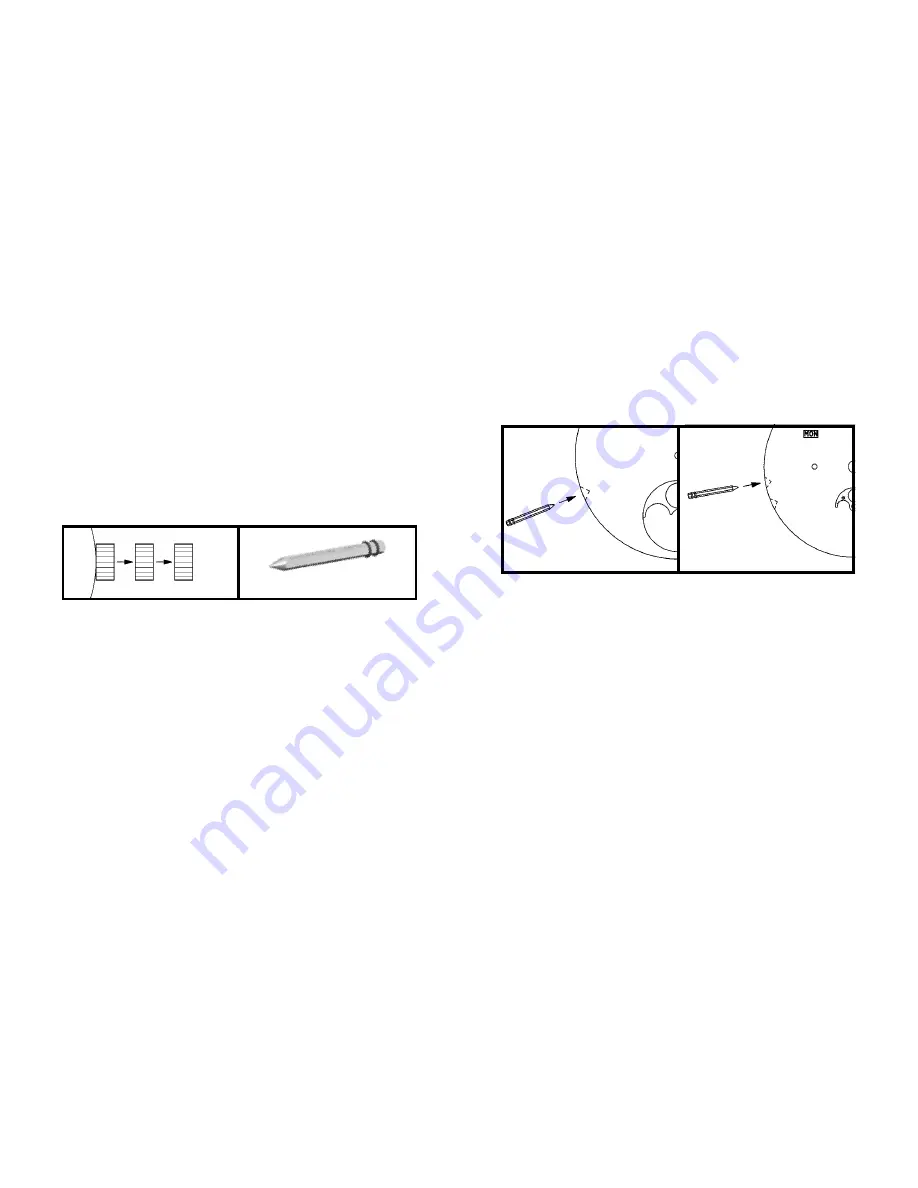
Moon phase
To adjust the moon phase without risking damage to
the movement, it is essential to position the hands in
the lower part of the dial between 3 and 9 o’clock.
Position the full moon at the center of its aperture by
pressing the corrector X on the side of the case several
times using the Zenith Time Tool. Using a moon cal-
endar, identify the date of the last full moon and count
the number of days between then and the present day.
Press the corrector the same number of times.
Example
It is September 28, 2010. The last full moon was on
September 23rd. The corrector must be pressed 5 times.
The moon phase is now set.
Zenith Time Tool
6
Setting the
day phase and
moon phase
ZENITH TIME TOOL
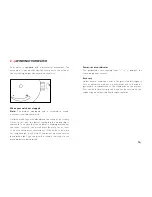
Dates of the full moon between 2016 and 2020
2016
2017
2018
2019
2020
J
24
12
2/31
21
10
J
19
9
27
16
5
F
22
11
19
9
A
18
7
26
15
3
M
23
12
2/31
21
9
S
16
6
25
14
2
A
22
11
30
19
8
O
16
5
24
13
1/31
M
21
10
29
18
7
N
14
4
23
12
30
J
20
9
28
17
5
D
14
3
22
12
30
6 >
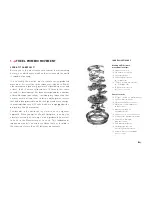
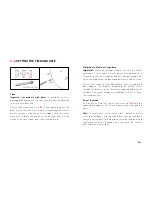
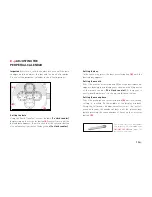
SETTING THE DAY PHASE
AND MOON PHASE
Day phase
The day phase, shown by the picture of the sun for day time
and the night sky for night time, is linked to the time of day. It
can therefore be set in the same way as the time after pulling
the crown out one click
(1)
.
Moon phase
To adjust the moon phase without any risk of damaging the
movement, it is essential to position the hands in the lower
part of the dial between 3 and 9 o’clock. Position the full moon
at the centre of its aperture by pressing the corrector
(X)
on
the side of the case several times using the Zenith Time Tool.
Using a moon calendar, identify the date of the last full moon
and count the number of days between then and the present
day. Press the corrector the same number of times.
Example
It is October 15th 2015. The last full moon was on October 5th.
The corrector must thus be pressed 10 times. The moon
phase is set.


