


19 <
10
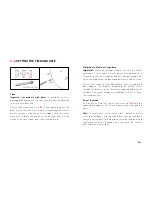
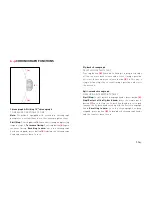
Day phase
The day phase, shown by the picture of the sun for day
time and the night sky for night time, is linked to the
time of day. It can therefore be set in the same way as
the time after pulling the crown out one click (1).
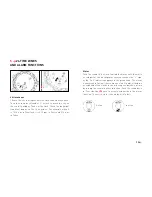
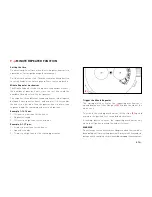
Moon phase
To adjust the moon phase without risking damage to
the movement, it is essential to position the hands in
the lower part of the dial between 3 and 9 o’clock.
Position the full moon at the center of its aperture by
pressing the corrector X on the side of the case several
times using the Zenith Time Tool. Using a moon cal-
endar, identify the date of the last full moon and count
the number of days between then and the present day.
Press the corrector the same number of times.
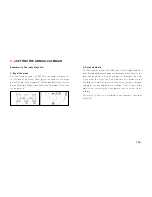
Example
It is September 28, 2010. The last full moon was on
September 23rd. The corrector must be pressed 5 times.
The moon phase is now set.
Zenith Time Tool
6
Setting the
day phase and
moon phase
14
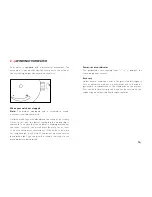
WARNING
Adjustments should never be made between 9 a.m.
and 3 p.m. or between 9 p.m. and 3 a.m. (shaded area)
because you might seriously and irreparably damage
certain parts of the EL PRIMERO movement. Please
set the perpetual calendar in the following order :
Setting the date
Using the ZENITH TIME TOOL, correct the date
(3 o’clock counter) by pressing on the corrector but-
ton A several times until the desired date appears. You
will notice that the corrector button also automatically
activates the days hand (9 o’clock counter).
Setting the day
In the same way, press the day corrector button B until
the desired day appears.
Setting the month
Press the month corrector button C until the desired
month appears, bearing in mind leap years shown on
the 4th quarter of the month counter (12 o’clock coun-
ter). A leap year is easily identifiable since it is shown
in a different color.
8
Adjusting
the perpetual
calendar
(C)
(A)
(B)
(D)
Setting the day
In the same way, press the day corrector button
(B)
until the
desired day appears.
Setting the month
Press the month corrector button
(C)
until the desired month
appears, bearing in mind leap years shown on the 4th quarter
of the month counter
(12 o’clock counter)
. A leap year is
easily identifiable since it is shown in a different colour.
Setting the moon phase
Press the moon-phase corrector button
(D)
until a full moon
setting is reached (in the middle of the display window).
Using the full moon calendar hereafter, select the last full
moon and count the number of days until the present day,
before pressing the same number of times on the corrector
button
(D)
.
The Zenith Time Tool will enable
you to press all setting buttons
(A), (B), (C), (D)
and make the
necessary corrections.
8 >
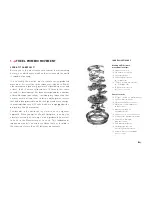
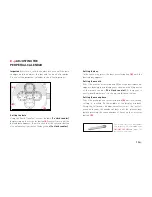
ADJUSTING THE
PERPETUAL CALENDAR
Important:
first of all, turn the hands clockwise until the date
changes and then adjust the day and the week afterwards.
Please set the perpetual calendar in the following order:
Setting the date
Using the Zenith Time Tool, correct the date
(3 o’clock counter)
by pressing on the corrector button
(A)
several times until the
desired date appears. You will notice that the corrector button
also automatically activates the days hand
(9 o’clock counter)
.


