background image

P A G E   4 1

206-3486-O

prg

power

tv

vcr

cable

help

source

display

flashbk

mute

channel

channel

volume

volume

1

2

3

4

5

6

7

0

8

9

rewind

f. fwd.

record

pip

swap

freez

move

tv/vcr

pause

timer

play

stop

menu

quit

fav

ch

pip ch

c.skip

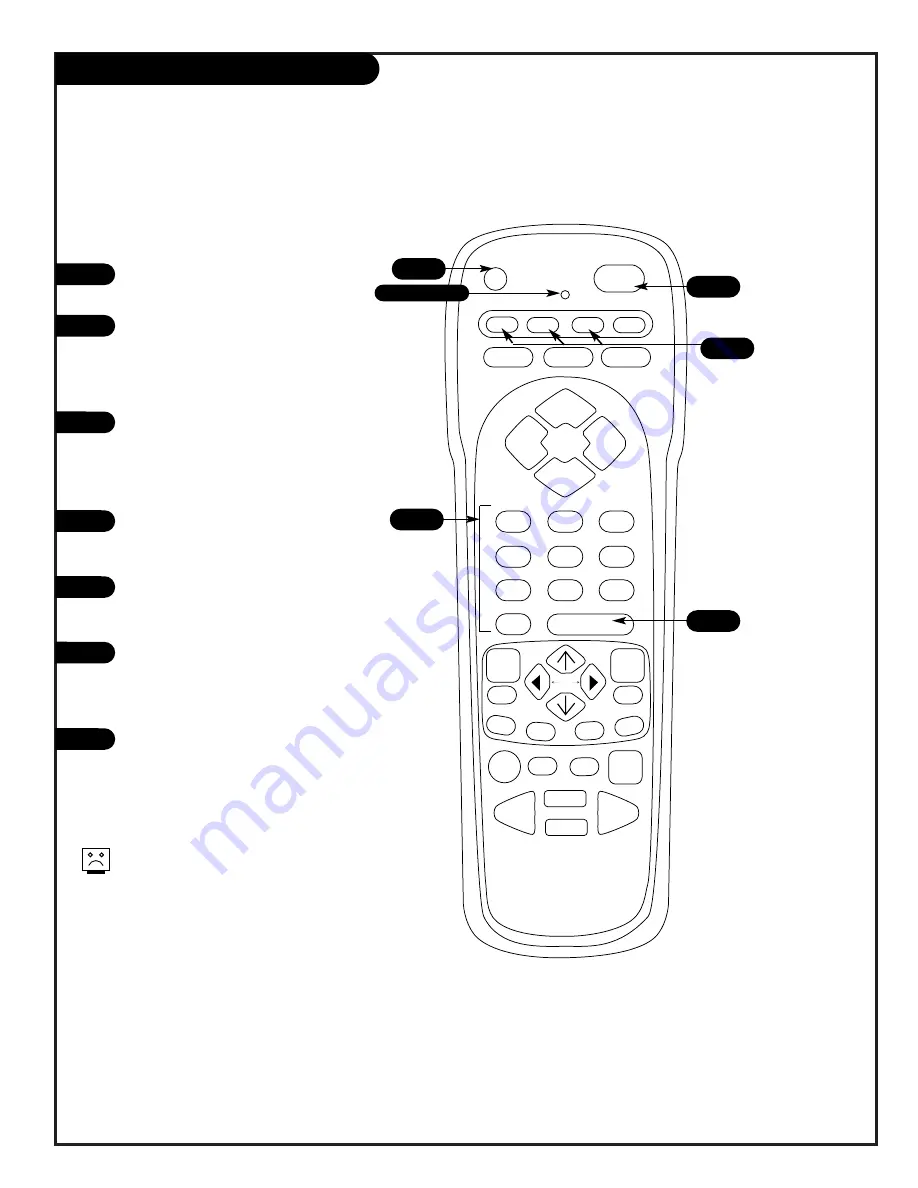
Programming the Remote

The device you want to program
should be ON.

On the chart in this manual, find
the type of device you’re program-
ming and then find the brand
name. Make a note of the two-
digit code—you’ll need it soon.

Press and hold the PRG button.
It’s recessed so it doesn’t get
pushed accidentally. When the
indicator light turns on, you can
release the button.

Push the button with the name of
the device you’re programming
(VCR or CABLE).

Using the number pad, enter the
two digit code found on the chart
in the Reference section.

Press DISPLAY to save the code
The indicator light will flash three
times and turn off if the code was
accepted.

Aim the remote at the device and
push the POWER button. It should
turn off. If not, try the other
codes listed and continue from
step three.

Not all devices will work with your
Zenith remote control.

1

2

3

4

5

6

7

3

Indicator Light

6

7

4

5

Program your remote to work with a VCR or Cable Box.

Summary of Contents for IQB50M90W

Page 1: ...opyright 2000 Zenith Electronics Corporation machine number IQB50M90W IQB55M90W IQB60M90W R60M90W o p e r a t i n g g u i d e w a r r a n t y h o o k u p d i r e c t o r y y o u r o n s c r e e n m e...

Page 2: ...ines for proper grounding and in particular specifies that the cable ground shall be connected to the grounding system of the building as close to the point of the cable entry as practical REGULATORY...

Page 3: ...instructions and should use a mounting accessory recommended by the manufacturer 8 Transporting Product A product and cart combination should be moved with care Quick stops excessive force and uneven...

Page 4: ...you to dangerous voltage or other hazards Refer all servicing to qualified service personnel 20 Damage Requiring Service Unplug this product from the wall outlet and refer servic ing to qualified ser...

Page 5: ...ect Antenna or cable service and perform channel search Remote Button Functions 17 On Screen Displays 18 Front Panel Controls 19 On Screen Menus Overview 20 Step 3 Customize your TV s Features Setup M...

Page 6: ...ers mini tower speaker or sub woofer go to page 12 To hook up your Entertainment Machine to an external stereo go to page 13 For general speaker placement advice go to page 14 Hookup Directory IMPORTA...

Page 7: ...etter pic ture quality Variable Out Used to connect either an external amplifier or add a sub woofer to your surround sound system RF Connectors Antenna Cable Used to connect cable to the television e...

Page 8: ...FT L MONO COMPONENT IN Y Cb Cr INPUT 2 SURROUND EXTERNAL STOP CONNECT ONLY 8 ohm SPEAKERS DO NOT SHORT CIRCUIT THESE TERMINALS Such damage is NOT COVERED by your television warranty Locate the Antenna...

Page 9: ...HT RIGHT LEFT L MONO COMPONENT IN Y Cb Cr INPUT 2 SURROUND EXTERNAL STOP CONNECT ONLY 8 ohm SPEAKERS DO NOT SHORT CIRCUIT THESE TERMINALS Such damage is NOT COVERED by your television warranty Locate...

Page 10: ...of your VCR Connect the cable line coming from your wall directly to this jack Find the composite video and audio jacks on the back of your VCR and con nect them following the instructions provided wi...

Page 11: ...E INPUT VARIABLE AUDIO OUT LEFT RIGHT AUDIO AUDIO RIGHT RIGHT RIGHT LEFT L MONO COMPONENT IN Y Cb Cr INPUT 2 SURROUND EXTERNAL STOP CONNECT ONLY 8 ohm SPEAKERS DO NOT SHORT CIRCUIT THESE TERMINALS Suc...

Page 12: ...Set the Surround External Speaker Matrix switch into the External position To use your Surround External Speaker clips as the only audio output connect the wires for your speakers to the Surround Spe...

Page 13: ...TOP CONNECT ONLY 8 ohm SPEAKERS DO NOT SHORT CIRCUIT THESE TERMINALS Such damage is NOT COVERED by your television warranty Audio cables not included with TV LEFT Locate the Variable Out jacks on the...

Page 14: ...ight speaker on either side of the Entertainment Machine will create a center channel making the dialog sound as though it s coming directly from the Entertainment Machine The rear surround sound spea...

Page 15: ...fwd record pip swap freez move tv vcr pause timer play stop menu quit fav ch pip ch c skip This page explains the first four steps you should perform to access any menu described in this manual 1 2 3...

Page 16: ...imer play stop menu quit fav ch pip ch c skip S M T W T F S S M T W T F S S M T W T F S Video Setup Special Audio Theater Calendr Language Signal Antenna Auto Program CATV 1 Channel Add Del CATV 2 Cha...

Page 17: ...s once for Soft Mute and again for full Mute SOURCE Cycles through the available sources on your Entertainment Machine VOLUME LEFT RIGHT Increases decreases the sound level MENU Displays on screen men...

Page 18: ...Sleep Timer MAIN PICTURE SOURCE Displays Main Picture Source Active source highlighted PIP SOURCE DISPLAY Displays PIP source RATING SELECTED Displays Parental Control rating you have selected for th...

Page 19: ...s the UP DOWN arrow buttons on your remote Push the EXIT button to return to normal TV viewing Press the SOURCE button to cycle through all sources 1 2 3 4 Refer to the various pages on how to use the...

Page 20: ...cs and customize your Entertainment Machine s MENU functions Channel Labels Label your channels with their network names ABC CBS HBO etc Source ID Customize the names of your sources by either selecti...

Page 21: ...suit your room and your taste Your options are Bass Treble Balance Reset and Advanced Settings Stereo Mono Second Audio Program Internal Speakers Auto Noise Cancel Loudness and SoundRite T H E AT E R...

Page 22: ...lock Set Projo Setup Video Setup Special Audio Theater Calendr Language English Signal French Auto Program Spanish Channel Add Del Channel Review Clock Set Projo Setup Video Setup Special Audio Theate...

Page 23: ...ge Signal Channel 03 Auto Program Add Channel Add Del Delete Channel Review Nest Channel Clock Set Ch Ch Projo Setup Or Keys Language Signal Channel 03 Auto Program Add Channel Add Del Delete Channel...

Page 24: ...T W T F S CHANNEL REVIEW ANT A CH I D SCAN LOCK 1 ON ON 2 3 4 5 6 7 8 Language Signal Auto Program Channel Add Del Channel Review Clock Set Projo Setup Video Setup Special Audio Theater Calendr Video...

Page 25: ...ions Press QUIT to save and exit prg power tv vcr cable help source display flashbk mute channel channel volume volume 1 2 3 4 5 6 7 0 8 9 rewind f fwd record pip swap freez move tv vcr pause timer pl...

Page 26: ...h is actually a combination of the outputs of the three color tubes The output of the green tube is stationary The outputs of the red and blue tubes can be adjusted When properly aligned the outputs o...

Page 27: ...lect custom channel press the RIGHT arrow button twice and then use the UP DOWN arrow buttons to select individual letters Use CHANNEL UP DOWN buttons or the NUMBER KEYPAD and select another channel t...

Page 28: ...tom then press the RIGHT arrow button Cycle through the character choices using the UP DOWN buttons and cycle through the character slots using the RIGHT arrow button Press QUIT to save your choice an...

Page 29: ...tons to scroll through the choices you have set Quit To Exit To Menu Bar Menu Quit To Exit To Menu Bar Menu Quit To Exit To Menu Bar Menu Quit To Exit To Menu Bar Menu S M T W T F S Favorite Channels...

Page 30: ...p ch c skip 1 2 4 4 3 Press MENU and the RIGHT LEFT arrow button to access the Special Menu Press an UP DOWN arrow to select Parental Control and press the RIGHT arrow button to activate Parental Cont...

Page 31: ...p to four ON OFF time settings for your TV Maximum time between ON timer and OFF timer is 3 hours Use the RIGHT arrow button to select 1 4 then press the DOWN arrow button to select the TV on time Use...

Page 32: ...sed Captions or Text shall be set to Usually this should be set to 1 Use the RIGHT arrow to select Quit To Exit To Menu Bar Menu Quit To Exit To Menu Bar Menu Channel Labels Source I D Favorite Channe...

Page 33: ...channel volume volume 1 2 3 4 5 6 7 0 8 9 rewind f fwd record pip swap freez move tv vcr pause timer play stop menu quit fav ch pip ch c skip Quit To Exit To Menu Bar Menu Quit To Exit To Menu Bar Men...

Page 34: ...ural picture Auto Flesh Automatically monitors and adjusts the color to maintain constant color levels even after a program or channel changes Video Filter Automatically reduces conspicu ous noise in...

Page 35: ...tions to their default settings Advanced Settings Set advanced setting on your TV Stereo Activate stereo sound Mono Activate mono sound Second Audio Programming Activates sepa rate audio channel avail...

Page 36: ...EFT arrow button to access the Theater modes Press DOWN arrow button to access the Theater modes Press RIGHT arrow to select the Theater Modes which you prefer Each is a preset Audio Video configurati...

Page 37: ...er Calendr Video Setup Special Audio Theater Calendr Press MENU and then the LEFT RIGHT arrow button to select calendar Press DOWN button and then the RIGHT buttton to access Calendar to view it Press...

Page 38: ...P is always available no matter what equipment you have WORKING WITH PIP This is where your MBR remote is put to the most use All of the functions PIP has are accessible through the menus that pop up...

Page 39: ...in to reduce the size of the picture Press PIP again to remove the display from the screen Use PIP Ch button on your remote to select between main picture and PIP dis play tuning control Press the SOU...

Page 40: ...the PIP dis play from corner to corner of your screen If you wish to move the PIP display to another part of your screen other than the corners simply activate the PIP dis play wait about eight second...

Page 41: ...n It s recessed so it doesn t get pushed accidentally When the indicator light turns on you can release the button Push the button with the name of the device you re programming VCR or CABLE Using the...

Page 42: ...athes 01 22 47 Cybernex 45 Daewoo 06 08 16 38 50 Daytron 06 Dynatech 00 Electrohome 23 Electrophonic 23 Emerx 07 Emerson 200 08 12 15 23 27 28 33 34 37 42 48 51 52 Fisher 18 20 32 46 Fuji 09 22 Funai...

Page 43: ...igit 7 VCR Digit 7 Cable Digit 7 8 TV Digit 8 VCR Digit 8 Cable Digit 8 9 TV Digit 9 VCR Digit 9 Cable Digit 9 0 TV Digit 0 VCR Digit 0 Cable Digit 0 DISPLAY TV Display VCR Enter Cable Enter MENU TV M...

Page 44: ...ment Machine on Use a quality wood cleaner and polish This will protect the Entertainment Machine from dirt and dust as well as keep the cabinet looking new If you leave your Entertainment Machine dor...

Page 45: ...single fixed images such as a photo CD player you should avoid setting the Brightness level too high If static images like network identification patterns are left sitting for too long they can leave...

Page 46: ...annel The problem may be the broadcast not your Entertainment Machine Are the Audio A V cables properly installed Are the wires for external speakers if you have external speakers properly installed M...

Page 47: ...rol menu and lock the video lock You must do this same process to unlock the video lock Make sure the batteries are fresh and installed properly Try unplugging your Entertainment Machine for a few min...

Page 48: ...iver of television signals sent over the air A large metal piece of equipment does not always have to be visible for your home to be using an antenna CAPTIONS A form of subtitling that writes out the...

Page 49: ...nish or French SIGNAL Picture and sound traveling through cable or on the air to your television screen SOURCE The term for the equipment that provides audio and video information to your Entertainmen...

Page 50: ...O HEADPHONES Use Your Visa or MasterCard to Order PLEASE ALLOW 3 4 WEEKS FOR DELIVERY zenith Become a part of the action with surround sound New space saving shelf design make these high quality speak...

Page 51: ...your Operating Guide carefully so that you will understand the operation of your set and how to adjust the customer controls Carry In Service Models under 21 diagonal U S A screen size must be taken t...

Page 52: ...QR44231...

Reviews: