background image

PICTURE 

CONTR

OL

48

MANUAL PICTURE ADJUSTMENT

PICTURE CONTROL

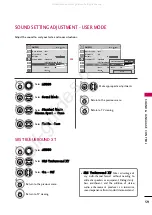
Picture Mode - User Mode

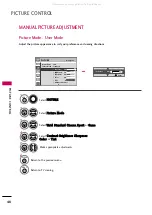
Adjust the picture appearance to suit your preference and viewing situations.

Select PPIIC

CT

TU

UR

REE.

Make appropriate adjustments.

Select C

Coonnttrraasstt, B

Brriigghhttnneessss, SShhaarrppnneessss,

C

Coolloorr, or T

Tiinntt.

1

MENU

Select PPiiccttuurree   M

Mooddee.

2

ENTER

Select V

Viivviidd, SSttaannddaarrdd, C

Ciinneem

maa, SSppoorrtt, or G

Gaam

mee.

3

ENTER

4

ENTER

5

ENTER

6

RETURN

Return to the previous menu.

MENU

Return to TV viewing.

Enter

Move

PICTURE

E

Aspect Ratio   : 16:9

Picture Mode  : Standard

• Contrast

90

• Brightness

50

• Sharpness

60

• Color

60

• Tint

0

• Advanced Control

• Contrast

80

E

E

E E

EE

EE

Enter

R

G

All manuals and user guides at all-guides.com

Summary of Contents for Z50PG10 and

Page 1: ...V As an ENERGY STAR Partner LG Electronics USA Inc has determined that this product meets the ENERGY STAR guidelines for energy efficiency ENERGY STAR is a set of power saving guidelines issued by the...

Page 2: ...ssly approved by the party responsible for compliance could void the user s authority to operate the equipment CAUTION Do not attempt to modify this product in any way without written authorization fr...

Page 3: ...electrician for replacement of the obsolete outlet Protect the power cord from being walked on or pinched particularly at plugs convenience receptacles and the point where they exit from the apparatu...

Page 4: ...d closed in a door or walked upon Pay particular attention to plugs wall outlets and the point where the cord exits the appliance Do not make the TV with the power cord plugged in Do not use a damaged...

Page 5: ...ni in ng g When cleaning unplug the power cord and scrub gently with a soft cloth to prevent scratching Do not spray water or other liquids directly on the TV as electric shock may occur Do not clean...

Page 6: ...ons 30 Turning On TV 32 Channel Selection 32 Volume Adjustment 32 Initial Setting 33 Quick Menu 34 On Screen Menus Selection 35 Channel Setup Auto Scan Auto Tuning 36 Add Delete Channel Manual Tuning...

Page 7: ...aptions 66 Digital Broadcasting System Captions 67 Caption Option 68 TIME SETTING Clock Setting Auto Clock Setup 69 Manual Clock Setup 70 Auto On Off Time Setting 71 Sleep Timer Setting 72 Auto Shut o...

Page 8: ...bs Inc TruSurround XT technology is incorporated under license from SRS Labs Inc Manufactured under license from Dolby Laboratories Dolby and the double D symbol are trademarks of Dolby Laboratories A...

Page 9: ...2PG10 1EA Z50PG10 2EA O Op pt ti io on n E Ex xt tr ra as s Wipe spots on the exterior only with the polishing cloth Do not wipe roughly when removing stain Excessive pressure may cause scratch or dis...

Page 10: ...from the TV CH VOL MENU INPUT ENTER CH VOL MENU INPUT ENTER INPUT Button POWER Button MENU Button ENTER Button VOLUME Buttons CHANNEL E E D D Buttons Remote Control Sensor Power Standby Indicator Illu...

Page 11: ...is port do not work RS 232C IN CONTROL SERVICE PORT Used by third party devices REMOTE CONTROL PORT For a wired remote control RGB PC Analog PC Connection Uses a D sub 15 pin cable VGA cable AUDIO RGB...

Page 12: ...cushioned surface to protect the screen from damage 1 Loosen the screws on the TV 2 Detach the stand from TV 3 Z42PG10 Z50PG10 After removing the stand install the included p pr ro ot te ec ct ti io o...

Page 13: ...NT SETUP section 1 Install the CABLE MANAGEMENT CLIP as shown If your TV has the CABLE HOLDER install it as shown and bundle the cables 2 How to remove the CABLE MANAGEMENT CLIP Z42PG10 Z50PG10 G G Fi...

Page 14: ...f 4 inches on all four sides from the wall Image shown may differ from your TV 4 inches 4 inches 4 inches 4 inches G G Ensure adequate ventilation by following the clearance recommendations G G Do not...

Page 15: ...it a detailed installation manual and all parts necessary for assembly are provided G G Do not use screws longer than the standard dimen sion as they may cause damage to the inside to the TV G G For w...

Page 16: ...rt the eye bolts or TV brackets bolts and tighten them securely in the upper holes Secure the wall brackets with the bolts sold separately to the wall Match the height of the bracket that is mounted o...

Page 17: ...mily Dwellings Houses Connect to wall jack for outdoor antenna Be careful not to bend the copper wire when connecting the antenna Copper Wire To improve the picture quality in a poor signal area pleas...

Page 18: ...x Refer to the owner s manual for the digital set top box operation Select the C Co om mp po on ne en nt t 1 1 input source on the TV using the I IN NP PU UT T button on the remote control If connecte...

Page 19: ...digital set top box Select the H HD DM MI I1 1 H HD DM MI I2 2 or H HD DM MI I3 3 input source on the TV using the I IN NP PU UT T button on the remote control 2 1 HDMI DTV Horizontal Vertical Freque...

Page 20: ...DVI output of the digital set top box to the H HD DM MI I D DV VI I I IN N1 1 2 2 or H HD DM MI I I IN N3 3 jack on the TV Connect the audio output of the digital set top box to the A AU UD DI IO O R...

Page 21: ...nnect the audio outputs of the DVD to the C CO OM MP PO ON NE EN NT T I IN N A AU UD DI IO O1 1 jacks on the TV 1 How to connect 2 How to use Turn on the DVD player insert a DVD Select the C Co om mp...

Page 22: ...r s manual for operating instructions 2 1 REMOTE CONTROL IN RS 232C IN CONTROL SERVICE OPTICAL DIGITALAUDIO OUT 1 2 Y AUDIO S VIDEO AV IN 1 VIDEO MONO L R S VIDEO AUDIO 1 2 OMPONENT IN HDMI DVI IN 2 1...

Page 23: ...s common to all TVs and is not covered by warranty IO DVI ANTENNA CABLE IN HDMI DVI IN 2 1 R L R S VIDEO VIDEO OUTPUT SWITCH ANT IN ANT OUT Wall Jack Antenna 1 2 Connect the RF antenna out socket of t...

Page 24: ...ou have a mono VCR connect the audio cable from the VCR to the A AU UD DI IO O L L M MO ON NO O jack of the TV NOTE REMOTE CONTROL IN RS 232C IN CONTROL SERVICE OPTICAL DIGITALAUDIO OUT 1 2 Y AUDIO S...

Page 25: ...ICAL DIGITALAUDIO OUT 1 2 G G When connecting with external audio equipments such as amplifiers or speakers you can turn the TV speakers off in the menu G G p p 6 61 1 NOTE G Do not look into the opti...

Page 26: ...source on the TV using the I IN NP PU UT T button on the remote control Connect the VGA output of the PC to the R RG GB B P PC C jack on the TV Connect the PC audio output to the A AU UD DI IO O R RG...

Page 27: ...ng period of time The fixed image could become permanently imprinted on the screen G G The synchronization input form for Horizontal and Vertical frequencies is separate G G Depending on the graphics...

Page 28: ...I IC CT TU UR RE E Select S Sc cr re ee en n R RG GB B P PC C Select R Re es so ol lu ut ti io on n Select the desired resolution 1024 x 768 1280 x 768 1360 x 768 Auto config Resolution G Position Siz...

Page 29: ...osition Size Phase Reset Screen Move Prev MENU To Set 3 2 ENTER ENTER Select Y Ye es s 4 ENTER Start Auto Configuration 5 ENTER Select P PI IC CT TU UR RE E 1MENU If the position of the image is still...

Page 30: ...tion is to adjust pic ture to left right and up down as you prefer S Si iz ze e This function is to minimize any vertical bars or stripes visible on the screen background And the horizontal screen siz...

Page 31: ...es se et t 3 ENTER Select P PI IC CT TU UR RE E Select S Sc cr re ee en n R RG GB B P PC C 1MENU 2 ENTER Select Y Ye es s 4 ENTER 5 ENTER Auto config Position Resolution Size Phase Reset G Screen Mov...

Page 32: ...ts the factory preset picture depend on the viewing environment G G p p 4 46 6 Selects the factory preset sound for type of program G G p p 5 58 8 Turns your TV on or off Select the desired quick menu...

Page 33: ...eference Allows the user to move return one step in an interactive application or other user interaction function Also closes menus See a list of SimpLink compatible devices that are currently connect...

Page 34: ...g the I IN NP PU UT T button on the remote control This TV is programmed to remember which power state it was last set to even if the power cord is out When finished using the TV press the P PO OW WE...

Page 35: ...the TV to H Ho om me e mode for the best picture in your home environment I In n s st to or re e Mode is only intended for use in retail environments Customers can adjust the P Pi ic ct tu ur re e men...

Page 36: ...Ca ap pt ti io on n Select on or off M Mu ul lt ti i A Au ud di io o Changes the audio language Digital signal S SA AP P Selects MTS sound Analog signal S Sl le ee ep p T Ti im me er r Select the amo...

Page 37: ...nter Move Auto Volume Off Clear Voice On Balance 0 Sound Mode Standard SRS TruSurround XT Off Treble 50 Bass 50 Reset AUDIO E L R Enter Move Clock Feb 21 2008 2 10 AM Off Time Off On Time Off Sleep Ti...

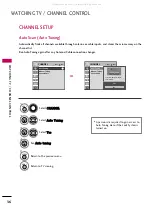
Page 38: ...AN NN NE EL L Select A Au ut to o T Tu un ni in ng g Select Y Ye es s Run A Au ut to o t tu un ni in ng g 1MENU 3 2 ENTER ENTER 4 ENTER A password is required to gain access to Auto Tuning menu if th...

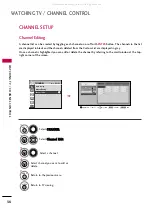
Page 39: ...or C CA AT TV V Select channel you want to add or delete 3 ENTER 4 Select A Ad dd d or D De el le et te e 5 ENTER A password is required to gain access to Manual Tuning menu if the Lock System is turn...

Page 40: ...d from the Custom List are displayed in gray Once a channel is highlighted you can add or delete the channel by referring to the small window at the top right corner of the screen Channel Editing Sele...

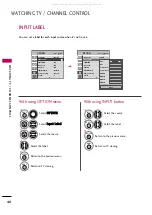
Page 41: ...ect them to watch a VCR or other external equipment C Co om mp po on ne en nt t 1 1 2 2 Select them to watch DVD or a Digital set top box R RG GB B P PC C Select it to view PC input H HD DM MI I1 1 3...

Page 42: ...OPTION menu Select the source Select the label 1INPUT 2Q MENU 3RETURN Return to the previous menu MENU Return to TV viewing With using INPUT button Enter Move OPTION Language English Input Label SIMPL...

Page 43: ...red source If you select C Ci in ne em ma a in AV mode C Ci in ne em ma a will be selected both for PIC TURE menu Picture Mode and AUDIO menu Sound Mode respectively If you select O Of ff f in AV mode...

Page 44: ...tch the Input source with the INPUT button on the remote control the SIMPLINK device will stop G G When you select a device with home theater functionality the sound output automatically switches to t...

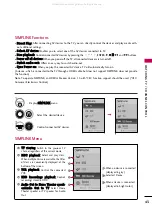
Page 45: ...IMPLINK an HDMI cable over Version 1 3 with CEC function support should be used CEC Consumer Electronics Control SIMPLINK Menu T TV V v viie ew wiin ng g Switch to the previous TV channel regardless o...

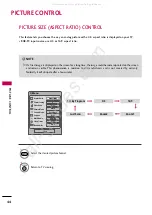
Page 46: ...on the screen and remain visible This phenomenon is common to all manufacturers and is not covered by warranty Normally it will dissipate after a few minutes 1 RATIO Just Scan Zoom1 Zoom2 Set By Prog...

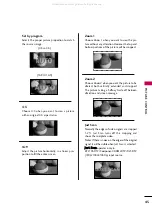
Page 47: ...will be cropped Zoom 2 Choose Zoom 2 when you want the picture to be altered both vertically extended and cropped The picture taking a halfway trade off between alteration and screen coverage Just Sca...

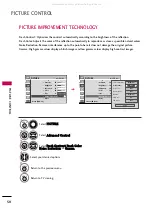
Page 48: ...Settings are preset for the optimum picture quality at the factory and are not adjustable 1 PICTURE Select V Vi iv vi id d S St ta an nd da ar rd d C Ci in ne em ma a S Sp po or rt t G Ga am me e E Ex...

Page 49: ...m 4 Select A Ad dv va an nc ce ed d C Co on nt tr ro ol l 2 ENTER 5RETURN Return to the previous menu MENU Return to TV viewing Enter Move PICTURE E R G Contrast 50 Brightness 50 Sharpness 50 Color 50...

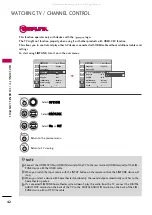
Page 50: ...e es ss s C Co ol lo or r or T Ti in nt t 1MENU Select P Pi ic ct tu ur re e M Mo od de e 2 ENTER Select V Vi iv vi id d S St ta an nd da ar rd d C Ci in ne em ma a S Sp po or rt t or G Ga am me e 3 E...

Page 51: ...offering the optimal picture quality for users 7RETURN Return to the previous menu MENU Return to TV viewing Enter Move PICTURE E Aspect Ratio 16 9 Picture Mode Standard Contrast 90 Brightness 50 Sha...

Page 52: ...va an nc ce ed d C Co on nt tr ro ol l Select F Fr re es sh h C Co on nt tr ra as st t F Fr re es sh h C Co ol lo or r N No oi is se e R Re ed du uc ct ti io on n or G Ga am mm ma a 1MENU 3 2 ENTER E...

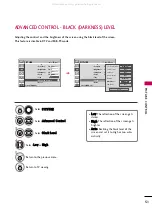
Page 53: ...Hi ig gh h The reflection of the screen gets brighter A Au ut to o Realizing the black level of the screen and set it to High or Low auto matically 5RETURN Return to the previous menu MENU Return to...

Page 54: ...Select A Ad dv va an nc ce ed d C Co on nt tr ro ol l Select F Fi il lm m M Mo od de e 1MENU 3 2 ENTER ENTER Select O On n or O Of ff f 4 5RETURN Return to the previous menu MENU Return to TV viewing...

Page 55: ...adjusted value 1MENU 3 2 ENTER ENTER 4MENU Return to TV viewing Enter Move PICTURE E R G Contrast 50 Brightness 50 Sharpness 50 Color 50 Tint 0 Advanced Control Reset Screen RGB PC Enter Move PICTURE...

Page 56: ...n nv ve er rs si io on n Inversion will automatically invert the plasma display panel color every 30 minutes W Wh hi it te e W Wa as sh h White Wash removes ghost images from the screen Use spar ingly...

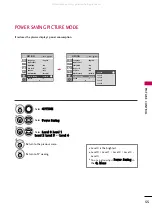
Page 57: ...L Le ev ve el l 0 0 L Le ev ve el l 1 1 L Le ev ve el l 2 2 L Le ev ve el l 3 3 or L Le ev ve el l 4 4 3 ENTER 4RETURN Return to the previous menu MENU Return to TV viewing Enter Move OPTION Language...

Page 58: ...o V Vo ol lu um me e Select O On n or O Of ff f 1MENU 3 2 ENTER ENTER 4RETURN Return to the previous menu MENU Return to TV viewing Enter Move AUDIO Auto Volume On Clear Voice On Balance 0 Sound Mode...

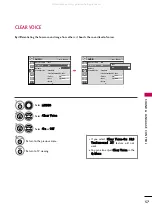
Page 59: ...the Q Q M Me en nu u Select A AU UD DI IO O Select C Cl le ea ar r V Vo oi ic ce e Select O On n or O Of ff f 1MENU 3 2 ENTER ENTER 4RETURN Return to the previous menu MENU Return to TV viewing Enter...

Page 60: ...po or rt t and G Ga am me e are preset for optimum sound quality at the factory and are not adjustable Standard Music Game Sport Cinema Q Menu Close 3 16 9 Vivid Off F F Standard G G Off English Off A...

Page 61: ...u un nd d X XT T Takes advantage of any multi channel format without needing to add extra speakers or equipment Dialog clarity bass enrichment and the addition of stereo audio enhancement produces an...

Page 62: ...and room situations 4RETURN Return to the previous menu MENU Return to TV viewing Enter Move AUDIO Auto Volume Off Clear Voice On Balance 0 Sound Mode Standard SRS TruSurround XT Off Treble 50 Bass 50...

Page 63: ...1MENU 3 2 ENTER ENTER 4RETURN Return to the previous menu MENU Return to TV viewing Enter Move AUDIO Clear Voice On Balance 0 Sound Mode Standard SRS TruSurround XT Off Treble 50 Bass 50 Reset TV Spe...

Page 64: ...alize the adjusted value 3 ENTER 4MENU Return to TV viewing Enter Move AUDIO Auto Volume Off Clear Voice On Balance 0 Sound Mode Standard SRS TruSurround XT Off Treble 50 Bass 50 Reset Enter Move AUDI...

Page 65: ...adcast is only in Mono Select S SA AP P Select M Mo on no o S St te er re eo o or S SA AP P Return to TV viewing 1Q MENU 3 2 Q MENU Select M Mu ul lt ti i A Au ud di io o Select other languages Return...

Page 66: ...red language E En ng gl li is sh h S Sp pa an ni is sh h or F Fr re en nc ch h 4 5RETURN Return to the previous menu MENU Return to TV viewing Enter Move OPTION Language English Input Label SIMPLINK O...

Page 67: ...on screen menus will be shown in the selected language 4 5RETURN Return to the previous menu MENU Return to TV viewing Enter Move OPTION Language English Input Label SIMPLINK On Key Lock Off Caption...

Page 68: ...4 or T Te ex xt t1 1 4 4 4 Analog Broadcasting System Captions When selecting O Of ff f Sub menus for Analog DTV and Digital Option become disabled C CA AP PT TI IO ON N The term for the words that sc...

Page 69: ...n Select O On n 1MENU 3 2 ENTER ENTER Select C CC C1 1 4 4 T Te ex xt t1 1 4 4 or S Se er rv vi ic ce e1 1 6 6 4 5RETURN Return to the previous menu MENU Return to TV viewing Enter Move OPTION Langua...

Page 70: ...oose a color for the text T Te ex xt t O Op pa ac ci it ty y Specify the opacity for the text color B Bg g B Ba ac ck kg gr ro ou un nd d C Co ol lo or r Select a background color B Bg g B Ba ac ck kg...

Page 71: ...as sk ka a or H Ha aw wa ai ii i Canada E Ea as st te er rn n C Ce en nt tr ra al l M Mo ou un nt ta ai in n P Pa ac ci if fi ic c N Ne ew w F F l la an nd d or A At tl la an nt ti ic c 4 Select A Au...

Page 72: ...the Year Month Date Hour or Minutes option 5 6RETURN Return to the previous menu MENU Return to TV viewing Enter Move TIME Clock Feb 21 2008 2 10 AM Off Time Off On Time Off Sleep Timer Off Auto Sleep...

Page 73: ...t T TI IM ME E Select O Of ff f t ti im me e or O On n t ti im me e Select R Re ep pe ea at t 1MENU 3 2 ENTER ENTER Select O Of ff f O On nc ce e E Ev ve er ry yd da ay y M Mo on n F Fr ri i M Mo on n...

Page 74: ...off Q Menu Close 3 16 9 Vivid Off Standard Off English F F Off G G Add Aspect Ratio Power Saving Clear Voice Picture Mode Sound Mode Caption Multi Audio Sleep Timer Del Add Fav CH 1 SLEEP Select O Of...

Page 75: ...3 2 ENTER ENTER 4RETURN Return to the previous menu MENU Return to TV viewing Enter Move TIME Clock Feb 21 2008 2 10 AM Off Time Off On Time Off Sleep Timer Off Auto Sleep Off Enter Move TIME Clock F...

Page 76: ...he theaters or direct to video movies use the Movie Rating System MPAA only Ratings for Television programs including made for TV movies TV G General audience TV PG Parental guidance suggested TV 14 P...

Page 77: ...MENU ENTER Input the password 21 4 5 6 7 8 0 9 2 3 5RETURN Return to the previous menu MENU Return to TV viewing Enter Move LOCK Lock System Off Set Password Block Channel Movie Rating TV Rating Child...

Page 78: ...ER 1 4 5 6 7 8 0 9 2 3 Select L LO OC CK K 1MENU ENTER Input the password 21 4 5 6 7 8 0 9 2 3 5RETURN Return to the previous menu MENU Return to TV viewing Enter Move LOCK Lock System Off Set Passwor...

Page 79: ...that you do not want your children to watch Select L LO OC CK K 1MENU ENTER Input the password 21 4 5 6 7 8 0 9 2 3 6MENU Return to the previous menu RETURN Return to TV viewing Block Unblock Move Pa...

Page 80: ...G Parental guidance suggested PG 13 Parents strongly cautioned R Restricted NC 17 No one 17 and under admitted X Adult only Blocking Off Permits all programs G G If you set PG 13 G and PG movies will...

Page 81: ...you block certain TV programs intended for mature audi ences in the TV Rating sub menu your children can view those programs Select L LO OC CK K 1MENU ENTER Input the password 21 4 5 6 7 8 0 9 2 3 6R...

Page 82: ...TV 14 Language adult language applies to TV PG TV 14 TV MA Sex sexual situations applies to TV PG TV 14 TV MA Violence applies to TV PG TV 14 TV MA Select L LO OC CK K 1MENU ENTER Input the password 2...

Page 83: ...e 14 Viewers 14 years and older 18 Adult programming Blocking Off Permits all programs Select L LO OC CK K 1MENU ENTER Input the password 21 4 5 6 7 8 0 9 2 3 5RETURN Return to the previous menu MENU...

Page 84: ...16ans Not convenient for children of 16 years and younger 18ans This programs is only for adults Blocking off Permits all programs Select L LO OC CK K 1MENU ENTER Input the password 21 4 5 6 7 8 0 9 2...

Page 85: ...a ad da ab bl le e R Ra at ti in ng g option 4 3 ENTER Select desired option and block it 5 ENTER Select L LO OC CK K 1MENU ENTER Input the password 21 4 5 6 7 8 0 9 2 3 6RETURN Return to the previous...

Page 86: ...he previous menu MENU Return to TV viewing Enter Move LOCK Lock System Off Set Password Block Channel Movie Rating TV Rating Children TV Rating General Downloadable Rating Input Block Enter Move LOCK...

Page 87: ...d off press the r r I INPUT CH D D E E button on the TV or POWER INPUT CH or NUMBER buttons on the remote control With the K Ke ey y L Lo oc ck k O On n the display K Ke ey y L Lo oc ck k appears on t...

Page 88: ...broadcast Is the power cord inserted into wall power outlet Check your antenna direction and or location Test the wall power outlet plug another product s power cord into the outlet where the product...

Page 89: ...nd Unusual sound from inside the product No sound when connecting HDMI or USB No output from one of the speakers T Th he e a au ud di io o f fu un nc ct ti io on n d do oe es s n no ot t w wo or rk k...

Page 90: ...c softener or dish washing detergent Wring the cloth until it s almost dry and then use it to wipe the screen Make sure the excess water is off the screen and then let it air dry before you turn on yo...

Page 91: ...edance Environment condition With stand Without stand With stand Without stand Operating Temperature Operating Humidity Storage Temperature Storage Humidity Z42PG10 Z42PG10 UA 40 9 x 28 7 x 12 1 inche...

Page 92: ...D6 D7 Lead code Low custom code High custom code Data code Data code Repeat code Tf 4 5 ms 9 ms 2 25 ms 9 ms 0 55 ms 0 56 ms 1 12 ms 0 56 ms 2 24 ms Tf Tf Tf 108ms 455KHz Bit 0 Bit 1 1 How to Connect...

Page 93: ...n 30 AV MODE Remote control Button 79 RATIO Remote control Button 0E SLEEP Remote control Button 52 SOUND Remote control Button 4D PICTURE Remote control Button D6 TV Discrete IR Code TV Input Selecti...

Page 94: ...ogramming software or to test functionality using telenet software COMPO R REMOTE CONTROL IN RS 232C IN CONTROL SERVICE OPTICAL DIGITALAUDIO OUT AV IN 1 AUDIO S VIDEO 1 2 VIDEO Y PB Type of Connector...

Page 95: ...specify a TV ID number Refer to Real Data Mapping G G p p 9 97 7 Enter Move OPTION Language English Input Label SIMPLINK On Key Lock Off Caption Off ISM Method Normal Power Saving Level 0 Set ID 1 Ent...

Page 96: ...standby mode O OK K A Ac ck kn no ow wl le ed dg ge em me en nt t The TV transmits ACK acknowledgement based on this for mat when receiving normal data At this time if the data is data read mode it in...

Page 97: ...ust volume You can also adjust volume with the volume buttons on remote control Transmission k f Set ID Data Cr Data Min 00 Max 64 transmit by Hexadecimal code Refer to Real data mapping See page 97 A...

Page 98: ...ure in the PICTURE menu Transmission k u Set ID Data Cr Data 00 Medium 01 Cool 02 Warm Acknowledgement u Set ID OK NG Data x 1 18 8 I IS SM M M Me et th ho od d C Co om mm ma an nd d jj p p To avoid h...

Page 99: ...or is 30 00 1E Data 03 04 Minor is 3 00 03 Data 05 0010 0010 in binary 22 Total ma 00 00 00 1E 00 03 22 Acknowledgement a Set ID OK Data00 Data01 Data02 Data03 Data04 x a Set ID NG Data00 x 2 22 2 C C...

Page 100: ...All manuals and user guides at all guides com...

Reviews: