background image


ZENN

iO

 AVANCE Y TECNOLOGÍA 


vwww.zennio.com 


12 

12 

arrow, thus avoiding carrying out repeated presses over the entire sequence. A long press over any 

arrow button does not imply a shifting. 

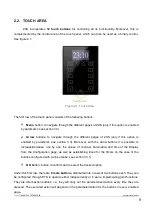
After  a  period  without  navigating  through  the  panel  or  pressing  the  touch,  the 

Screensaver

  is 

shown  (if  configured).  This  is  a  special  ZAS  page,  which  will  appear  after  an  inactivity  period, 

configured  by  parameter,  and  where the  current time,  the  temperature  of  the room  or  both  values 

will be shown, alternately. (See section 3.3.5 for further information). 

Note:

  Take  into  account  that,  after  a  KNX  bus  failure,  the  page  that  will  be  shown  is  Page  1,  no 

matter  which  the  active  page  was  before  the  failure.  Moreover,  if  the  active  page  is  other  than  1, 

after 45 seconds of inactivity ZAS will automatically switch to page 1 (only if the screensaver has not 

been enabled or has not been triggered yet). 
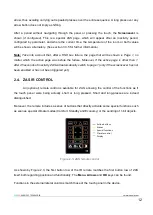
2.4.  ZAS IR CONTROL 

An  (optional)  remote control  is  available  for  ZAS,  allowing  the  control  of  the functions  as  if 

the  touch  panel  were  being  actually  short  or  long  pressed.  Short  and  long-presses  are  indeed 

distinguished. 

Moreover, the remote includes a series of buttons that directly activate some special functions such 

as scenes, special climate modes (Comfort, Standby and Economy) or the sending of 1-bit objects. 


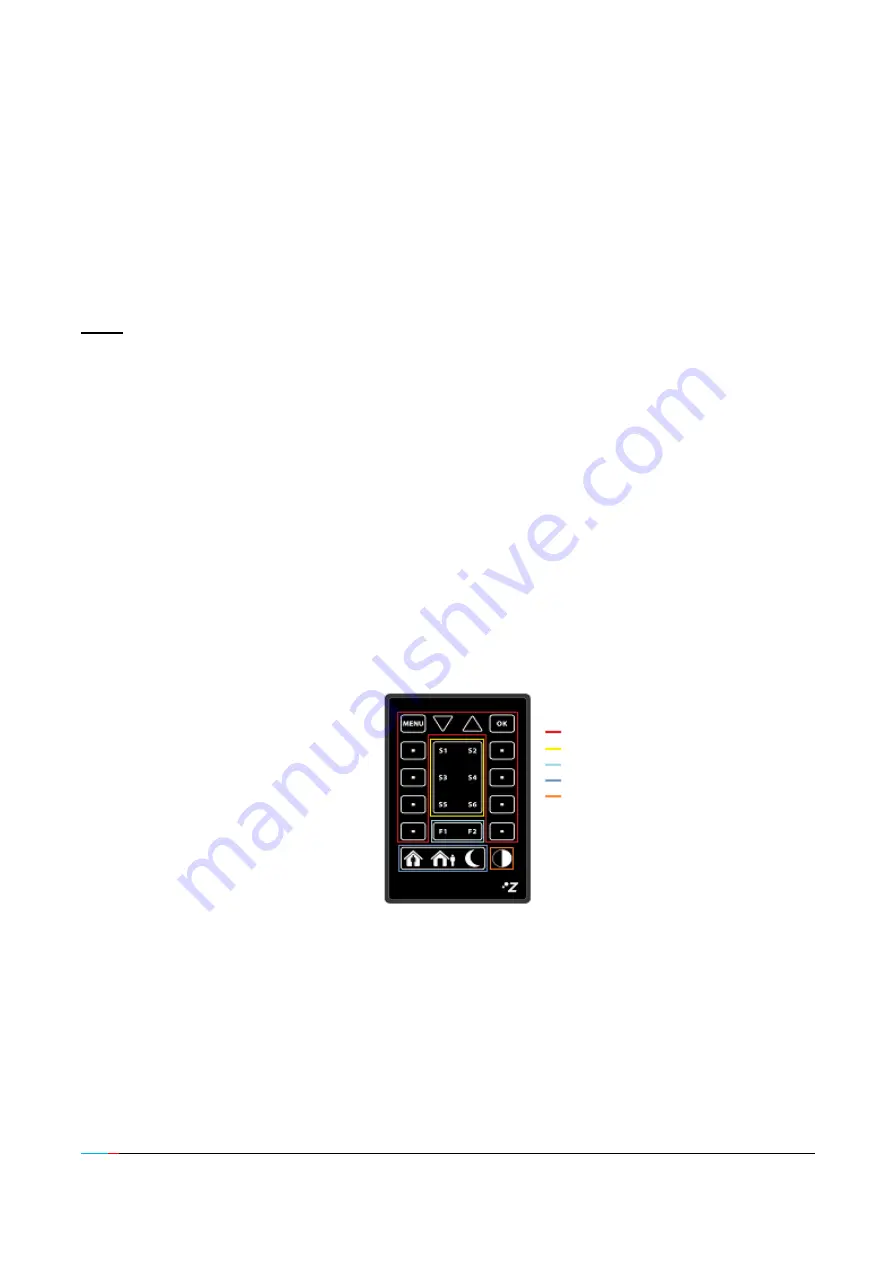
Figure 2.3. ZAS remote control 

As  shown by Figure 2.3, the first  button row of the IR remote matches the first  button row of ZAS 

itself, both regarding position and functionality. The 

Menu

Arrows 

and 

OK

 keys can be found. 

Functions in the external lateral columns match those of the touch panel in the device. 

Action buttons 
Scenes 
Special functions 
Climate control 
Display 

Summary of Contents for Roll-ZAS

Page 1: ...Roll ZAS KNX Room Controller ZN1VI TPZAS Program version 1 1 Manual edition a PRODUCT MANUAL...

Page 2: ...Parameterization 14 3 1 Default configuration 14 3 2 General 15 3 3 Pages 21 3 3 1 Pages 1 4 23 a Pair buttons 24 b Individual buttons 28 3 3 2 Configuration page 30 3 3 3 Security page 32 3 3 4 Indic...

Page 3: ...s in the factory defaults Possibility to enter the programming mode from the buttons of the touch panel 6 Section 2 4 note added on the use of the remote control 13 Section 3 3 screenshot updated info...

Page 4: ...te shutters lights scenes etc Figure 1 1 ZAS Room Controller The most relevant features of ZAS are shown below 1 8 back lighted display with 128 x 64 pixels Temperature sensor with thermostat function...

Page 5: ...erent actions according to the ETS configuration Moreover starting with version 1 1 it is also possible to use the central area of the touch panel as an additional binary control providing the user wi...

Page 6: ...touch interface itself In the factory default state after being connected to the KNX bus and prior to any type of download the device will show a certain interface with almost no functionality at all...

Page 7: ...screen will indicate the button to be pressed each time only if a text string associated to this process has been previously configured in ETS under General Labels See section 3 2 Figure 1 3 Calibrat...

Page 8: ...nd Screensaver All of them are explained in detail in section 3 3 Pages of this manual The access and navigation through the configured pages is explained in section 2 3 Inputs ZAS incorporates 2 opto...

Page 9: ...ee section 3 3 Moreover with the arrow buttons it is possible to increase decrease one by one the values of contrast illumination and time of the Display from the Configuration page as well as establi...

Page 10: ...h the corresponding object 2 3 PAGE NAVIGATION The Roll ZAS application has an intuitive user interface that allows through the use of pages knowing at any time the chosen functionality for every butt...

Page 11: ...ery enabled button can be intuitively identified Moreover to identify which button has been pressed the corresponding icon will be drawn with the colour inverted for example in Figure 2 2 the button t...

Page 12: ...ter 45 seconds of inactivity ZAS will automatically switch to page 1 only if the screensaver has not been enabled or has not been triggered yet 2 4 ZAS IR CONTROL An optional remote control is availab...

Page 13: ...omfort Standby and Economy they allow directly setting the special climate mode Comfort Standby and Economy It is necessary that these modes have been implemented in ETS in order to active them from t...

Page 14: ...n the following sections there is a detailed explanation about each of the different functionalities of MAXinBOX 16 in ETS 3 1 DEFAULT CONFIGURATION This section shows the default parameterization the...

Page 15: ...o configure the screensaver configuration Inputs destined to enable and configure each input of the controller individually Thermostats destined to enable and configure each thermostat of the controll...

Page 16: ...nsaver mode or keeping the default levels these values are Normal luminosity 10 and Screensaver luminosity 7 To customize this luminosity level the following options appear Figure 3 4 Luminosity optio...

Page 17: ...a LED whenever the value 1 is received This option may be useful when connecting ZAS to a presence detector so that when it detects movement in the room to be controlled it sends the value 1 through...

Page 18: ...through the object General Central button while unlocked Lock IR as well option to lock the remote control at the same time as the touch panel Yes In this case presses over the remote will not be take...

Page 19: ...emote control is not possible but it is by pressing the same buttons in the touch panel Presses over the other action buttons will provoke an automatic switch to page 1 and the corresponding action wi...

Page 20: ...ommunication object is enabled IR Special mode which will send to the remote thermostat the value of the button pressed 1 for Comfort 2 for Standby and 3 for Economy IR locking locking the remote cont...

Page 21: ...nal Sensor Overheating and Internal Sensor Overcooling which will indicate with the value 1 if the corresponding limit has been exceeded It is necessary to define the overheating or the overcooling te...

Page 22: ...t button will send an ON increase order while a pressing on the left button sends an OFF decrease order or the opposite The pages to be enabled and configured are Pages 1 4 Configuration page Security...

Page 23: ...er to Page 1 but they are exactly the same for the rest of the pages 2 4 Figure 3 9 Page 1 Configuration First of all the Header parameter is shown where it is possible to establish an identifying tex...

Page 24: ...dependent both LEDs lighting both LEDs will stay on or off simultaneously depending on the value of the object Dimmer 3 communication objects are enabled Px Byz Light On Off a 1 bit object to switch o...

Page 25: ...op shutter and one 1 byte object Px Byz Shutter position which sets the position of the shutter in percentage at any time 0 Top 100 Bottom In the Display between both buttons the status sent from the...

Page 26: ...buttons will make the different labels alternate in the display sending to the bus the numeric value associated to the final label The first press will always show the current value of the control A c...

Page 27: ...Byz Temperature indicator which will receive the value 20 and 95 C to be represented in the Display every time a button of the pair is pressed Multimedia control Only available for pair buttons in Pag...

Page 28: ...Release under this mode the KNX bus will be sent a binary value 0 or 1 through the 1 bit object Px Byz Binary control Hold while the corresponding button is held and the same value or another one whe...

Page 29: ...the status object of the light actuator so that the LED lighting status is always up to date Timer this functionality allows sending to the KNX bus a binary value 1 or 0 or a scene number at a certain...

Page 30: ...n is performed directly from the Display by long pressing the corresponding button In this configuration mode a digital clock is shown with the hh mm format where to configure the time at which the va...

Page 31: ...thing to be modified is the hour by means of the Arrow buttons Then via the OK button or the Hour button itself the focus goes to the Minutes that can be adjusted with the Arrow buttons To confirm the...

Page 32: ...fies the Security page and that will be shown in the left upper area of the display when accessing that page The first parameter to be configured is the number of the security levels to perform being...

Page 33: ...h panel in execution time The configured security level may be modified in Execution time through the Security page in the Display see Figure 3 12 Figure 3 12 Security page Display Buttons 1 4 allow h...

Page 34: ...lue received by the Ind x 1 byte indicator object Scaling shows in the Display the value received by the Ind x Scaling indicator object Enumeration allows the definition of up to 6 discrete values wit...

Page 35: ...of inactivity greater than 45 seconds ZAS will switch to Page 1 automatically Moreover the luminosity level of the Display can be configured being the possible options Always lighting the Display rema...

Page 36: ...nsor it is necessary to select the actions to perform on the arrival of one falling edge and on the arrival of one rising edge Figure 3 14 Input Switch Sensor The available options are Rising edge for...

Page 37: ...new 1 bit communication object Ix Lock is deployed making it possible to lock and unlock the corresponding input with one 1 or one 0 respectively During the time the input is locked orders received f...

Page 38: ...enths of a degree Temperature protection permits enabling overheating overcooling or both protections Depending on the chosen protection one or two communication objects will be enabled Ix Overheating...

Page 39: ...n the behaviour and the ETS parameterization of them please consult the specific documentation Motion Detector available at http www zennio com 3 5 THERMOSTATS The possibility to controlling up to 2 i...

Page 40: ...nce simulation After enabling the presence simulation in ETS two new 1 bit communication objects will be shown Sim Presence Simulation and Sim Simulation Channel The first one allows activating or dea...

Page 41: ...hich the presence simulation begins or finishes provided that the functionality has been enabled by a 1 through the object Sim Presence simulation Note The start and the finish times must be different...

Page 42: ...0 1 Minus Plus Down Up Left Right Stop Play Icons for pair buttons they are the same as for individual buttons but they appear grouped in pairs The left one will be shown on the left button of the pa...

Page 43: ...e float value BUTTONS 6 37 1 bit 1 byte 2bytes I O Several 0 1 0 255 20 95 C 0 100 0 6553 5 P1 By Individual Buttons Page 1 Several Functionings P1 Byz Pair Buttons Page 1 Several Functionings 38 69 1...

Page 44: ...Indifferent Indifferent General Touch block 1 Block 0 Nothing 0 Block 1 Nothing 140 1 bit I W 0 1 Indifferent Indifferent General Touch unblock 0 Unblock 1 Nothing 1 Unblock 0 Nothing 141 1 bit O T 0...

Page 45: ...rcool 157 158 1 bit O TR 0 1 0 Last Ix Overheating 1 Overheat 0 No Overheat 160 161 1 bit O RT 0 1 State dependant State dependant Ix Probe error 1 Error 0 No Error 216 218 1 bit O T 0 1 0 0 Ix Shortc...

Page 46: ...ndby Economy or Protection 0 Nothing 1 Trigger Tx Special Mode x x Comfort Standby Economy or Protection 0 Off 1 On 176 177 1 bit I W 0 1 0 Last Tx Window status input 0 Closed 1 Opened 178 179 1 bit...

Page 47: ...2 203 1 bit O RT 0 1 As Param As Param Tx ON OFF Status 0 Off 1 On 204 206 1 bit O RT 0 1 0 Last Tx Control variable Cool PI control PWM Tx Control variable Cool 2 point control 205 207 1 bit O RT 0 1...

Page 48: ...48 ZENNIO TECHNICAL DOCUMENTATION BECOME USER http zennioenglish zendesk com TECHNICAL SUPPORT...

Reviews: