background image

9

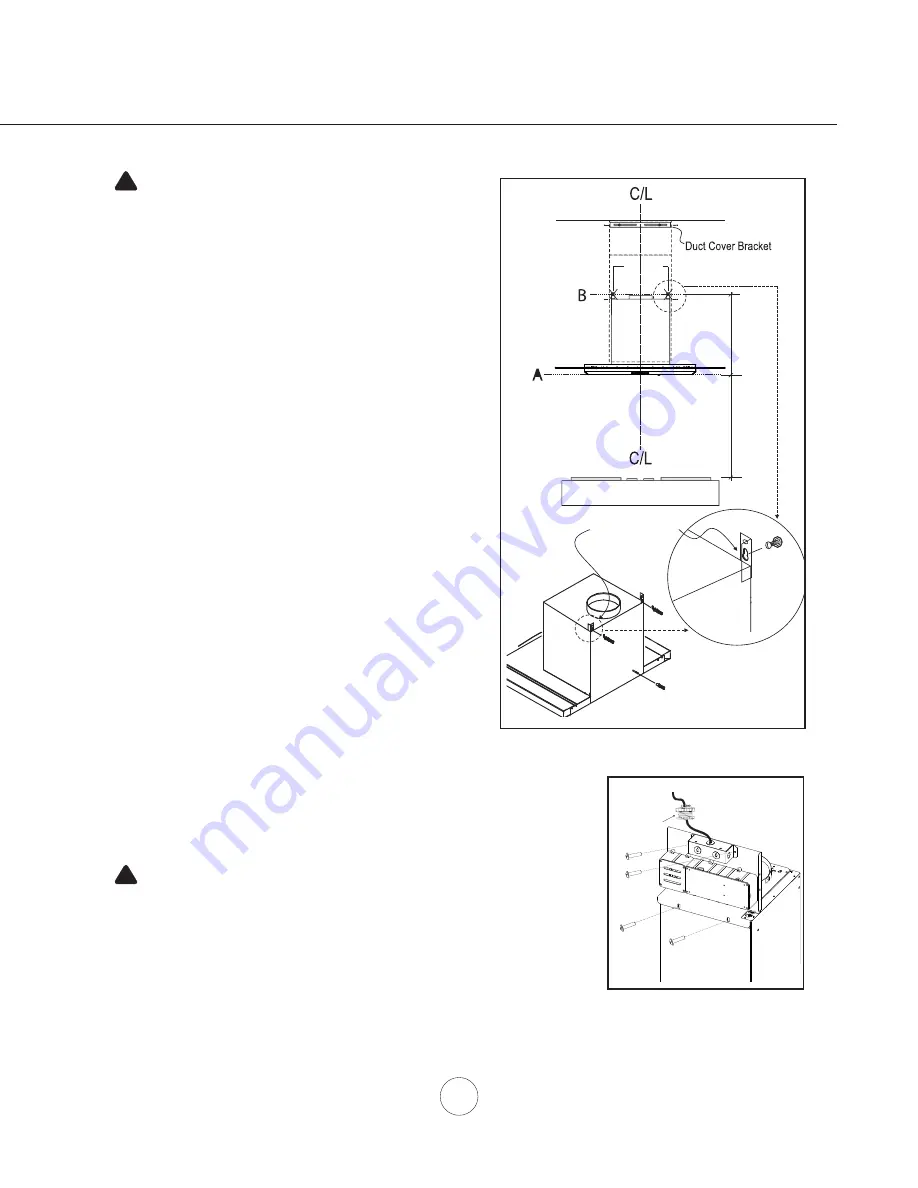
 0HDVXUHIURPUDQJHWRSWRKRRGERWWRPDQGPDUNOLQH$´

PLQLPXPIURPUDQJHWRS

2.  Plum and mark center line.

 0DUNPRXQWLQJKHLJKWOLQH%´IURPOLQH$

 0DUNPRXQWLQJVSUHDGIURP&/´

 )DVWHQ0[´VFUHZVLQWRVWXGVRQOLQH%EXWGR

not tighten all the way.  

Note: Wood blocking may need 

to be added behind the drywall if no studs are present.  
Wall anchors may also be used but check local codes 
for compliance. Failure to use suitable wall anchors 
and screws to hold the weight of the hood could result 
in personal injury or damage to the cooking surface or 
counter.

5HPRYHWDSHDQGVFUHZVVHFXULQJHOHFWURQLFVPRXQWLQJ

bracket to hood. Reposition electronics mounting bracket as 

VKRZQLQ),*%DQGVHFXUHWRPRWRUKRXVLQJXVLQJWKH

previously removed screws.

5HPRYHVFUHZVVHFXULQJHOHFWULFDOMXQFWLRQER[WR

HOHFWURQLFVPRXQWLQJSODWH5HPRYHMXQFWLRQER[),*%

 5HPRYHWKHDOXPLQXPPHVK¿OWHUV

9.  Hang hood onto the mounting screws and hand tighten each 

VFUHZ),*$6HFXUHWKLUG0[´VFUHZWKURXJKLQVLGH
RIKRRGLQWRZDOOIRUH[WUDVXSSRUW),*$

10.  Center and attach duct cover mounting bracket to wall just 

EHORZWKHFHLOLQJRUVRI¿WXVLQJ0[´VFUHZV

11.  Install electrical and duct work.  Seal duct work with aluminum 

duct tape. Re-install electrical junction box with cable lock and 

LQVWDOOWKHHOHFWULFDO),*%

12.  Power up hood and check for leaks around duct tape.

3ODFHWHOHVFRSLFGXFWFRYHUVRQWRKRRGDQGH[WHQGLQQHUWRS

duct cover upwards and secure to duct cover

EUDFNHWXVLQJ

M3.5 x 8 screws. 

5HLQVWDOODOXPLQXPPHVK¿OWHUV

* If using hood in recirculating mode you must secure the air diverter 

plate onto wall before installing duct work and duct covers.  Turn 
to page 10 for more details.

11 1/8”

14 3/4”

Brackets are 

pre-installed

1

2

26” min

CAUTION: At least two installers are

required due to the weight and size of the
hood.

!

WARNING: Electrical wiring must be done by a qualified person(s) in

accordance with all applicable codes and standards. This range hood must be
properly grounded. Turn off electrical power at service entrance before wiring.

!

Installation – 

Mounting the Hood

Cable Lock

2

Motor Housing

1

3

Cable Lock

$FDEOHORFNLQJFRQQHFWRUQRWVXSSOLHGPLJKW

be required by local codes.  Check with local 
requirements and codes, purchase and install 
appropriate connector if necessary.

FIG. A

FIG. B

Summary of Contents for Verona ZVO-E30AG

Page 1: ...Installation Guide www zephyronline com Model number Serial Number APR14 0701 Zephyr Corporation For use with models of serial numbers beginning with 21 Air ow Control Technology TM C Verona ZVO E30A...

Page 2: ...www zephyronline com...

Page 3: ...rance 6 Ducting Options 7 RRG 6SHFL FDWLRQV 8 Mounting the Range Hood 9 Ductless Recirculating 10 FEATURES CONTROLS Touch Controls 11 User Interface 12 MAINTENANCE Hood and Filter Cleaning 13 TROUBLES...

Page 4: ...are and utensils appropriate for the type of and amount of food being prepared WARNING TO REDUCE THE RISK OF INJURY TO PERSONS IN THE EVENT OF A RANGE TOP FIRE OBSERVE THE FOLLOWING D 6027 5 0 6 ZLWK...

Page 5: ...or CSA standards C22 1 94 Canadian Electrical Code Part 1 and C22 2 No 0 M91 latest edition and all local codes and ordinances I FRGHV SHUPLW DQG D VHSDUDWH JURXQG ZLUH LV XVHG LW LV UHFRPPHQGHG WKDW...

Page 6: ...le connector if required by local codes Duct cover extension accessory Recirculating kit accessory HARDWARE PACKAGE CONTENTS MODELS ZVO E30AG ZVO M90AG PARTS SUPPLIED 1 Hood with internal blower 2 Alu...

Page 7: ...1 Duct pieces T otal Equivalent number length x used 6 8 Round wall cap with damper 30 Ft x Ft Round wall cap with damper 30 Ft x Ft 7 or 8 Round 900 elbow 15 Ft x Ft 7 or 8 7 or 8 Round 450 elbow 9 F...

Page 8: ...HUIRUPDQFH DQG HI FLHQF If available also refer to range manufacturer s height clearance requirements and recommended hood mounting height above range Always check your local codes for any differences...

Page 9: ...ing option Use single wall rigid Metal ductwork only DVWHQ DOO FRQQHFWLRQV ZLWK VKHHW PHWDO VFUHZV DQG WDSH DOO MRLQWV Z FHUWL HG 6LOYHU 7DSH RU XFW 7DSH Some Ducting Options Installation Ducting Opti...

Page 10: ...WLRQV side of hood front of hood top of hood STANDARD min ducted 26 1 2 min recirc 31 max 50 Z1C 00VO min ducted 41 1 2 min recirc 46 max 80 12 13 16 22 1 16 2 5 8 7 15 16 4 1 8 6 1 16 AC In 12 13 16...

Page 11: ...er mounting bracket to wall just EHORZ WKH FHLOLQJ RU VRI W XVLQJ 0 VFUHZV 11 Install electrical and duct work Seal duct work with aluminum duct tape Re install electrical junction box with cable lock...

Page 12: ...LW LQFOXGHV FKDUFRDO OWHUV FKDUFRDO OWHU EUDFNHW DQG DLU GLYHUWHU SODWH Hood Model Part No Filters in Pkg ZVO E30AG ZVO M90AG ZRC 00VO 2 1 Purchase recirculating kit per the part number above 6HFXUH...

Page 13: ...e displayed on the LCD 2 Speed Selection Button Fan Speed Decrease Button Press this button to decrease fan speed 6 burst 5 4 3 2 1 If fan is On Speed 1 and this button is pressed fan will power Off F...

Page 14: ...ing it is time to replace the charcoal filter Graphic and words will remain illuminated until reset To reset With hood off hold the Button for three seconds after three seconds the Graphic and words r...

Page 15: ...OWHU RXW UHVLGXH DQG JUHDVH IURP cooking They need not be replaced on a regular basis but are required to be kept clean IWHU KRXUV RI XVH WKH ZRUGV FOHDQ PHVK OWHU ZLOO LOOXPLQDWH RQ WKH FRQWURO VFUHH...

Page 16: ...d is not secured in place 3 Check the installation of the hood The unit is whistling 7KH OWHU LV QRW LQ WKH FRUUHFW SRVLWLRQ GMXVW WKH OWHUV XQWLO WKH ZKLVWOLQJ VWRSV 2 The duct pipe connections are n...

Page 17: ...set the maximum blower speed to RQH RI WKUHH PRVW FRPPRQO VSHFL HG 0 OHYHOV RU 0 7KH XVDJH RI 7 PD QRW EH necessary for your installation Please check your local codes for CFM restrictions By default...

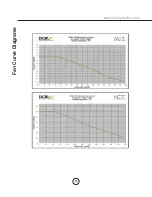
Page 18: ...16 www zephyronline com Fan Curve Diagrams...

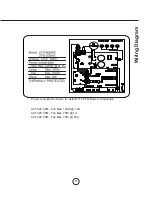
Page 19: ...17 4 A Wiring Diagram 3RZHU FRQVXPSWLRQ VKRZQ IRU GHIDXOW 0 EORZHU FRQ JXUDWLRQ ACT 590 CFM Fan Max 130W 1 8A ACT 390 CFM Fan Max 70W 1A ACT 290 CFM Fan Max 35W 55A...

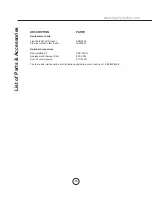
Page 20: ...RT Replacement Parts LJKW XOE HDFK OXPLQXP 0HVK LOWHU HDFK Optional Accessories Recirculating Kit ZRC 00VO Replacement Charcoal Filter Z0F C002 Duct Cover Extension Z1C 00VO To order parts visit us on...

Page 21: ...rst year from the date of your original purchase you are also responsible for all labor costs associated with this warranty Limitations of Warranty OUR OBLIGATION TO REPAIR OR REPLACE AT OUR OPTION SH...

Page 22: ...o de mod le _________________ Num ro de s rie _________________ APR14 0401 Zephyr Corporation Pour une utilisation avec des mod les de num ros de s rie commen ant par 21 Air ow Control Technology TM C...

Page 23: ...www zephyronline com...

Page 24: ...llation pour le conduit 7 6SpFL FDWLRQV GH OD KRWWH 8 Montage de la hotte 9 12 Reprise d air sans conduit 13 COMMANDES RPPDQGHV j HI HXUHPHQW 14 Interface utilisateur 15 ENTRETIEN 1HWWR DJH GHV OWUHV...

Page 25: ...e de cuisine et des ustensiles convenant au type et la quantit de nourriture que vous pr parez AVERTISSEMENT POUR R DUIRE LES RISQUES DE BLESSURE LORS D UN INCENDIE SUR LA SURFACE DE CUISSON a TOUFFEZ...

Page 26: ...national de l lectricit la plus r cente dition du ANSI NFPA 70 ou des normes du CSA C22 1 94 le Code canadien de l lectricit section 1 la plus r cente dition du code C22 2 No 0 M91 ainsi que tous les...

Page 27: ...le conduit 1 Bo tier de la hotte avec ventilateur pr install 1 Filtres tamis en aluminium 4 Ampoules DEL 3W 1 Registre circulaire de 8 pr install MOD LES ZVN M90AG ZVN E42AG PI CES FOURNIES CONTENU D...

Page 28: ...gth x used 6 8 Round wall cap with damper 30 Ft x Ft Round wall cap with damper 30 Ft x Ft 7 or 8 Round 900 elbow 15 Ft x Ft 7 or 8 7 or 8 Round 450 elbow 9 Ft x Ft Ft Ft Ft 6 8 Round roof cap 30 Ft x...

Page 29: ...ez les exigences de hauteur d espace libre requise par le fabricant de la cuisini re ainsi que la hauteur recommand e de montage de la hotte au dessus de la surface de cuisson Informez vous toujours d...

Page 30: ...utilis e N utilisez que des conduits en m tal pour cloison simple Fixez toutes les pi ces du conduit avec des vis t le et isolez tous les joints avec du ruban adh sif en toile ou du UXEDQ Up HFWHXU FH...

Page 31: ...min avec conduit 28 1 2 min avec reprise d air 32 max 50 Z1C 00VN min avec conduit 42 min avec reprise d air 46 1 2 max 80 1 2 12 3 4 27 7 16 2 11 16 12 15 16 35 7 16 41 15 16 11 1 16 14 3 16 8 1 4 7...

Page 32: ...laissez d passer environ 1 4 2 3UpSDUDWLRQ GH OD KRWWH QOHYH OHV YLV TXL UHWLHQQHQW OHV FDGUHV GH DWLRQ VXSpULHXU HW LQIpULHXU HQVHPEOH MXVWH OH FDGUH GH DWLRQ VHORQ OD KDXWHXU G LQVWDOODWLRQ GpVLUpH...

Page 33: ...HX FRLQV UHVWDQWV GX FDGUH GH DWLRQ VXSpULHXU SRXU OH HU solidement au plafond Serrez les vis HV SDWWHV GH VXSSRUW ODWpUDOHV GRLYHQW rWUH pHV DX GHX EUDV GX FDGUH GH DWLRQ VXSpULHXU HW DX EUDV FRUUHVS...

Page 34: ...GH DWLRQ LQIpULHXU DLWHV OH JOLVVHU YHUV OD SDUWLH pWURLWH GHV HQFRFKHV HQ WURX GH VHUUXUH SRXU OH HU HQ SODFH 6HUUH FKDTXH YLV j OD PDLQ SRXU HU OD KRWWH DX FDGUH GH DWLRQ LQIpULHXU L H XQH YLV GH V...

Page 35: ...3 Assemblez les pi ces de recouvrements inf rieures l aide de trois vis M3 x 6 par c t Les pi ces de recouvrements inf rieures reposeront sur la partie sup rieure du bo tier de la hotte FIG J 3 14 Ins...

Page 36: ...GH OWUHV j FKDUERQ HW XQ Gp HFWHXU G DLU 0RGqOH GH KRWWH 1XPpUR GH SLqFH LOWUHV SDU SDTXHW ZVN M90AG ZRC 00VN 1 ZVN E42AG ZRC 00VN 1 1 Procurez vous l ensemble de reprise d air en utilisant le num ro...

Page 37: ...h sur l cran LCD 2 Touche de choix de vitesse Touche de r duction de la vitesse du ventilateur Appuyez sur ce bouton pour r duire la vitesse du ventilateur 6 Rafale 5 4 3 2 1 Si le ventilateur est la...

Page 38: ...nitialisation de la fonction Pour r initialiser Lorsque la hotte est teinte appuyez et tenez la touche enfonc e pendant trois secondes Apr s trois secondes le symbole et les mots replace charcoal filt...

Page 39: ...PLQLXP LQVWDOOpV SDU OH IDEULFDQW RQW SRXU IRQFWLRQ GH OWUHU OHV UpVLGXV HW OD JUDLVVH de cuisson Ils ne n cessitent aucun remplacement sur une base r guli re mais doivent tre gard s propres SUqV KHXU...

Page 40: ...FH 9pUL H O LQVWDOODWLRQ GH OD KRWWH 4 Tableau de contr le commande d fectueux 4 Remplacez la pi ce d fectueuse Les niveaux de vitesse de OD VRXI HULH OH m me son 1 Utilisation de la mauvaise taille d...

Page 41: ...ventilateur l un des trois les plus couramment prescrits niveaux de CFM 590 390 ou 290 CFM L utilisation de l ACT peut tre pas n cessaire pour votre installation S il vous pla t YpUL H YRV FRGHV ORFD...

Page 42: ...19 Courbe de rendement du ventilateur 390 CFM Entree en CA 120V 60 Hz Diametre du conduit de sortie 8 Pression en TQ Debit pi3 min Tableau De Rendement Du Ventilateur...

Page 43: ...20 6FKpPD GH FkEODJH 4 A RQVRPPDWLRQ PRQWUp SRXU GpIDXW GH FRQ JXUDWLRQ GX YHQWLODWHXU 0 ACT 590 CFM Ventilateur Max 130W 1 8A ACT 390 CFM Ventilateur Max 70W 1A ACT 290 CFM Ventilateur Max 35W 55A...

Page 44: ...50200049 Accessoires optionnels Ensemble de reprise d air ZRC 00VN Filtre charbon de remplacement Z0F C002 Ensemble de prolongement de recouvrement de conduit Z1C 00VN Pour des plafonds allant jusqu 1...

Page 45: ...responsable de tous les frais de main d uvre associ s la pr sente garantie Restrictions de la garantie NOTRE OBLIGATION DE R PARER OU DE REMPLACER NOTRE GR LE PRODUIT CONSTITUE VOTRE SEUL ET UNIQUE R...

Reviews: