Z 2500-130/150
16
Before installation
www.zepro.com
3.6
Temporary connection
When the tail lift is installed, it is sometimes necessary to operate its functions in order to change the posi-
tion of the cylinders and the lift arms. Temporarily connect the lift to enable the lift functions.
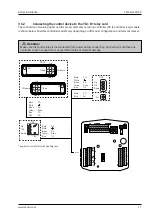
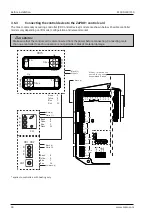
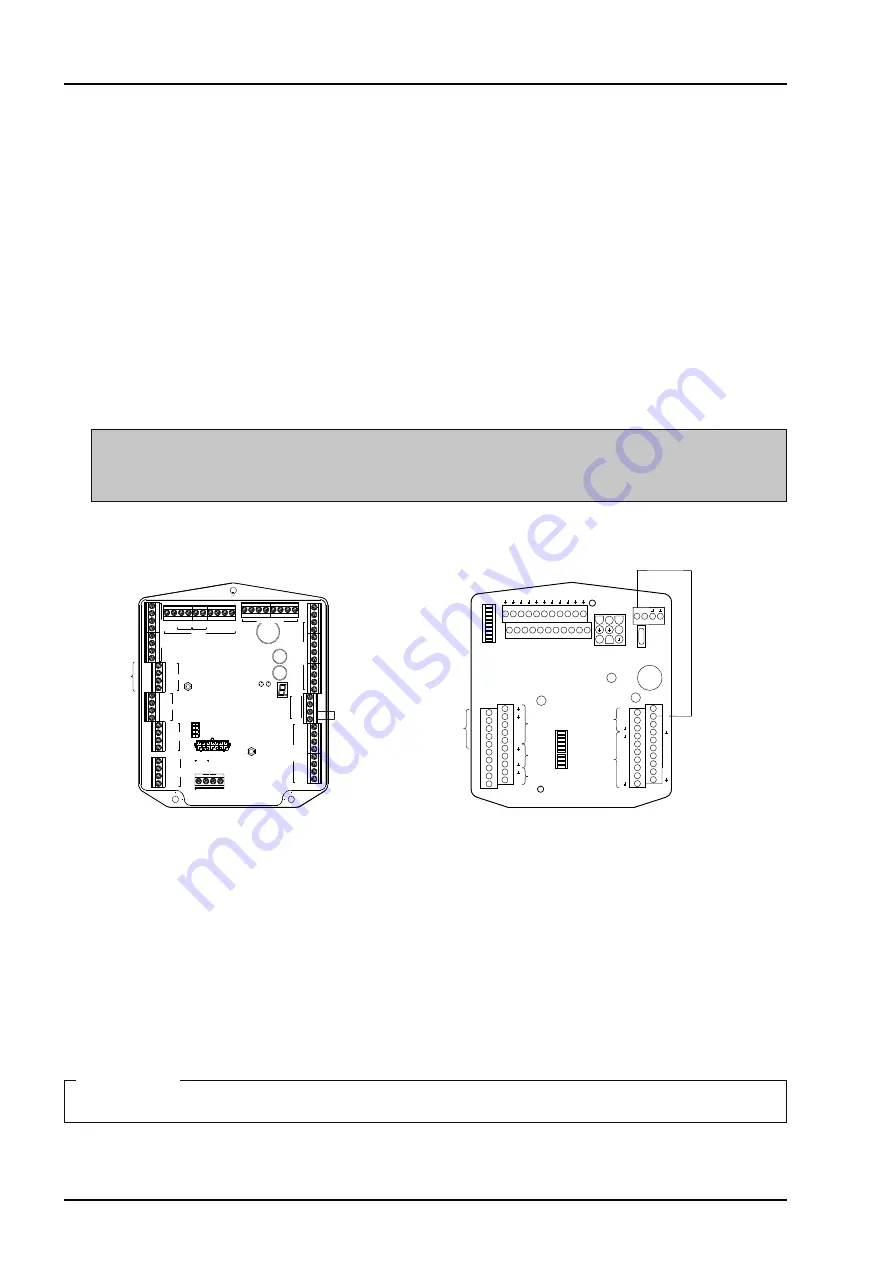
1. Connect a suitable control device to Ctrl 1/C1, see
3.6.2
/
3.6.3
.
2. Connect the +12/24V battery to the tail lift’s main power cable.
3. Connect the negative battery terminal to the tail lift’s earth cable (GND).
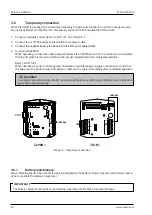
4. Control card ZePRO1:
When operating, connect the cable (jumper) between the CSPWR and CS on the control card to simulate
that the CS switch is turned on. Remove the jumper immediately after completed operation.
Relay card TLC-B1:
When operating, connect a cable (jumper) between an available power supply connection (+) and CS on
the relay card to simulate switch CS being on. Remove the cable immediately after completed operation.
m
WARNING!
Take great care while running the lift functions and make sure nothing gets pinched: risk of personal
injury and material damage.
Ctrl 4
Spiral
Ctrl 3
Radio
Ctrl 2
Ctrl 1
C
on
tr
l P
ow
er
Sensor Power
G
ro
un
d
IN OUT
Ai 1
Ai 2
Di 1
Di 2
Di 3
Di 4
Di 5
Di 6
PA-
PA+
CSPWR
CS
+
B
E
C
2H1
B
E
C
2H2
B
E
C
Lock
B
E
C
Lock
U
7
U
6
U
5
U
4
U
3
U
5
U
4
U
2
U
1
U
0
Ctrl 6
O
ut
In GND LLED
Ctrl 5
Outputs
S
en
so
rs
Image 21.
T
emporary connection
3.6.1
Battery maintenance
When installing the lift, when the lift is operated repeatedly, the battery charger must be used between opera-
tions to maintain the battery charge level.
The battery charger must not be connected when operating the lift. Risk of material damage.
IMPORTANT
!
WL1 U7 U6 U5 U5 U4 U4 U3 U2 U1 U0
+
+
WL2
PA+
S5
S1+
S4
S3
S2
S1
S5+
S4+
S3+
S2+
PA-
CS+
Down
2H
Out
Down
Down
C1+
C1+
Up
Tilt
In
C2+
Up
Tilt
C3+
Up
CS
+
U1
U2
U3
U0
+
ZePRO1
TLC-B1
Jumper
Jumper
Ctrl 1
C1
Summary of Contents for Z 2500-130
Page 2: ......
Page 63: ...Z 2500 130 150 Specifications 63 www zepro com...


