EN
11
Fa
Fc
Fd
Fb
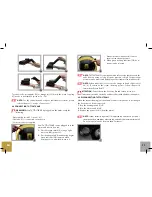
To connect the rectangular (36) or triangular (33) brush, the brush coupling
(37) needs to be attached (pictures Fa - Fd).
NOTE: For the connection and usage of individual accessories, please
refer to chapter 11 “Usage of accessories”.
9.4 CONNECTING TUTTOSTEAMY
WARNING! Before TUTTOSTEAMY is plugged into the mains, verify the
following:
• Water is filled (min 0.5 l – max. 1.6 l)
• Flex tube (31) is connected to the device
• Correct accessory is applied
Now, TUTTOSTEAMY can be plugged into the
mains and start to be used.
1. Press the main switch (4), orange light
comes on (4B) (picture G).
2. Press heating switch (5) and heating begins.
Green indicator (5B) comes on when
heating process is finished (picture I).
Parallel pressure indicator (8) starts to
show current steam pressure.
3. When green heating indicator (5B) is on,
steam can be released.
NOTE: TUTTOSTEAMY is equipped with a safety valve that prevents the
valve from opening as long as steam pressure is high. Current steam
pressure can be monitored by looking at the steam pressure indicator (8).
NOTE: When water level is too low, the orange indicator light comes
on (6). To continue the steam cleaning process, follow chapter 10
instructions “Water Re-fill”
ATTENTION: Do not lift up the device by flex tube when it is in use.
Tuttosteamy must be on steady and flat surface with all wheels during use.
9.5 DISCONNECTING TUTTOSTEAMY
When the steam cleaning job is done and/or an accessory needs to be changed,
the device has to be disconnected.
1. Turn the heating switch (5) off.
2. Turn the main switch (4) off.
3. Remove the power cord (3) from the mains.
NOTE: Steam intensity regulator (10) adjustable positions: on position 1,
steam quantity is minimum, whereas in position 6 it is maximum (picture I).
Do not use position one for more than 5 minutes.


