background image

_16

Capture the skies.


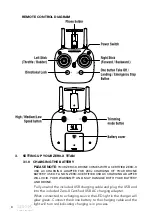
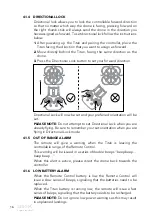
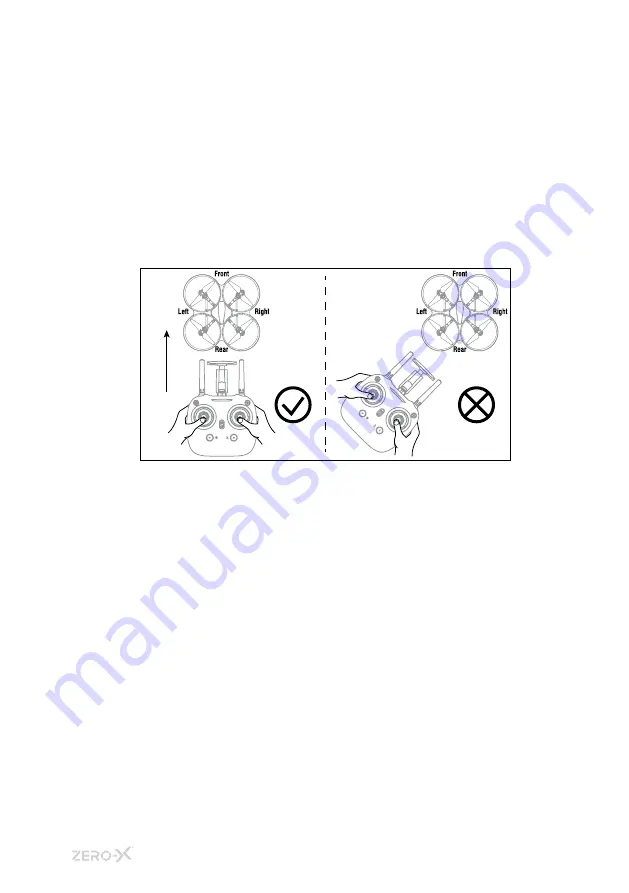
4.1.4  DIRECTIONAL LOCK


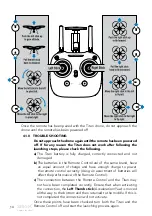
   Directional lock allows you to lock the controllable forward direction 

so that no matter which way the drone is facing, pressing forward on 

the right thumb stick will always send the drone in the direction you 

have assigned as forward. To set directional lock follow the instructions 

below.


1. 

 After powering up the Titan and pairing the controller, place the 

Titan facing the direction that you want to assign as forward.


2. 

 Move directly behind the Titan, facing the same direction as the 

drone.


3. 

 Press the Directional Lock button to set your forward direction.


   Directional Lock will now be set and your preferred orientation will be 

set.


PLEASE NOTE:

 Do not attempt to set Directional Lock when you are 

already flying. Be sure to remember your set orientation when you are 

flying in Directional Lock mode


4.1.5  OUT OF RANGE ALARM


The remote will give a warning when the Titan is leaving the 

controllable range of the Remote Control.


   This warning will be issued in a series of double beeps “beep beep…

beep beep…”.


   When this alert is active, please direct the drone back towards the 

controller.


4.1.6  LOW BATTERY ALARM


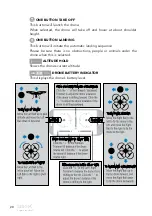
   When the Remote Control battery is low the Remote Control will 

issue a slow series of beeps, signalling that the batteries need to be 

replaced. 


   When the Titan battery is running low, the remote will issue a fast 

series of beeps, signalling that the battery needs to be recharged. 


PLEASE NOTE:

 Do not ignore low power warnings as this may result 

in unplanned landings.

Summary of Contents for Titan

Page 1: ...PRODUCT CODE ZX TTN v1 Capture the skies Extended Range Drone with Advanced Flight Systems DRONE USER MANUAL ...

Page 2: ......

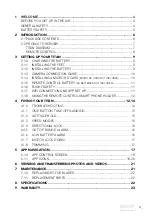
Page 3: ...RY AA BATTERIES NOT INCLUDED 11 3 1 6 FLIGHT SAFETY 11 3 1 7 WIFI CONNECTION AND APP SET UP 11 3 1 8 USING THE REMOTE CONTROL SMART PHONE HOLDER 12 4 FLYING YOUR TITAN 12 14 4 1 0 TROUBLESHOOTING 14 4 1 1 ONE BUTTON TAKE OFF LANDING 15 4 1 2 ALTITUDE HOLD 15 4 1 3 SPEED MODES 15 4 1 4 DIRECTIONAL LOCK 16 4 4 5 OUT OF RANGE ALARM 16 4 1 6 LOW BATTERY ALARM 16 4 1 7 MOTOR LOCK DOWN 17 4 1 8 TRIMMING...

Page 4: ...ead carefully and understand this information as operating a drone outside of these guidelines may result in legal issues Zero X takes no responsibility for operation of this product outside of what is legally permissible in your local area Do not fly your Titan any closer than 30 metres from people animals or buildings Check to make sure you are no closer than 5 5 kilometres from any airfields or...

Page 5: ... the batteries when charging Do not leave batteries in direct sunlight After each flight or crash please check battery for any damage or swelling If the battery is damaged leaking making noise punctured or malformed in any way DO NOT attempt to use it Please dispose of the battery immediately and safely in the correct manner Do not bend puncture crush or scratch the drone s battery Do not store ba...

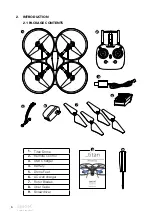
Page 6: ..._6 Capture the skies 2 INTRODUCTION 2 1 PACKAGE CONTENTS 2 9 8 1 4 5 7 6 3 1 Titan Drone 2 Remote Control 3 USB Charger 4 Battery 5 Drone Feet 6 AC wall charger 7 Rotor Blades 8 User Guide 9 Screwdriver ...

Page 7: ...Capture the skies 7_ 2 2 PRODUCT OVERVIEW TITAN DIAGRAM ...

Page 8: ...OF A NON ZERO X CERTIFIED USB AC CHARGING ADAPTER WILL VOID YOUR WARRANTY AND MAY DAMAGE BOTH YOUR BATTERY AND DRONE Fully unwind the included USB charging cable and plug the USB end into the included Zero X Certified USB AC charging adapter When connected to a charging source the LED light in the charger will glow green Connect the drone battery to the charging cable and the light will turn red in...

Page 9: ...hat the battery is charged please remove the battery from the charger When connecting the USB cable with the battery make sure to follow the guides on the battery connector as these are designed to only be inserted in one direction Forcing the connection in the incorrect direction may cause damage to the battery and charging cable When flying the Titan low battery will be indicated when the remote ...

Page 10: ...ion ensuring that the camera is secure 2 To connect the Micro USB connection connect one end of the supplied cable to the camera while supporting the camera with your other hand Then Connect the other end of the micro USB cable to the Titan drone 3 1 4 INSTALLING A MICRO SD CARD 1 With the Titan facing away from you insert the Micro SD Card Micro SD Card not included into the side of the camera en...

Page 11: ... intended area of flight please consider an alternative location 3 1 7 WIFI CONNECTION AND APP SET UP To use your Apple or Android smart phone as a FPV screen you will need to wirelessly connect your smartphone to your Titan over WiFi This is done during the set up and launching of the Titan and requires you to have the Zero X Titan App installed 1 To find the Zero X Titan App search Zero X Titan ...

Page 12: ...e Titan should flash signalling no connection to the Remote Control 3 On your Android or Apple Smart phone open your WiFi settings and connect to the ZX Titan WiFi connection Once connection is made open the Zero X Titan app on your Smart phone 4 Position your phone in the remotes smart phone holder 5 Switch the remote controls power switch to the up On position The remote control should beep once...

Page 13: ...ying Your Titan process When calibrating the Titan please ensure that the Titan is on a level surface 8 Once the remote is paired and the Titan is calibrated the motors will need to be unlocked before you fly To unlock the motors move the left thumbstick to the right and downward position while also moving the right thumbstick to the left and downward position as shown in the diagram When done cor...

Page 14: ...Remote Control are of the same brand have an equal amount of charge and have enough charge to power the remote control correctly Using an assortment of batteries will affect the performance of the Remote Control c The connection between the Remote Control and the Titan may not have been completed correctly Ensure that when activating the connection the Left Thumb stick Acceleration Yaw is moved al...

Page 15: ...off land button The motors will stop completely and the Titan will fall to the ground PLEASE NOTE When using any land function make sure that there are no obstacles people or animals under the drone Do not use the emergency stop function unless it is an emergency situation as this will cause the motors to lock and the drone to free fall 4 1 2 ALTITUDE HOLD Altitude hold allows the drone to hover a...

Page 16: ...orientation will be set PLEASE NOTE Do not attempt to set Directional Lock when you are already flying Be sure to remember your set orientation when you are flying in Directional Lock mode 4 1 5 OUT OF RANGE ALARM The remote will give a warning when the Titan is leaving the controllable range of the Remote Control This warning will be issued in a series of double beeps beep beep beep beep When thi...

Page 17: ... As you are adjusting the trimming the beep tone will go lower the more that you trim in any directing PLEASE NOTE If Trimming is not fixing the drones drifting you may need to re calibrate your drone by turning off the drone and the controller and restarting the instructions in the Getting Started section of this manual 5 APP NAVIGATION Once you have connected your Smart phone to the Titan via Wi...

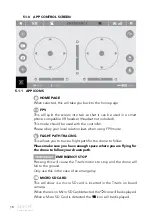
Page 18: ...ode FLIGHT PATH TRACING This allows you to trace a flight path for the drone to follow Please make sure you have enough space where you are flying for the drone to follow your drawn path EMERGENCY STOP Pressing this will cause the Titan s motors to stop and the drone will fall to the ground Only use this in the case of an emergency MICRO SD CARD This will show is a micro SD card is inserted in the...

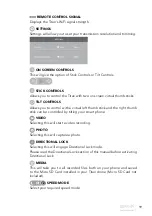
Page 19: ... to control with a virtual left thumb stick and the right thumb stick can be controlled by tilting your smart phone VIDEO Selecting this will start a video recording PHOTO Selecting this will capture a photo DIRECTIONAL LOCK Selecting this will engage Directional Lock mode Please read the Directional Lock section of this manual before activating Directional Lock MEDIA This will take you to all rec...

Page 20: ...nd hover at about shoulder height ONE BUTTON LANDING This button will initiate the automatic landing sequence Please be sure there is no obstructions people or animals under the drone when this is selected ALTITUDE HOLD Shows the drones current altitude DRONE BATTERY INDICATOR This displays the drone s battery level ...

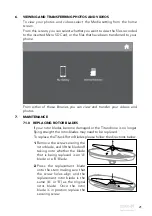
Page 21: ...E 7 1 0 REPLACING ROTOR BLADES If your rotor blades become damaged or the Titan drone is no longer flying straight the rotor blades may need to be replaced To replace the Titan s Rotor Blades please follow the directions below 1 Remove the screw securing the rotor blade and lift the blade off taking note whether the blade that is being replaced is an A blade or a B Blade 2 Press the replacement bl...

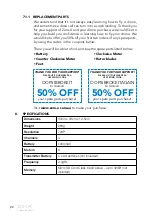
Page 22: ...e to find and buy the spare parts listed below Battery Clockwise Motor Counter Clockwise Motor Rotor blades Feet Visit www zero x com au to make your purchase 8 SPECIFICATIONS Dimensions 33cm x 33cm x 12 5cm Weight 280g Resolution 720P Channels 4 Battery 1000mAh Motors 4 Transmitter Battery 4 x AA batteries not included Frequency 2 4gHz Memory Micro SD Card Class 6 and above up to 32GB not include...

Page 23: ...tated on the packaging This warranty is only valid where you have used the product in accordance with any recommendations or instructions provided by Zero X This warranty excludes defects resulting from alterations of the product accident misuse abuse or neglect In order to claim the warranty you must return the product to the retailer from whichitwaspurchasedorifthatretailerispartofaNationalnetwo...

Page 24: ...www zero x com au www zero x co nz Zero X v1 0 2017 Capture the skies ...

Reviews: