14
5. MAINTENANCE
5.1 CLEANING:
Avoid exposing your Blitz drone and it’s accessories to dust, sand and
moisture as these can damage the Blitz drone. If the Blitz drone is exposed
to dust or sand, use a soft brush to remove any visible particles.
5.2 ROTOR BLADE INSTALLATION AND REPLACEMENT GUIDE:
To install or replace Rotor Blades on the Blitz please follow the Rotor Blade
replacement instructions below.
1.
There are two types of rotor blades that come with the Blitz drone,
clockwise blades, and counter clockwise blades. You will need two of
each blade to correctly set up the Blitz drone.
The blades are marked with the following codes on the top of the blades
to differentiate between clockwise and counter clockwise.
Clockwise 6045R | Counter 6045
2.
Pair each blade with an accompanying lock nut. Like the Rotor Blades
there are two types of lock nut as the lock nut will be tightened by
turning in the opposite direction that the blade spins.
The lock nut that is paired with the clockwise Rotor Blades (6045R) is
black and will be tightened by turning counter clockwise.
The lock nut that is paired with the counter clockwise Rotor Blades
(6045) is silver and will be tightened by turning clockwise.
3.
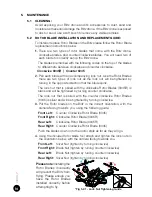
Put the Rotor blades on the Blitz in the correct orientation, with the
camera facing towards you, using the following guide:
Front Left:
Counter Clockwise Rotor Blade (6045)
Front Right:
Clockwise Rotor Blade (6045R)
Rear Left:
Clockwise Rotor Blade (6045R)
Rear Right:
Counter Clockwise Rotor Blade (6045)
Push the blades down onto the motor stalk as far as they will go.
4.
Using the included rotor blade tool attach and tighten the lock nuts in
the orientation below, with the camera facing towards you.
Front Left:
Silver Nut (tighten by turning clockwise)
Front Right:
Black Nut (tighten by turning counter clockwise)
Rear Left:
Black Nut (tighten by turning counter clockwise)
Rear Right:
Silver Nut (tighten by turning clockwise)
Please note:
Installing the
Rotor Blades incorrectly
will prevent the Blitz from
flying. Please ensure you
have the Rotor Blades
installed correctly before
attempting to fly.
*Fig 5.2.1 - Lock Nut Tightening Guide


