INFINITY ID2 INSTALLATION MANUAL.
Software Versions: PANEL 1.N & LOOP O.N
Approved Document No: GLT-211-7-1
Issue 1.9 Author: MG/NJ Date: 06/04/2016
PAGE 24
12. CONFIGURING THE ID2 FIRE ALARM PANEL
12.1 CONFIGURING THE ZONES
12.1.1 FROM A BLANK INFINITY ID2 PANEL
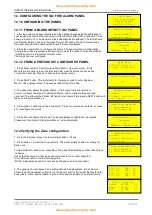
1. After the system has been installed, and the cabling checked and the addresses of
each device set, connect the loop cable to the CIE termination PCB (connection 1-8 as
shown in Section 21.1), and power up the system(mains & batteries). The LCD should
say “System Normal” and only the green Power LED will be lit. After a few seconds,
the panel will find all the new devices & report them unconfigured
2. Press the enter button to configure the zones. The panel will show Configuration
in progress, (while the system is configuring you have the option to enter zone labels)
it will then return to the system normal screen.
The zones are now configured.
12.1.2 FROM A PREVIOUSLY CONFIGURED PANEL
1. Press Enter button. This will bring up Main Menu 1 (the user menu). In this
Menu there are options to set the time and date, view the status of each device,
or view the event log. Press 4 to access the engineer menu
2. Press NEXT button. This will prompt for the access code to enter Engineer
Menu 1 (the engineer menu).The access code for the ID2 is 369
3. The panel now shows Engineer Menu1. In this menu there are options to
View or configure the zones, to edit each device, and to configure the panel and
zone text. The arrow in the bottom left hand corner shows that pressing NEXT button will
take you to Engineer Menu 2
4. Press button 1 will bring up the Zone menu. Press 1 to view zone contents, or press
2 to reconfigure the zones
5. Press 2 to reconfigure the zones. The panel displays configuration in progress,
Please wait. It will return to Engineer Menu 1 when completed.
12.2 Verifying the Zone configuration
1. Go to the Engineer menu 1 screen. Select option 1: Zones
2. Press button 1 to view the zone contents. The panel initially shows a summary for
Each zone
To view details for each zone, press Next. The panel then lists the number of each type
of device,
Check that the number of devices seen compares to the number expected.
If it is different, refer to the fault finding guide.
(NOTE: A sandwich sounder is not seen by the panel, so is not counted.)
3. The panel is now configured, and will function as a basic system, (press Cancel
until screen shows system normal to run the panel), but it is more user friendly to enter
Zone labels, and/or device labels, to give a more precise location of an alarm device.
ID2/8 Zone
Fire Alarm Panel
System Normal
24-09-2012 09:35
Main Menu
1:Clock 3:Device
2:Logs 4:Engineer
Enter Access Code
***
Engineer Menu 1
1:Zones
2:Panel/Zone Text
3:ID Device →
Configuration in
Progress
30%
ENTER to Label Zone
Z01: 02 Z02: 03
Z03: 00 Z04: 00
Z05: 00 Z06: 00
Z07: 00 Z08: 00
Devices Found
Press ENTER to
Configure Panel
Zone 1 Contents
Smoke 01|SND 02
Heat 01|I/O 00
MCP 01|ERR 00
Zone Configuration
1: Zone Summary
2: Configure now
Configuration in
Progress
30%
ENTER to Label Zone
Engineer Menu 1
1:Zones
2:Panel/Zone Text
3:ID Device →
Zone Configuration
1: Zone Summary
2: Configure now

