background image

136

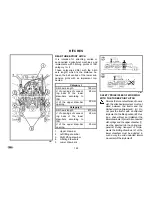
BALLAST WEIGHTS 

P11NE551 P11NE552a 

E553 

WEIGHTS IN FRONT OF THE HOOD 

GRILL  

Weights in front of the hood grill 


Combina-

tion of 

weights 

(pcs) 

Mass of weights  

(kg) 

4+1 4

x50 + 66 

266 

8+1 8

x50 + 66 

466 


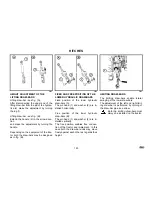
WEIGHTS OF THE FRONT THREE-

POINT HITCH 

The weight of the front three-point 

hitch is made of concrete


Weight mass  

(kg) 

290 


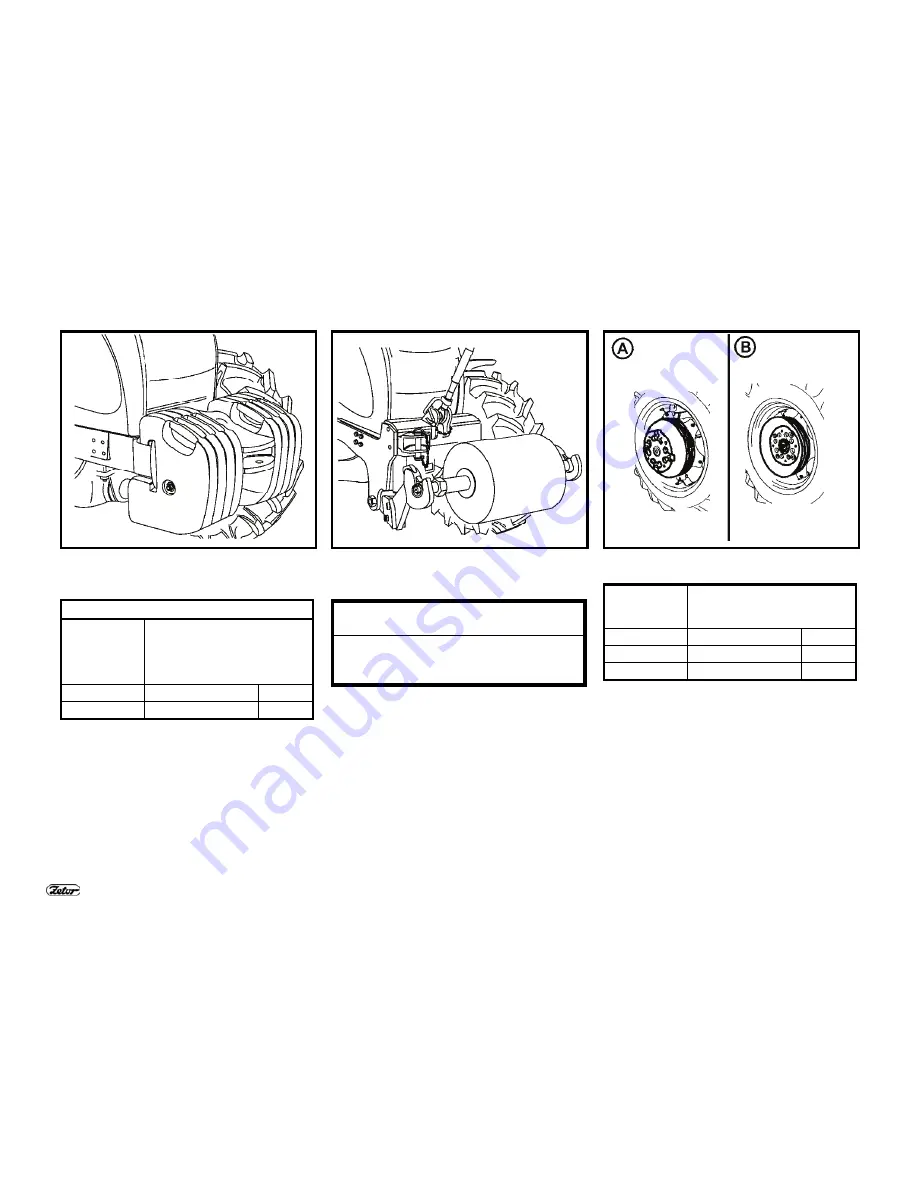
REAR WHEEL WEIGHTS 

Combination 

of weights 

(pcs)


Mass of weights (kg)


2+2 2

x16 + 

2

x30 

90 

2+4 2

x16 + 

4

x30

 150 

2+8 2

x16 + 

8

x30

 270 

 
A -  Installation of weights for rear wheel 

tracks of 1350 - 1500 mm 

B -  Installation of weights for rear wheel 

tracks of 1575 - 1800 mm 


Summary of Contents for PROXIMA POWER Z100 2012

Page 1: ......

Page 2: ...on con tained in this Operator s Manual very carefully In the Manual you will find a lot of new information and get a perfect overview of how to use the tractor with maxi mum efficiency during various...

Page 3: ...2 The technical specifications and information about the design equipment material and appearance are valid at the time of print The manufacturer reserves the right to implement changes...

Page 4: ...arate booklet that is handed over to you at the purchase of your new tractor Page Location of serial numbers 5 Policy of correct use for Proxima Power tractors 7 Safety instructions for users 16 Preve...

Page 5: ...4 TRACTORS PROXIMA POWER TRACTORS WITH FRONT DRIVING AXLE 4 X 4 Engine output kW Tractor type EC 24 2000 25 EC Z90 60 64 3 Z100 66 70 4 Z110 74 78 4 Z120 81 86 2 G1...

Page 6: ...5 LOCATION OF SERIAL NUMBERS G2...

Page 7: ...actor type Zetor Proxima Power Z90 Zetor Proxima Power Z100 Zetor Proxima Power Z110 Zetor Proxima Power Z120 The right left front and back indi cations refer to the driving direction of the tractor T...

Page 8: ...RIPTION The tractor is provided with two independent engine clutches one for the forward direction and one for the reverse direction Mov ing the reverse lever from the neutral position to the forward...

Page 9: ...tion saved during calibration and cannot be influenced by the driver The function of automatic acceleration spares the engine clutches more than controlling the engine clutch with the clutch pedal the...

Page 10: ...dden to partly depress the clutch pedal to regulate speed when the rotation of the engine is higher than 1 000 RPM Do not use the clutch pedal as a foot support Breaking these rules may lower the dura...

Page 11: ...clutches ACCELERATING THE TRACTOR IN ORDINARY OPERATION THE FUNCTION OF AUTOMATIC ACCELERATION To accelerate the tractor use the reverse lever under the steering wheel to control the engine clutch To...

Page 12: ...ft the gears while the tractor is in motion operate the engine clutch with the red clutch button on the gear lever While shifting press and hold the red clutch button on the gear lever release the gas...

Page 13: ...you must decrease the speed of the tractor below 10 KPH move the re verse lever to the neutral position and shift it into the desired direction of motion again Following the instructions below when c...

Page 14: ...shaft clutch 5S the upper part of the switch is completely depressed this position results in the longest delay between switching on the rear PTO switch and a complete activation of the PTO shaft clu...

Page 15: ...reaping machines and field and forest cultivators STARTING THE REAR PTO SHAFT After selecting the mode with the rear PTO delay switch switch on the rear PTO start switch If the power take off of the...

Page 16: ...e rear PTO shaft helps to extend the durability of the clutch If the tractor is equipped with rear PTO shaft of the 540 540E type it should be preferred to use 540E rotation to operate the rear PTO sh...

Page 17: ...ion working boots gloves etc STARTING THE ENGINE 5 The engine cannot be started by driv ing the tractor downhill 6 The engine cannot be started by tow ing the tractor with another tractor 7 Only start...

Page 18: ...resents a danger of death 27 During recovery it is dangerous to stand near the towing rope 28 On the tractor frame a front hook is installed that can only be used to tow the tractor itself i e without...

Page 19: ...you should wash yourself with a mild agent and treat your hands with a suitable ointment or cream 47 When connecting and disconnection quick couplers of the hydraulic circuits use any piece of cloth t...

Page 20: ...tage 12 V Grounded minus pole pole Using starting trucks or auxiliary power supplies with a different voltage or polar ity may cause serious failures of the trac tor 55 When handling the battery you m...

Page 21: ...20 PREVENTIVE DAILY MAINTENANCE Perform this maintenance daily or after every 8 10 hours of operation at the latest G4...

Page 22: ...en check the connection of the engine lubri cation system for leaks Maintain the oil level between the dip stick marks COOLING SYSTEM Check the connection of the engine cool ing system for leaks and t...

Page 23: ...fore starting your work TRAILER AIR BRAKES Check the air brake system for leaks and the efficiency of the tractor brakes with the trailer TRAILER HYDRAULIC BRAKES Check the hydraulic brake system for...

Page 24: ...og ging indicator The indicator is accessible after lifting of the tractor hood It is installed near the suctioning pipeline elbow CAB FILTRATION Check and if necessary clean the cab ventilation air f...

Page 25: ...nd remove the air conditi oning condenser to the left side of the tractor 3 Clean the front walls of the engine air conditioning condenser cooler with compressed air blow air in the direction from the...

Page 26: ...the driver s weight 33 Longitudinal adjustment 33 Vertical adjustment 33 Grammer maximo driver s seat 34 Grammer s driver s seat 34 Air filter with active carbon 35 Control panel of heating Air condi...

Page 27: ...ving axle f 49 Rear differential lock button j 49 Controller of multiplier pre selection 50 Automatic gear change of multiplier 50 Blocking and automatic gear change of multiplier 52 Switching box 53...

Page 28: ...TRACTOR Page Lever of the parking brake and hitch for a single axle trailer 58 Hydraulics control panel 58 Battery disconnector 58 Tractors with the travelling speed of 40 KM H 59 Fuel tank 59 Drain...

Page 29: ...ting lever and the manual throttle lever DOOR OPENING FROM THE OUTSIDE The cab doors can be locked from the outside After unlocking depress the lock button and open the door by pulling the handle DOOR...

Page 30: ...tion of maxi mum lift of the three point hitch and the open rear window In case of interference we recom mend you to work with the win dow closed SIDE WINDOW The window is secured in the partly open p...

Page 31: ...NEL On the right rear panel there is a storage place for a PET bottle 1 a 12V three pin socket 2 and a lighter 3 E109 REARVIEW MIRRORS Before driving or starting work adjust the rearview mirrors to be...

Page 32: ...uard of the cabin SEAT TILTING OUT Passenger s seat to be tilted out in the direction of an arrow 1 upward Locking of the seat is done automatically SEAT TILTING Lift the passenger s seat in the direc...

Page 33: ...ll of the cab The capacity of the tank is 2 5 litres In the summer season the tank must be filled with distilled water or a washer mix ture In winter the tank must be filled with an an tifreeze washer...

Page 34: ...ight adjustment indicator is located in the recess of the rear seat cover The spring stroke is 120 mm Do not adjust the seat when driving Danger of accident LONGITUDINAL ADJUSTMENT You can adjust the...

Page 35: ...seat can be turned by 20 to both the sides 4 Seat vibration absorption control by flipping the control to the front you will select the floating position of the seat 5 Backrest angle adjustment contro...

Page 36: ...osition of air suctioned from the outside The fan control must be in the maximum position WARNING The filter does not provide complete protection from toxic substances When handling the filter wear pr...

Page 37: ...ROL A a Heating valve closed b Heating valve open FAN CONTROL B 0 Fan off 1 Slow fan speed 2 Medium fan speed 3 Maximum fan speed AIR CONDITIONING SWITCH C The air conditioning system is switched on a...

Page 38: ...ition of the con trol for the necessary time PROPER FUNCTION OF THE HEATING AND AIR CONDITIONING SYSTEM To ensure proper functioning of the heat ing or air conditioning system it is neces sary to crea...

Page 39: ...nce with individual requirements to a temperature in a position between a and b so that the fan can suction air from the outside via filters When pesticides are sprayed and a heating filter with activ...

Page 40: ...ing of the front windshield direct the side outlets to the side glasses of the doors as necessary and gradually defrost them After defrosting direct the outlets in such a way that the air should not b...

Page 41: ...switch 8 rear window defroster switch 9 delay of the rear PTO shaft 3 modes according to the tool connected 5S use this mode to start PTO shaft connected light machines with low en gine power take off...

Page 42: ...p or push it down after it is unlocked by mov ing the lever 1 in the direction shown by the arrow After adjusting lock the wheel by pressing the lever 1 in the opposite direction than shown by the arr...

Page 43: ...42 ACQUAINTANCE WITH THE TRACTOR PW08X131a...

Page 44: ...red not con nected 12 Indicator of the 1 st stage of the torque multiplier on green 13 Indicator of the 2nd stage of the torque multiplier on green 14 Indicator red of a failure in the hy drostatic c...

Page 45: ...44 ACQUAINTANCE WITH THE TRACTOR F54d...

Page 46: ...s shown on the display The value can be reset with long pressing of the button 25 Button of the current travelling speed in km h which is shown on the display Resolution 1 km h 26 1000 rpm PTO button...

Page 47: ...for 540 revolutions E for 540E revolutions The button serves only for displaying data P11N090 DIESEL PARTICLE FILTER Solid particles carbon particles which originate by burning diesel are accumu late...

Page 48: ...h e Warning light switch the symbol starts flashing f Switch of the front driving axle Engaged front driving axle is indicated by the illuminated symbol on the switch g Beacon switch off on on is indi...

Page 49: ...t in the roof ON This selector controls the lights in the grill or roof of the tractor cab Only u se the lights in the cab roof if an implement is attached to the front three point hitch that covers t...

Page 50: ...ching box off the front driving axle is ON The front driving axle is on in the basic position indicator lit and it can be deac tivated with the switch indicator off E138 REAR DIFFERENTIAL LOCK BUTTON...

Page 51: ...revolution of engine based on predefined values engine revolutions The system of automatic gear change of a multiplier is not dependent on the changed speed gear With a switched on controller of mult...

Page 52: ...umber of engine revolutions is set by a driver based on the specific use of a tractor With a pre selection multiplier controller on it is possible to change the gears of multiplier also manually by bu...

Page 53: ...cally BLOCKING AND AUTOMATIC GEAR CHANGE OF MULTIPLIER If brake pedals are used with the controller of multiplier pre selection on the system of automatic gear change of multiplier blocks the automati...

Page 54: ...on the dashboard see arrow KEY IN 0 POSITION The voltage of all appliances controlled via the key is disconnected The key can be removed KEY IN I POSITION Voltage is connected to all appliances except...

Page 55: ...omatically returns to the I position MANUAL THROTTLE LEVER A Maximum engine speed B Idle run The lever allows you to set the engine speed in the whole range A to B ENGINE STOPPING CONTROL By pulling t...

Page 56: ...3 Foot throttle pedal GEAR SHIFTING LEVER Main shifting lever 1 Clutch disengagement button on the shifting lever head 2 Shifting buttons of individual multi plier stages GEAR SHIFTING PLAN Reverse ge...

Page 57: ...HIFTING LEVER OF ROAD AND REDUCED GEARS H Road gears N Neutral position L Reduced gears The shifting is performed with the tractor at standstill SELECTOR OF TURN SIGNAL LOW AND HIGH BEAM LIGHTS AND HO...

Page 58: ...shaft end with eight or twenty one splines Shifting of 540 and 1000 or 540E rpm is possible regardless of the number of splines of the installed end The speed of the PTO and end piece type must be sel...

Page 59: ...on a slope its wheel must be addi tionally secured with wedges HYDRAULICS CONTROL PANEL Hydraulics control panel is located in the area of the right wing Controlling the rear three point hitch is enab...

Page 60: ...lled in the reducers of the front wheels can be equipped with the travelling speed of 40 km h FUEL TANK The fuel tank is installed at the right hand side of the tractor The tractor is equipped with a...

Page 61: ...60 NOTES...

Page 62: ...nd reduced gears speeds 67 Shifting from lower to higher gear speed 68 Shifting from higher to lower gear speed 68 Three stage torque multiplier 68 Indication of the multiplier function 69 Shifting th...

Page 63: ...on of an air pressure drop 79 Single hose and double hose brakes 80 Wingle hose brakes 80 Double hose brakes 80 Hydraulic brakes of trailers 81 Connecting and disconnecting quick couplings of hydrauli...

Page 64: ...the cab right piller 4 Depress the clutch pedal 5 Move the reversation lever located under the steering wheel the the ne utral position 6 Move the gear lever to the neutral po sition 7 Turn the key to...

Page 65: ...e a second the glowing will occur in the emergency mode as at low temperatures regardless of the coolant temperature If at engine standstill the glowing indica tor flashes twice a second the glowing i...

Page 66: ...rs must go off and other functions ensuring proper opera tion of the engine The period of running the engine without loading must be ob served especially in winter ENGINE PREHEATING Continue preheatin...

Page 67: ...ctric mains with the voltage of 220 V With regard to reduced wear of the engine during starting at low temperatures the use of the heater is recommended by the manufacturer The heating time depends on...

Page 68: ...ion of the tractor for ward reverse F Forward drive 24 speeds N Neutral position R Reverse drive 24 speeds The reversing gearbox offers 24 reverse speeds that are approximately as fast as the forward...

Page 69: ...AGE TORQUE MULTIPLIER The three stage multiplier is standard equipment of all tractor types Shifting of individual stages of the three stage multiplier is controlled with two but tons on the main shif...

Page 70: ...the tortoise symbol is lit L Two indicators with the tortoise symbol are lit Note On starting or stopping of the tractor engine the H stage is always en gaged automatically SHIFTING THE STAGES OF THE...

Page 71: ...pair of controls green and red on the dashboard When starting the engine a green control lights up on a dashboard briefly It signalizes that the system of diesel particle filter works The failures in...

Page 72: ...diesel particle filter system are displayed on the display The acoustic signal can be turned off by the button 2 If the failure has not been re moved the acoustic signal is active with repeated starin...

Page 73: ...sel particle filter and followingly also by acoustic signal and on the display of displaying unit of diesel particle filter by fail ure code E 36 If this situation occurs increase the load of engine a...

Page 74: ...actor sensitively e g when attaching an implement etc Very fast acceleration may cause overloading of the power train in creased fuel consumption exces sive wear of tyres and damage of the transported...

Page 75: ...y CHANGING THE DRIVING DIRECTION WITH THE AUTOMATIC FUNCTION You can change the driving di rection with the use of the auto matic function at a driving speed lower than 10 km h If you try to change th...

Page 76: ...aging and at the same time increase the engine speed GEAR SHIFTING USING THE CLUTCH CONTROL BUTTON ON THE SHIFTING LEVER HEAD Press the clutch control button on the shifting lever head At the same tim...

Page 77: ...fully usable If this situation occurs stop working and contact the repair shop Serious errors of the travelling clutches and reversing A failure of the serious error category is signalled by illumina...

Page 78: ...n If you go down from a longer slope the rule is the steeper the slope is the lower gear should be used Shift the lower gear before the slope if possible Note The gear with which you easily overcome t...

Page 79: ...ing switch on the dashboard a Front driving axle ON b Front driving axle OFF In case of a pressure drop in the air pressure system of the tractor the front driving axle is automati cally engaged DRIVI...

Page 80: ...s semi trailers and the control of the trac tor brakes is designed in such a way that the braking effect of both the vehicles is synchronized During driving with a connected trailer or semi trailer th...

Page 81: ...actor type the maximum allowed speed of the set is 30 km h The maximum permissible speed of the set results from the maxi mum permissible speed of the slower vehicle in the set DOUBLE HOSE BRAKES The...

Page 82: ...t the brake function overrides the hy draulic function When bleeding the tractor brakes do not forget to bleed the brake valve as well If during depression of the foot brake pedals shocks occur in the...

Page 83: ...nual throttle lever to the MIN position 3 Pull up the control of the engine stop ping device and turn it after stopping of the engine operation push the con trol back 4 After stopping of the engine yo...

Page 84: ...engine speed the indicator goes off it is not an error The system is all right IMPORTANT WARNING If during work of the tractor the lubrica tion charging or hydrostatic steering er ror is illuminated...

Page 85: ...84 NOTES...

Page 86: ...85 RUNNING IN THE TRACTOR Page General principles for running in the new tractor in the course of the first 100 hours of operation 86 During the first 10 hours 86 From 100 hours on 87...

Page 87: ...oil consumption is normal in this period Check screw connections mainly of the supporting parts of the tractor Immediately remove all established shortcomings thus you will prevent subse quent damage...

Page 88: ...you can work with the tractor without any restrictions Operation regime of the tractor engines Recommended operation speed 1400 2300 rpm Idle speed 800 25 rpm Operation oil pres sure 0 2 0 5 MPa Oil p...

Page 89: ...88 NOTES...

Page 90: ...Height adjustment and disassembly of the CBM stage hitch 90 Automatic mouth of the CBM stage hitch 91 Modular system of hitches for trailers and semi trailers 91 Swinging draw bar console module 91 S...

Page 91: ...r lighter single axle semi trailers The guiding mouth is height ad justable During work with various im plements it may be necessary to adjust the height of the hitch or to disassemble the entire hitc...

Page 92: ...railer you must always check whether the indicator 3 is retracted in accordance with fig B MODULAR SYSTEM OF HITCHES FOR TRAILERS AND SEMI TRAILERS Module types Fig B Swinging draw bar console Fig C S...

Page 93: ...in 1 CONSOLE WITH A 80 BALL MODULE The console with a 80 ball is only used to connect semi trailers with a hitching device designed for a 80 ball Releasing the hitch fig A By moving the lever 1 in the...

Page 94: ...gaged Move the hitch control lever backwards The lever is lo cated at the left side of the driver s seat With the inner hydraulic circuit lever lower the hitch a disconnected the trailer shaft lug HIT...

Page 95: ...tion brakes of the tractor and pneumatic or hydraulic brakes of the trailer In aggregation with a semi trailer the static load of the rear tractor axle must not exceed the value of maximum permissible...

Page 96: ...s hitch C class hitch 2 000 kg 43 mm 1 500 kg 28 mm The maximum weight of an aggregated braked trailer or semi trailer must not exceed the value specified on the data plate of the tractor and the valu...

Page 97: ...e verti cal static load Hitch pin ball 736 kg 31 mm 3 000 kg 80 mm Fixed pin 2 000 kg 44 5 mm 3 000 kg 47 mm 1 200 kg 32 mm The maximum weight of an aggregated braked trailer or semi trailer must not...

Page 98: ...ferent speeds may lead to serious dam ages and injuries Page Working with PTO 98 Control of the front and rear PTO 98 Rear PTO dependent and independent speed selection 99 Rear PTO selecting the pto s...

Page 99: ...the engine stopped and PTO switched off 5 Any repairs or cleaning of parts of attached machines driven by the PTO may only be carried out with the engine stopped PTO switched off and the lever of the...

Page 100: ...h the lever 1 with the tractor at standstill As standard the tractor is equipped with the combination of 540 and 1000 rpm of the PTO optionally it can be equipped with the combination of 540 and 540 r...

Page 101: ...eable end piece 2 3 Install the end piece in the reverse order paying increased attention to the assembly of the locking ring 1 The end piece may only be ex changed with the engine stopped The speed o...

Page 102: ...RTIAL MASSES CRUSHERS ROTARY HARROWS MOWING MACHINES ETC The cardan shaft of the drive of these machines must be equipped with a free wheel device that will ensure disconnection of the torque transmis...

Page 103: ...102 NOTES...

Page 104: ...ation of the lifting of the rear three point hitch 108 Power regulation of the lifting of the rear three point hitch 109 Mixed regulation of lifting the rear three point hitch 110 Exterior rear hydrau...

Page 105: ...urce of pressure oil Oil is taken from reservoir shared by gearbox and transmission Hydraulic pump cannot be switched off If the engine is working the pump is on The amount supplied is 50 liters per m...

Page 106: ...he lifting of the rear three point hitch Position regulation img 1 the tool connected to the rear three point hitch is automatically kept in the same height position with regard to the tractor Mixed r...

Page 107: ...top FREE FLOATING POSITION Free floating position makes it possible to work with tools with a support wheel In this position the arms of the rear three point hitch are loose Move lever 2 to the front...

Page 108: ...f the arms of the rear three point hitch turning it in a direction increases the speed If the knob is turned in b direction to its stop point the arms of the rear three point hitch cannot be lowered H...

Page 109: ...rt tools which are connected to the rear three point hitch always use position regulation To raise tools into transport position turn the three point hitch lowering speed control knob 3 in the directi...

Page 110: ...to the adjustable stop 5 Move lever 1 to g position accelerate the tractor and move lever 1 in the direction shown by the arrow to set the depth of tilling in g position depth is the lowest Once the...

Page 111: ...resistance Set the depth of tilling by lever 1 as described in Power regulation of the lifting of the rear three point hitch Then start moving lever 2 in the direction shown by the arrow until the arm...

Page 112: ...on shown by the arrows moving the lever is restricted with a link By repeating this procedure hydraulic arms are lowered in small steps Raising hydraulic arms img C Move lever 3 in the direction shown...

Page 113: ...the following combinations of control levers and quick couplers can be supplied lever a quick couplers 1 and 2 levers a and b quick couplers 1 2 3 and 4 levers a b and c quick couplers 1 2 3 4 5 and...

Page 114: ...and turn it to a stop point in the direction shown by the arrow To lock them again move the levers to neutral N position and turn the lock control in the opposite direction than shown by the arrow to...

Page 115: ...ever a is locked in this position In case pressure exceeds 16 5 MPa when connected to quick coupler 1 lever a automatically returns to N position kick out function 2 Pressure in quick coupler 2 Quick...

Page 116: ...t is necessary to hold lever b in this position when released lever b automatically returns to N position In addition quick coupler 3 is equipped with a one way valve convenient for connecting a tool...

Page 117: ...ed with the drain It is necessary to hold lever c in this position when released lever c automatically returns to N position In addition quick coupler 5 is equipped with a one way valve convenient for...

Page 118: ...flat terrain Max amount of oil taken 20 liters Gearbox filling standard filling within the range shown by lines A Working area in a slope Max amount of oil taken 13 liters Gearbox filling standard fil...

Page 119: ...lled Check the reservoir regularly if it is full empty it ecologically CONNECTING AND DISCONNECTING QUICK COUPLERS When connecting or disconnecting quick couplers be careful about leakage oil which re...

Page 120: ...k out function from overload This function stops the hydraulic engine if pressure in the filling arm exceeds 17 MPa Connecting reverse rotary hydraulic engine Due to its function reverse rotary hydrau...

Page 121: ...120 NOTES...

Page 122: ...openings in the console 124 Lower draw bars with extensible end pieces 125 Lower draw bars with cbm hooks 125 Securing the lower draw bars with CBM hooks 125 Front three point hitch 126 Adjusting the...

Page 123: ...aw bars according to ISO 28 mm of the upper draw bar opening 25 mm 1 Upper draw bar 2 Left lifting draw bar 3 Right lifting draw bar 4 Limiting draw bars 5 Lower draw bars G452 SAFETY PRINCIPLES OF WO...

Page 124: ...LOWER HYDRAULIC DRAW BARS Fixed position of the lower hydraulic draw bars A The pin head 1 and washer 2 are in stalled horizontally Free position of the lower hydraulic draw bars B The pin head 1 and...

Page 125: ...g d to avoid overloading of the kinematic sys tem of the lifting hydraulic system or fall of the attached implement UPPER DRAW BAR When extending the upper draw bar you must make sure that both the jo...

Page 126: ...er 3 and upper 4 draw bars of the hitch are equipped with CBM hooks First suspension CBM balls 1 must be fit ted to the implement and the limiting draw bars must be used to set the distance be tween t...

Page 127: ...draulic lock is recommended even in case no machine is attached to the three point hitch ADJUSTING THE LOWERING RATE OF THE FRONT THREE POINT HITCH Before the start of work with an imple ment attached...

Page 128: ...not to be used If the tractor is equipped with front three point hitch use lever b to control it When the front three point hitch is used quick couplers cannot be connected as they are pressured toge...

Page 129: ...Transport position of the front three point hitch Changing the position of the draw bars of the front three point hitch 1 Release and remove the pin 1 from the opening 2 Lift the arm from position A t...

Page 130: ...t wheel track of the front driven axle 130 Setting the stops on the front driving axle 131 Front wheel toe in 132 Adjustment of toe in of tractors with the front driving axle 133 Fenders of the front...

Page 131: ...remove the screws 3 Change the track by setting the rim in the required position 4 Re install the screws with washers and secure them with nuts 5 Tighten the nuts of the screws connecting the disc wit...

Page 132: ...e nut 2 with the torque of 100 150 Nm Tire 11 2 24 12 4 24 13 6R24 Treads A mm A mm A mm 1525 60 61 1610 59 1620 46 55 1680 47 1690 50 1760 43 1770 39 1825 32 1835 34 1910 27 1920 27 In the case of tr...

Page 133: ...asured on the rim at the tractor with the driving axle 0 to 4 mm Toe in S is determined by the differ ence of the measured values S b a Before checking the toe in value you must inflate the front tyre...

Page 134: ...ease the locking nuts of the heads of the ball screws 2 of connecting rods of the steering at the hydraulic cylinder Adjust the toe in value by turning the shank of the ball screw 3 Perform the ad jus...

Page 135: ...rack tighten all the screws connecting the disc with the rim with the torque of 200 220 Nm and the nuts of the screws connecting the disc with the wheel shaft with the torque of 400 470 Nm After every...

Page 136: ...tions of its manufacturer Page Weights in front of the hood grill 136 Weights of the front three point hitch 136 Rear wheel weights 136 Valve for filling tyres with liquid 137 Wedging the front wheels...

Page 137: ...1 8x50 66 466 WEIGHTS OF THE FRONT THREE POINT HITCH The weight of the front three point hitch is made of concrete Weight mass kg 290 REAR WHEEL WEIGHTS Combination of weights pcs Mass of weights kg 2...

Page 138: ...s not permitted to use liquid to fill the front wheels and the rear wheels in case of using the dou ble assembly Frost or water solution may only be used for filling tyres if you have purchases additi...

Page 139: ...the valve 9 Fill the other tyre in the same way PROCEDURE OF DRAINING LIQUID FROM THE TYRES 1 Unload the tyre by lifting the tractor and turn it with the valve upwards A 2 Deflate the tyre and unscre...

Page 140: ...45 15 4 0 25 1 21 30 50 61 Solution preparation 1 Dry calcium chloride CaCl2 is added to water never the other way round 2 The solution is not dangerous but it is necessary to work carefully with it...

Page 141: ...140 NOTES...

Page 142: ...on to handling the battery to avoid contact of your skin or clothes with the electrolyte Page Basic service information 142 Accumulator battery 143 Accumulator battery maintenance 143 Alternator 144 A...

Page 143: ...ging circuit disconnect the battery from the tractor ground with the battery disconnector This way you will avoid accidental short circuits on the terminals In case of any handling or repair of the st...

Page 144: ...ted on the case Only add distilled water to the battery 1 When working with the battery first read the attached manual 2 During work with the battery protect your eyes with goggles or a safety shield...

Page 145: ...NATOR MAINTENANCE When washing and cleaning the tractor protect the alternator from penetration of water or diesel fuel During operation the alternator must not be disconnected from the battery The al...

Page 146: ...is accessible after removal of the left cover of the steering bracket The blade type fuses 1 shall be re placed for new ones having the same rating In case of repeated blowing seek an authorised repai...

Page 147: ...ed lights fog headlamp with a control 8 7 5A Left dipped lights lights control in a grill roof of tractor 9 15A Working lights in bonnet grill 10 3A Front PTO shaft 1A 15A Diesel particle filter 1B 15...

Page 148: ...actor l distance of the test wall from the headlight 5 m h height of the headlight centre above the road surface h headlight inclination 3 5 to the distance of the test wall 17 5 cm raising of the out...

Page 149: ...headlight centre further than 30 m from the front outline of the tractor In the horizontal direction the light beams must be parallel with the longitudinal axis of symmetry of the tractor Check the a...

Page 150: ...BA 15s Position lights R5W 12 V 5 W BA 15s 4 Working and ploughing lights 12 V 65 W PGJ19 5 5 Rear combined lights Tail lights and brake lights 12 V 5 21W BAY 15d Turn signal lights 12 V 21 W BA 15s...

Page 151: ...150 NOTES...

Page 152: ...ils for zetor engine 156 Front PTO oil 156 Oil in the gearbox and final drive housing 157 Oil for the front driving axle 158 Oil for hydrostatic steering of tractors 158 Plastic lubricant for the trac...

Page 153: ...unction indicator Check the charging function indicator Check the steering function indicator Check the function and tightness of the steering circuit Check the function and efficiency of the tractor...

Page 154: ...se Check the tightness and function of the pressurized air system Check the function of the driver s seat lubricate the movable parts with grease STEPS PERFORMED OUTSIDE THE INTERVAL OF 500 HOURS OF W...

Page 155: ...ling liquid replacement once every 2 years Brake liquid replacement once every 2 years Replacement of oil in the gearbox and final drive housing o o 1000 Replacement of oil in the rear axle gantries o...

Page 156: ...the front driving axle box 5 5 Oil of the planetary reducers of the front driving axle 2x0 6 Oil of the planetary reducers of the front driving axle equipped with brakes 2x1 7 Gantry oil 2x1 9 Gearbo...

Page 157: ...Oil marking Viscosity class SAE Performance class API MOGUL DIESEL L SAPS 10W 40 10W 40 API CJ 4 SM FRONT PTO OIL Manufacturer Oil designation BP Autran DX III Fluid 9 Shell Donax TX Esso ATF E 25131...

Page 158: ...anufacturer Oil designation Viscosity class SAE Performance class API Paramo Gyrol UTTO 80W GL 4 Gyrol 80W 80W GL 4 Mogul Trans 80 80W GL 4 Mogul Traktol UTTO EKO 80W GL 4 Esso Torque Fluid 62 80W GL...

Page 159: ...L 5 MV Gear Oil LS 85W 90 GL 5 Shell Spirax AX 80W 90 GL 5 MOL Hykomol K 80W 90 80W 90 GL 5 ORLEN OIL Platinum Gear 80W 90 80W 90 GL 5 OIL FOR HYDROSTATIC STEERING OF TRACTORS Manufacturer Oil designa...

Page 160: ...um T 4 EP2 HYDRAULIC BRAKE LIQUID FOR TRACTORS Type Classification Synthol 205 PND 31 656 80 ISO 4925 SAE J 1703 Fuchs MAINTAIN DOT 4 SAE J 1703 Brake Fluid DOT 4 ISO 4925 SAE J 1703 Shell Donax YB SA...

Page 161: ...cooling system of the engine CAUTION 1 Water without an antifreeze mixture must not be used in tractors 2 Replace the cooling liquid after two years of operation The FRIDEX STABIL and FRIDIOL 91 liqui...

Page 162: ...161 TRACTOR MAINTENANCE LUBRICATION PLAN OF THE TRACTOR FRONT DRIVEN AXLE Pos no Identification No of lubrica tion points 1 Turning radius pins 4 2 Central pin 2 3 Connecting shaft coupling 2...

Page 163: ...SINGLE AXLE SEMI TRAILER Pos no Identification No of lubrica tion points 1 Hook pin bearings 0 to 4 by version FRONT THREE POINT HITCH Pos no Identification No of lubrica tion points 1 Pins of cylinde...

Page 164: ...163 TRACTOR MAINTENANCE THREE POINT HITCH Pos no Identification No of lubrica tion points 1 Pins of auxiliary hydraulic cylinders 2 2 Lifting draw bars 2...

Page 165: ...ANCE UPPER DRAW BAR CONSOLE Pos no Identification No of lubrica tion points 1 Pins of the upper draw bar console 2 HITCH MOUTH FOR A TRAILER Pos no Identification No of lubrica tion points 1 Hitch mou...

Page 166: ...ondition of the following distribution of tractor work Ploughing and pre sowing soil treatment 15 25 Sowing and planting 10 15 Harvest work 10 20 Farming transport 40 65 If the tractor works in mounta...

Page 167: ...166 NOTES...

Page 168: ...l in the hydrostatic steering tank 174 Replacing oil and the filter element of hydrostatic steering 174 Bleeding the hydraulic circuit of hydrostatic steering 175 Replacing the hydrostatic steering ho...

Page 169: ...light bulbs situated in the front hood might get dam aged CHECKING THE OIL LEVEL IN THE ENGINE Check the oil level daily before starting work with the tractor in the horizontal posi tion The engine oi...

Page 170: ...en the cleaner by hand When the sealing gets in contact with the block sealing tighten the cleaner again by 3 4 to 1 1 4 turns Check the cleaner for possible leaks af ter starting the engine FILLING T...

Page 171: ...stem BLEEDING THE FUEL SYSTEM Before bleeding place a suitable container under the engine to col lect dripping fuel from the filter and injection pump 1 Prime the fuel system with several strokes of t...

Page 172: ...LOGGING INDICATOR The clogging condition of the filter is in dicated by the position of the runner 1 in the indicator window When the run ner 1 gets to the red field marked ser vice 2 maintenance of t...

Page 173: ...ain element is not damaged there must not be any dust on the inner side of the element recover it by blow ing pressurized air from the inner side of the element This way you can recover the main ele m...

Page 174: ...oints during the element reassembly Make sure the contact surfaces are clean During the assembly the elements must not get deformed and after instal lation they must not vibrate After closing of the c...

Page 175: ...nk cap 5 Remove the cap of the hydrostatic steering tank 6 Remove and replace the filter element 7 Put the tank cap back 8 Secure its position with the nut 9 Tighten the drain screw 10 Disconnect both...

Page 176: ...ne speed turn the wheels with the steering wheel 3 times alternately slowly and quickly to both the sides up to the limiting stops of the wheels 5 Stop the engine 6 After the end of bleeding check or...

Page 177: ...e working media around the end pieces and on the hose surface abrasion of the hose surface to the metallic reinforcement In case of a pump failure or after stopping of the engine the steering capabili...

Page 178: ...eld of the hood 4 Close the screw and the valve after draining the coolant leave the heating valve open 5 Fill the cooling system with an anti freeze mixture 6 Start the engine and let it run for appr...

Page 179: ...NINGS 1 Drain plug of oil from the transmis sion system 2 Drain plug of oil from the line for the front driving axle 3 Inspection screw of the brake chamber 4 Drain plug of oil from the final drive ho...

Page 180: ...cuff 4 and remove the filter 5 To place a new filter proceed contrariwise Put the oil which has flown out back to gearbox this holds if it is necessary to change the filter outside the period recommen...

Page 181: ...direction is equipped with a hollow bolt of the oil cooler hose instead of the inspec tion and filling plug Perform the check after removing the hollow bolt After unscrewing of the inspec tion screw t...

Page 182: ...ccordance with the figure 1 Checking the oil level opening on the horizontal axis of the reducer after unscrewing of the inspection screw the oil level must reach the bottom edge of the inspection ope...

Page 183: ...ormal filters The filter must be inserted with the white side towards the grill The installation instructions are found on the next page The filter is only used during spraying of pesticides then it m...

Page 184: ...s through the white dust filtration layer 4 Check proper sealing of the filter 5 Secure the filter DRAINING CONDENSATE FROM THE AIR RESERVOIR Incline the bleeding valve by pulling the ring The valve i...

Page 185: ...ndenser is clogged it does not only reduce the cooling efficiency of the AC system but also the efficiency of the engine cooling Open the hood remove the nut 1 and slide the cooler towards the side an...

Page 186: ...ty valve Unscrew the wing nut of the pressure controller or remove the rubber cap and screw a tyre inflation hose instead of it Screw the hose up to the end of the thread to compress the non return va...

Page 187: ...k and the oil cleaner is accessible from the bottom side of the tractor Before replacing the oil cleaner element place a suitable container under the tractor to collect dripping oil 4 Unscrew the clea...

Page 188: ...Bleeding the brake system of the tractor 189 1 Bleeding the main brake valve for trailers 190 2 Bleeding the rear wheel brakes 191 3 Bleeding the brake system of the front driving axle 192 4 Bleeding...

Page 189: ...ension the V belt to the prescribed value after releasing the fixation screws of the alternator 1 2 TENSIONING THE V BELT OF THE AC COMPRESSOR If the V belt is properly tensioned its de flection must...

Page 190: ...ydraulic brakes of the trailer with the brake pedals connected During the bleeding observe the liquid level in the equalizing tank to avoid aspi ration of air After two years you must replace the brak...

Page 191: ...de hoses onto the screws and immerse their other ends to the bottom of a transparent container 3 partly filled with the brake liquid Place the container at least 300 mm above the bleeding screws The s...

Page 192: ...r partly filled with the brake liquid 3 The bleeding screw must be perma nently under pressure to avoid aeration of the brake system through its threads In this step place the container at least 300 m...

Page 193: ...screws are positioned on the upper surfaces of the reducers 3 Slide hoses 1 onto the screws Immerse their other end to the bottom of a trans parent container partly filled with the brake fluid Place t...

Page 194: ...lide a hose onto the screw and immerse its other end to the bottom of a trans parent container 3 partly filled with the brake liquid Place the container at least 300 mm above the bleeding screw The sc...

Page 195: ...terrelated FOOT BRAKE ADJUSTMENT Secure the tractor against movement 1 Lift the rear wheels of the tractor 2 Release the nuts 2 nuts 6 and nuts 8 3 Release the screw 7 4 Instruct your assistant to tur...

Page 196: ...adjustment procedure is the same at the right as well as left side of the tractor 4 Use the nuts 8 to adjust the Bowden cable of the parking brake lever in such a way that with the 20 angle of the le...

Page 197: ...By lowering and repeated lifting of the hydraulic arms to the transport posi tion check whether the engine does not tend to stall at the idle speed the relief valve of the hydraulic pump must not be i...

Page 198: ...track Press the A and B buttons simulta neously Keep the buttons pressed for 7 sec There will be an acoustic signal and in c n t inscription starts flashing on the display Release both buttons A and...

Page 199: ...198 NOTES...

Page 200: ...ol condition 204 Load capacity of the front tyres 205 Change of the load capacity of the front tyres 205 Load capacity of the rear tyres 206 Change of the load capacity of the rear tyres 206 Permitted...

Page 201: ...rs 1890 Height to the exhaust outlet 2694 2780 depending on tyre dimen sions Tractor height to the upper cab edge 2639 2725 depending on tyre dimen sions Inner height under the front axle support 468...

Page 202: ...mpression ratio 17 17 17 17 Max overspeed rpm 2460 2460 2460 2460 Idle speed rpm 800 25 800 25 800 25 800 25 Net output at the nominal speed meas ured in accordance with ISO 2288 kW 64 71 79 86 Specif...

Page 203: ...1406 Minimum oil pressure at the en gine speed of 800 rpm and oil temperature of 80 C MPa 0 08 0 08 0 08 0 08 Max coolant temperature C 106 Timing type OHV Timing angle 11 11 12 12 Valve clearance wit...

Page 204: ...issible load with regard to the tyres is specified in the table Load capacity of the front tyres The value refers to a front loader MAXIMUM PERMISSIBLE LOAD OF THE REAR AXLE KG Wheel base mm Travellin...

Page 205: ...ing speed km h Maximum weight of the set 8 7500 20 7000 30 6600 40 6000 STEERING CONTROL CONDITION Travelling speed km h Load of the front axle of the tractor out of the total weight of the tractor at...

Page 206: ...200 1960 3920 230 12 4R24 1280 2500 120 1500 3000 150 1500 3000 150 1920 3840 160 13 6R24 1290 2500 100 1630 3000 140 1630 3000 140 2120 4000 160 380 70R24 1310 2500 100 1530 3000 120 1530 3000 120 2...

Page 207: ...2500 5000 140 2550 5000 130 2570 5000 110 2820 5500 90 540 65R34 2540 5000 120 2510 5000 100 2510 5000 100 2790 5500 80 18 4 34 8 PR 2120 4240 140 2650 5000 140 2615 5000 100 3050 5500 100 18 4R34 26...

Page 208: ...els Rear wheels Tyre dimen sions Equivalent Tyre dimensions Equivalent 11 2 24 11 2R24 13 6 36 16 9 30 16 9R30 480 70R30 12 4 24 12 4R24 360 70R24 18 4 30 18 4 R30 520 70R30 16 9 34 16 9R34 480 70R34...

Page 209: ...from 100 hours on 52 5 58 65 5 73 LIFTING FORCE OF THE THREE POINT HITCH Tractor type Z 90 Z 100 Z 110 Z 120 Engine type 1206 1006 1306 1406 Lifting force at the end of the lower draw bars of the rear...

Page 210: ...4 8 25 6 490 926 732 926 M 21 4 22 1 423 799 631 799 3 Hi L 18 5 19 1 366 691 546 691 H 15 5 16 0 307 579 457 579 M 13 4 13 8 265 500 395 500 2 Hi L 11 6 11 9 229 433 342 433 H 10 4 10 8 206 388 307 3...

Page 211: ...26 3 27 2 521 984 778 984 M 22 8 23 5 452 853 674 853 3 Hi L 19 7 20 3 391 737 583 737 H 16 5 17 0 327 618 488 618 M 14 2 14 7 282 531 420 531 2 Hi L 12 3 12 7 244 460 364 460 H 11 1 11 4 220 415 328...

Page 212: ...e speed PTO speed engine speed 540 540 1987 598 2200 540 1000 1000 1000 1950 1128 2200 540 540 2005 592 2200 540 540E 540E 540 1584 750 2200 FRONT PTO SPEED Turning direc tion PTO speed engine speed P...

Page 213: ...With engagement of the front driving axle 12570 12130 Track diameter mm With engagement of the front driving axle with braking of the inner rear wheel 8750 8580 Without engagement of the front drivin...

Page 214: ...connector 58 Before starting the engine 63 Bleeding the brake system of the front driving axle 192 Bleeding the brake system of the tractor 189 Bleeding the fuel system 170 Bleeding the hydraulic brak...

Page 215: ...77 Driving operation 61 Driving uphill 77 Driving with agricultural machines attached to the front three point hitch 128 Driving with the front driving axle engaged 78 During the first 10 hours 86 E...

Page 216: ...4 Hitches 121 Hydraulic brake liquid for tractors 159 Hydraulic brakes of trailers 81 Hydraulic lock of the front three point hitch 128 Hydraulic system 103 Hydraulic system 104 Hydraulic system sensi...

Page 217: ...m 200 Main technical parameters 199 Maintenance and treatment of tyres 185 Maintenance instructions 167 Manual throttle lever 54 Mars Svratka driver s seat 33 Max permissible load of the front axle Ca...

Page 218: ...lter element of hydrostatic steering 174 Replacing the fuel filter element 170 Replacing the full flow engine oil cleaner 169 Replacing the hydrostatic steering hoses 176 Reversing lever 56 Reversing...

Page 219: ...ressor 188 Three point hitch 163 Three point hitch lowering speed control 107 Three stage torque multiplier 68 Tilt and telescope steering wheel 41 Tilt steering wheel 41 Tilting lid 29 Towing bar 92...

Page 220: ...219 NOTES...

Page 221: ...rator s manual Proxima Power 90 Proxima Power 100 Proxima Power 110 Proxima Power 120 Edition 3 100 2012 Publication No 222 212 665 ZETOR TRACTORS a s Department of Technical Documentation Trnkova 111...

Page 222: ......

Reviews: