


4
3.2. Starting to Print
(1) Press and hold down the power button. Wait for the green PWR/CHR
LED indicator to light then let go.
(2) When the BT LED light is flashing, there is still no Bluetooth device
connected to the printer yet.
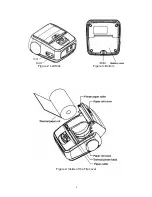
(3) To let the paper come out, just press the paper feed key.
(4) Seeing the "L. BATT" or "ERROR" light means that a problem has been
encountered. Note the error message, investigate the cause and
troubleshoot accordingly.
(5) To shut the device off, press and hold down the power button. Wait for
the PWR / CHR light to turn off then let go.
3.3 Battery
*Using the battery charging cradle:
(1) Plugged the Battery Charging Cradle to the power socket. Note that the
indicator lights is green.
(2) Insert the battery to the cradle. It must be in correct position for the
charging to start and proceed. Red indicator light implies that battery is
being charged.
(3) A continuous green light means the battery is fully charged and ready to
go.
* Using the car charging cable: (Option)
(4) The car charging cable allows connection between the printer and the car
cigarette lighter socket.
(5) While charging, the PWR/CHR light becomes red. The printer is fully
charged when the red light disappears.
3.4 Printing Procedure
(1) Turn the power on.
(2) Using your device's software, establish a bluetooth connection betweem
the printer and the device.
(3) Enter authentication code of the printer which is "0000"
(4) When a successful connection has been established, the BT light will
light steadily.
(5) Using your device software, send the information to the printer.
(6) A flashing blue light implies occurrence of disconnection. When this
happens, re-establish connection and try printing again.
(7)
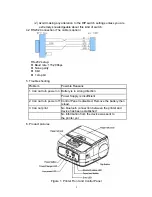
The printer can be connected to a computer or other device using the
RS232 cable provided that the DIP switch is adjusted (see Chapter III).
When the connection is set up in this manner, there is no need
to establish Bluetooth connection to enable printing.
4. Setup and Maintenance
4.1 The DIP Switch
(1) Definition and Function
Code ON
OFF
1 Reserved
Reserved
2
Reserved
Reserved
3 Software
Upgrade
Normal
4 RS232
Connector
Bluetooth
Connector


