Installation Instructions
Step 1: Decide where to put everything
Before you start to install the various components of this kit, you’ll have to
locate the best locations of each component by trial fitment and careful
measurement. First, decide where you want to mount the nitrous and fuel
solenoids. Remember, the stainless steel braided lines that connect these to the
distribution blocks are 24 inches long. Observe and mark the location on each
intake runner where you will drill and tap for the nitrous nozzles. You’ll also have
to decide where to install the arming switch and the nitrous bottle. The arming
switch should be installed in a position convenient to the driver, but not in an area
where it could be accidentally armed. To help you decide where and how you’ll
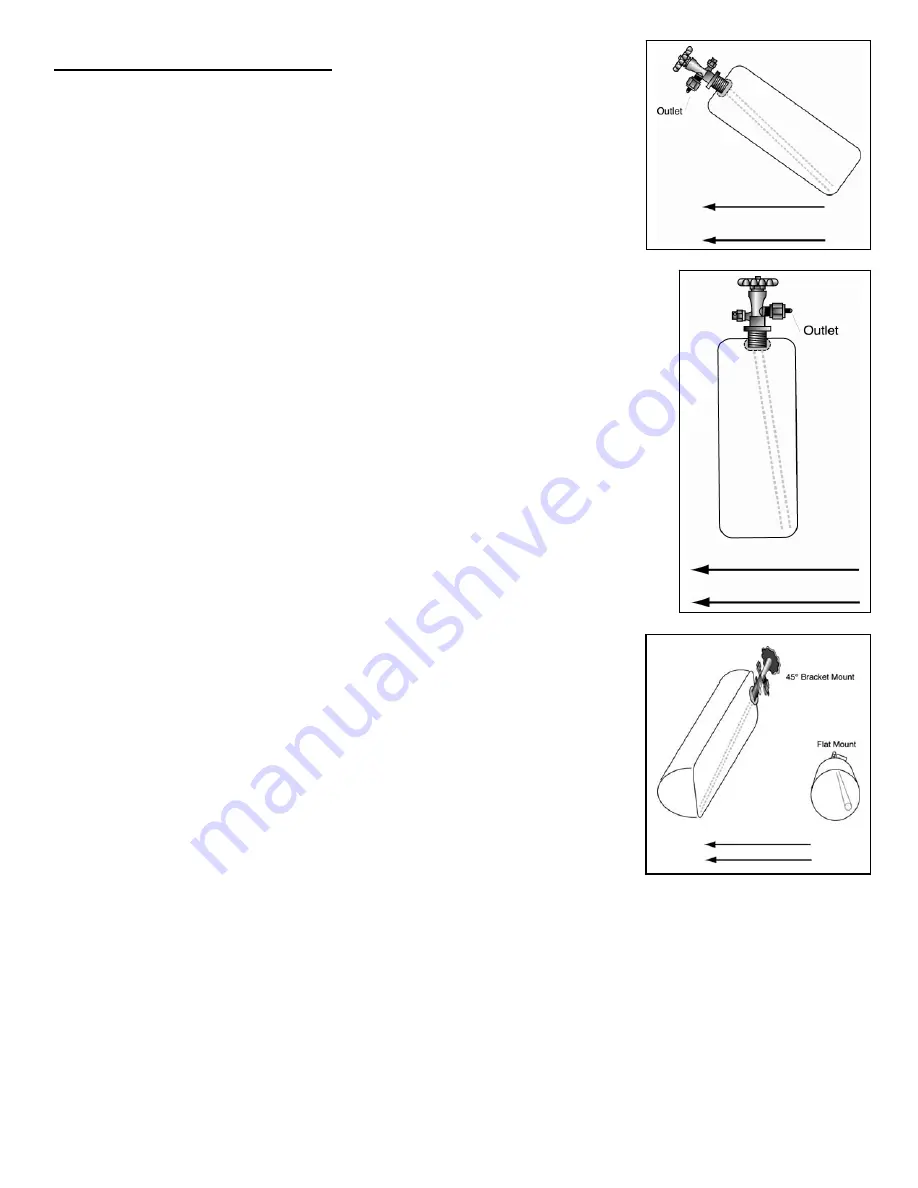
mount the nitrous supply bottle, check fig. 1, 2, 3, and 4 for technical restrictions on
bottle mounting locations and positions. Finally, have a reputable performance shop
fill your nitrous bottle with automotive grade nitrous oxide before you begin. Do
not overfill the nitrous bottle.
Step 2: Mount Nitrous Supply Bottle
1. Mount the nitrous supply bottle so that it is separated from the passenger cabin.
Fastback style cars that do not have separate trunk compartments have to be
equipped with a safety blowdown tube (ZEX Part # 82099). Route the tube
from the safety pressure relief cap to the exterior of the car, preferably under the
car. Doing so will prevent your car from filling with a cloud of nitrous oxide
should the safety pressure relief cap rupture.
2. Index the pickup tube with bottle position. (Refer to fig. 1, 2, and 3). ZEX™
nitrous bottles are designed with the bottom of the siphon tube at the bottom of
the bottle towards the outlet. Always mount the bottle so that as your car
accelerates, the liquid flows toward the pickup tube.
Step 3: Mount Nitrous Delivery Line Under the Car
When routing the nitrous delivery line under the car, try to use the subframe as a conduit (fig.4). This protects
the line and eliminates the need to use clamps. The supplied cable ties work if you can run the line higher in the
under-body so that it's safe from road level obstacles such as speed bumps. For the pro-race look, you can use
steel loom clamps with rubber sheathing to fasten the line to the body.
Fig. 1
Fig. 2
Fig. 3


