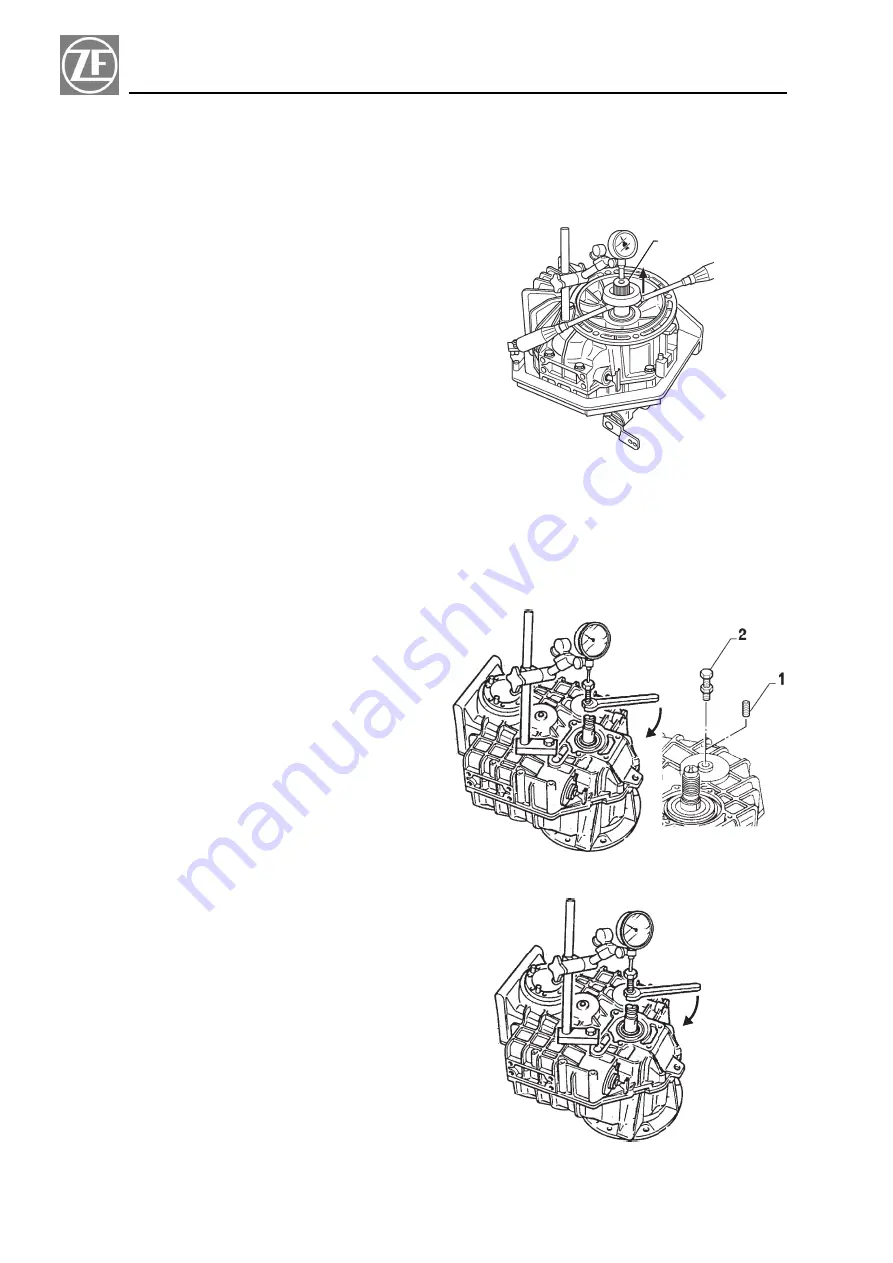
4.5.4 Measuring bearing clearance on input
shaft
a) Turn input shaft severaltimes to permit bearings to
seat.
b) Fit clamping ring (tool p/n 319.354.3 (618582) to the
spline of the input shaft (item 1, Fig. 5-4).
c) "0" dialindicator to obtain accurate reading.
d) With two levers carefully pry on the clamping ring
and record end play of shaft.
This step must be done very carefully to obtain the
actualbearing clearance.
NOTE
This step must be done very carefully to obtain the
actual bearing clearance.
e) Carry out steps "a" and "d" for severaltimes.
f) The bearing clearance measured plus the pretension
required in section 5.1 will determine the required
thickness of shims.
Round off the determined shims thickness to 0.05
mm (0.001968 in.).
4.5.5 Measuring bearing clearance at
intermediate and reversal shafts
a) Unscrew plug (item 1, Fig. 5-5a) from the housing.
b) Screw bolt (tool no. 224.836.008 - 458105) (item 2,
Fig. 5-5a) into intermediate shaft.
c) Mount dialgauge support securely onto housing.
d) Turn intermediate shaft severaltimes to permit bear-
ings to seat.
e) Adjust the dial indicator needle on top of the bolt
head, and "0" indicator (Fig. 5-5b).
f) Screw hexagon nut carefully against housing flange
untilbearing clearance is overcome (Fig. 5-5b).
NOTE
This step should be done very carefully to obtain the
actual bearing clearance.
g) Carry out Steps "d" and "f" for severaltimes.
h) The bearing clearance measured plus the preten-
sion required in section 5.1 will determine the re-
quired thickness of shims.
NOTE
Round off the determined shimr thickness to 0.05
mm (0.001968 in.).
i) Unscrew bolt with nut and remove dial gauge with
support.
l) Repeat same procedure for reversal shaft.
24
Repair Manualand Spare Parts List
Section 4
1
FIG. 5 - 4
FIG. 5 - 5a
FIG. 5 - 5b


