25
GB
Filling with fuel
m
Danger of injury! Fuel is explosive!
Turn off and cool the motor down before filling
the tank with fuel. You must observe all safety
instructions relating to handing fuel.
m
Risk of device damage!
The device is supplied without motor or gearbox
oil.
ATTENTION! Before operating, you must fill it
with fuel.
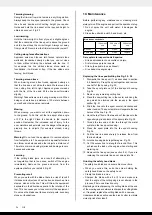
• Unscrew the tank cap (14) and remove it. Fig. 1
• Pour in the fuel carefully. Avoid spilling!
•
Screw the tank cap on firmly by hand.
Draining fuel. Fig. 40
• Hold a collection container beneath the fuel drain bolt.
• Unscrew the tank cap and remove it.
• Allow the fuel to run out completely.
•
Screw the tank cap on firmly by hand.
Start on the unit
Do not start the unit until it has been completely
assembled.
m
Danger of injury!
Do not operate the device unless you did not find
any faults. If a part has become defective, make sure
to replace it before you use the device again.
Check before use!
• Check the safe condition of the device:
• Check the device for leaks.
• Check the device for visual defects.
• Check that all parts of the device have been securely
fitted.
• Check that all safety devices are in proper condition.
m
Danger of injury!
Before starting work, always check the ground and
remove all objects which could be thrown by the device.
Start Fig. 21 - 27 + 41
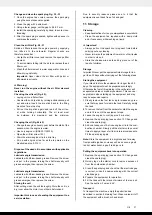
Once the machine has been set up properly, start the
engine as follow:
1. Set the equipment down on a hard, level surface.
2. Turn the engine switch to the ON position. Fig. 23
3. Put the choke lever on the position. Fig. 23
4. Press the fuel pump more than 5 times. Fig. 24
5. Pull the recoil starter handle 3-5 times to start the
engine. Fig. 25
6. Wait a while adjust the choke lever to position.
Fig. 26
7. Pull the rope until engine starts. Fig. 25
8. When the engine is running and idling. The throttle
lever on handle is as picture 25. First press the lock off
lever (7) and then switch the throttle lever (8) on, the
machine will be working. If you want to lock the throttle
lever (8) press the throttle lever lock (9). Fig. 27
9. Adjusting line length when working:
This machine is fitted with a “Tap & Go”head.To
release more line, tap the cutting line head against
the round with engine at top speed: the line will be
released automatically and the knife cut off the
excess length. Fig. 41
10. If meet any problems, press the engine switch to off
position, the machine will stop running. If need stop cutting
head working, release the throttle lever (8). Fig. 27
11. If any problem occurs, pull the pin of safety belt, then
release the brush cutter immediately. Fig. 22
12. If the machine is hot, the throttle level can be
adjusted to ON position directly when re start the
machine.
Note:
If the engine does not start up even after several
attempts, read the section „Engine troubleshooting“.
Note:
Always pull the starter cord out in a straight line. If
it is pulled out at an angle, then friction will occur on the
eyelet. As a result of this friction, the cable will become
frayed and will wear away faster. Always hold the starter
handle when the cable retracts.
Never allow the cable to snap back when it has been
pulled out.
Note:
Do not start the motor in tall grass.
m
Attention:
When the engine has been switched
off, the cutter continues running for several seconds
therefore do not close to cutting head of brush cutter
until the cutter has come to a standstill!
9. Working instructions
Extending the cutting line
Caution!
Do not use any kind of metal wire or metal
wire encased in plastic in the line spool. This may cause
serious injuries to the user. To extend the cutting line, run
the engine at full speed and tap the line spool on the
ground. This will automatically extend the line. Fig. 41
The blade on the safety shield will cut the line to the
appropriate length. Fig. 16
m
Important:
Remove all grass and weed remnants at
regular intervals to prevent the shaft tube overheating.
Lawn, grass and weed remnants become trapped under
the safety shield and prevent the shaft tube from recei-
ving adequate ventilation. Remove the remnants careful-
ly using a screwdriver or the like. Fig. 42
Different cutting methods
When the equipment is correctly assembled it will cut
weeds and long grass in places which are diffi cult to
access, e.g. along fences, walls and foundations and
also around trees. It can also be used for „mowing“ down
vegetation so that a garden can be better prepared or a
certain area cleared down to the soil. Fig. 43
m
Attention:
Even if it is used carefully, cutting around
foundations, stone or concrete walls, etc. will result in the
line suff ering more than normal wear.
Summary of Contents for NEW GENERATION Yellow Garden Line YGL N.G....
Page 2: ......
Page 4: ...14 17 9 10 4 25 24 15 16 A 8 24 11 12 13...
Page 5: ...18 19 20 21 25 24 26 27 7 8 6 9 23 22...
Page 6: ...34 37 32 33 35 B C 36 30 31 28 29...
Page 7: ...WIND CORD 38 39 40 42 41 43 44 Max Min Max Min Motor oil 10W30 SAE30 80 ml 45...
Page 29: ...29...
Page 31: ...31...
Page 32: ...32 B...
Page 33: ...33...
Page 34: ...34...


