background image

22

GB

Device description (Fig. 1-5)

1.  Motor housing
2.  ON- / OFF switch
3.  Handle
4. 

Oil fill opening / sight glass

5.  Additional handle
6.  Tool holder
7.  Point chisel
8.  Locking bolt
9.  Clamping screw
10.  Locking switch
11.  Tapping screw

Scope of delivery (Fig. 6)

(1x) Demolition Hammer

(1x) Transport box (A)

(1x) Lubricating grease (B)

(1x) Oil can (C)

(1x) Point-chisel ø 30 L390 (D)

(1x) Flat-chisel ø 30 L390 (E)

(1x) Instruction manual

• 

Open the packaging and remove the de-
vice carefully.

• 

Remove the packaging material as well 
as the packaging and transport bracing 
(if available).

• 

Check that the delivery is complete.

• 

Check the device and accessory parts 
for transport damage. When complaints 
the dealer must be informed immediate-
ly. Subsequent complaints will not be ac-
cepted.

• 

If possible, store the packaging until the 
warranty period has expired.

• 

Read the operating instructions to make 
yourself familiar with the device prior to 
using it.

• 

Only use original parts for accessories 
as well as for wearing and spare parts. 
Spare parts are available from your spe-
cialized dealer.

• 

Specify our part numbers as well as the 
type and year of construction of the de-
vice in your orders.

m

 Attention!

The device and packaging materials are 

not toys! Children must not be allowed 

to play with plastic bags, film and small 

parts! There is a risk of swallowing and 

suffocation!

Intended use

The machine is intended for heavy chisel-
ling and demolition work as well as for driv-
ing in and compacting with the appropriate 
accessories.

The equipment is allowed to be used only 
for its prescribed purpose. Any other use is 
deemed to be a case of misuse. The user/
operator and not the manufacturer will be 
liable for any damage or injuries of any kind 
resulting from such misuse.

An element of the intended use is also the 
observance of the safety instructions, as 
well as the assembly instructions and oper-
ating information in the operating manual.

Summary of Contents for YELLOW PROFILINE YPL 1900

Page 1: ...n Hammer Translation of the original instructions YPL 1900 Art Nr 5906103924 AusgabeNr 5906103851 Rev Nr 16 04 2015 Art Nr 3908204972 57933 Ausgabe Nr 3908204850 Rev Nr 15 02 2018 www scheppach com se...

Page 2: ...2 DE Abb 1 2 3 1 4 6 8 5 7 5 9 Abb 3 180 Abb 2 8 Abb 4 2 Abb 5 11 4 E D B A C 10 Abb 6...

Page 3: ...Inbetriebnahme Bedienungsanleitung und Sicher heitshinweise lesen und beachten Schutzhandschuhe tragen Augenschutz tragen Geh rschutz tragen Staubschutz tragen Sicherheitsschuhe tragen Erkl rung der...

Page 4: ...mungsgem e Verwendung 6 Allgemeine Sicherheitshinweise f r Elektrowerkzeuge 7 Technische Daten 11 Vor Inbetriebnahme 13 Betrieb 13 Inbetriebnahme 13 Bedienungs Arbeitshinweise 14 Elektrischer Anschlus...

Page 5: ...hre bestimmungsgem en Einsatz m glichkeiten zu nutzen Die Bedienungsanleitung enth lt wichtige Hinweise wie Sie mit der Maschine sicher fachgerecht und wirt schaft lich arbeiten und wie Sie Gefahren v...

Page 6: ...st ndig ist Kontrollieren Sie das Ger t und die Zu beh rteile auf Transportsch den Bei Be anstandungen muss so fort der Zubringer verst ndigt werden Sp tere Reklamatio nen werden nicht anerkannt Bewa...

Page 7: ...en Einsatz konstruiert wurden Wir berneh men keine Gew hrleistung wenn das Ge r t in Gewerbe Handwerks oder Indust riebetrieben sowie bei gleichzusetzenden T tigkeiten eingesetzt wird Allgemeine Siche...

Page 8: ...t das Risiko eines elektrischen Schlages f Wenn der Betrieb des Elektrowerkzeuges in feuchter Umgebung nicht vermeidbar ist verwenden Sie einen Fehlerstrom schutzschalter Der Einsatz eines Feh lerstro...

Page 9: ...und sicherer im angegebe nen Leistungsbereich b Benutzen Sie kein Elektrowerkzeug dessen Schalter defekt ist Ein Elektro werkzeug das sich nicht mehr ein oder ausschalten l sst ist gef hrlich und mus...

Page 10: ...uch metallene Ger teteile unter Span nung setzen und zu einem elektrischen Schlag f hren Verwenden Sie geeignete Suchger te um verborgene Versorgungsleitungen aufzusp ren oder ziehen Sie die rtliche V...

Page 11: ...eise M gliche Ursachen daf r k nnen sein Verkanten im zu bearbeitenden Werk st ck Durchbrechen des zu bearbeitenden Materials berlasten das Elektrowerkzeuges Greifen Sie nicht in die laufende Maschi n...

Page 12: ...dern und in Ausnah mef llen ber dem angegebenen Wert liegen Der angegebene Schwingungsemissions wert kann zum Vergleich eines Elektro werkzeuges mit einem anderen verwendet werden Der angegebene Schwi...

Page 13: ...e Teil ausgetauscht wer den berpr fen Sie die Ausrichtung aller beweglichen Teile aller gebrochenen oder Befestigungsteile und alle an deren Bedingungen die den ordentli chen Be trieb beeintr chtigen...

Page 14: ...rieb Betriebsschalter 2 dr cken und mit dem Sperrschalter 10 verriegeln Dauerbetrieb stoppen Betriebs schalter 2 antippen Bedienungs Arbeitshinweise Achtung Zu Ihrer Sicherheit darf die Maschine nur a...

Page 15: ...ch den durch Herausrei en aus der Wandsteckdose Risse durch Alterung der Isolation Solch schadhafte Elektro Anschlusslei tungen d rfen nicht verwendet werden und sind aufgrund der Isolationssch den le...

Page 16: ...Reini gungsarbeiten sowie die Beseitigung von Funktionsst rungen grunds tzlich nur bei ausgeschaltetem Antrieb vornehmen S mtliche Schutz und Sicherheitsein richtungen m ssen nach abgeschlosse nen Re...

Page 17: ...ein 4 Schrauben Sie das Schauglas wieder fest und kontrollieren Sie den lstand F llen Sie gegebenfalls l nach bzw lassen ber sch ssiges l ab bis der lstand stimmt 5 lstand nach kurzer Laufzeit noch e...

Page 18: ...er te 2012 19 EU und nationalen Gesetzen nicht ber den Hausm ll entsorgt werden darf Dieses Produkt muss bei einer daf r vorgesehenen Sammelstelle abgegeben werden Dies kann z B durch R ckgabe beim Ka...

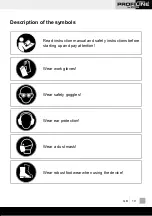
Page 19: ...ction manual and safety instructions before starting up and pay attention Wear work gloves Wear safety goggles Wear ear protection Wear a dust mask Wear robust footwear when using the device Descripti...

Page 20: ...y 22 Intended use 22 General Power Tool Safety Warnings 23 Technical data 26 Before starting the equipment 28 Operation 28 Starting up 28 Operation work instructions 29 Electrical connection 29 Mainte...

Page 21: ...nce with the recommendations The operating instruc tions contain important information on how to operate the machine safely profession ally and economically how to avoid danger costly repairs reduce d...

Page 22: ...make yourself familiar with the device prior to using it Only use original parts for accessories as well as for wearing and spare parts Spare parts are available from your spe cialized dealer Specify...

Page 23: ...r dark areas invite accidents b Do not operate power tools in explosive atmospheres such as in the presence of flammable liquids gases or dust Power tools create sparks which may ignite the dust or fu...

Page 24: ...y result in personal injury e Do not overreach Keep proper footing and balance at all times This enables better control of the power tool in unex pected situations f Dress properly Do not wear loose c...

Page 25: ...plied with the tool Loss of control can cause per sonal injury Hold power tool by insulated gripping surfaces when performing an operation where the cutting accessory may con tact hidden wiring or its...

Page 26: ...hined it has pierced through the material to be machined the power tool is overloaded Do not reach into the machine while it is running Chips and splinters must not be removed while the machine is run...

Page 27: ...be used to compare the equipment with other elec tric power tools The specified vibration value can be used for initial assessment of a harmful effect Keep the noise emissions and vibra tions to a min...

Page 28: ...achine if a switch can not be switched on and off correctly Caution Before beginning the operation check the installation site for concealed electrical cables gas and water pipes us ing a pipe locator...

Page 29: ...y at low pressure when chiselling Excessive pressure loads the motor un necessarily Sharpen the chisels in time and replace if necessary Dust Chip Extraction Dusts from materials such as lead contain...

Page 30: ...y AC motor The mains voltage must be 230 V 50Hz Extension cables up to 25 m length must have a cross section of 1 5 mm2 Power supply and extension cord must be 3 wire P N SL 1 N PE The mains supply is...

Page 31: ...plastic parts of the device Make sure that no water can get inside the device Carbon brushes In case of excessive sparking have the carbon brushes checked by a qualified electrician Caution The carbo...

Page 32: ...prod uct must not be disposed of together with domestic waste in compliance with the Directive 2012 19 EU per taining to waste electrical and electronic equipment WEEE This product must be disposed of...

Page 33: ...or switch out of order c Check with the help of an electrician d Motor or switch defective d Check with the help of an electrician e Carbon brushes defective e Check with the help of an electrician Mo...

Page 34: ...34...

Page 35: ...ie Vorschriften der Richtlinie 2011 65 EU des Europ ischen Parlaments und des Rates vom 8 Juni 2011 zur Beschr nkung der Verwendung bestimmter gef hrlicher Stoffe in Elektro und Elektronikger ten The...

Page 36: ...kkur byrgjumst vi af v leiti a eins a vi eigum r tt byrg arkr fum gagnvart birg as lum Kostna ur vegna uppsetningar n jum hlutum skal falla skaut kaupanda gilding s lu e a afsl ttur kaupver i sem og a...

Reviews: