background image

 Part III    Basic Knowledge and Operation 


BECS-129S Singular-head Computerized Embroidery Machine 

20 

button to carry out forward embroidery, the frame will move forward along 

the stitch trace with the main shaft not rotating; when the user presses the stop 

button to carry out the return operation, the frame will move backward along 

the stitch trace with the main shaft not rotating. 

If the machine is set as high-speed idling, when the user presses the 

startup button, the frame and the main shaft will remain still and the stitch 

count is added; when the stop button is pressed, the frame will move directly 

to the position corresponding to the current stitch count. When the user 

presses the stop button, the frame and the main shaft will remain still and the 

stitch count is reduced; and when the stop button is pressed, the frame will 

move directly to the position corresponding to the current stitch count. 

The user has to ensure that the system is in normal embroidery mode 

before carrying out the embroidery work. 

3. Work sequence 

Threads of different colors are required for a complicated design. This is 

often based on color blocks in the design. The work order is to preset 

whether to change thread for every color block. 

When embroidery is started up with the work sequence effective, the 

machine will automatically change thread according to the set sequence. 

Otherwise the user should set it in the manual operation before embroidery. 

The user can choose whether to use the work sequence by the key "

". 

When the work order is effective, it’s displayed in highlight in the main 

Summary of Contents for BECS-129S

Page 1: ...______18 3 2 Inputting Design from USB Disk and Starting First Embroidery________________________21 3 3 Select Memory Design for Embroidery _____________________________________________26 Part IV Sett...

Page 2: ...Backward Code Float____________________________________________________________58 5 10 Forward Sti Float _____________________________________________________________59 5 11 Backward Sti Float _______...

Page 3: ...rt VIII Assistant Function____________________________________________________________88 8 1 Set soft Limit___________________________________________________________________88 8 2 Frame Restore _____...

Page 4: ......
Page 5: ...put the designs data in the following formats into the memory files in binary system dsb ternary system dst and Z coding system dsz from Tajima format disk and files in binary system ternary system an...

Page 6: ...parameter setting the user can select thread break detecting or no thread break detecting When it s effective the machine will stop automatically and show an icon in the screen when thread breaks 7 W...

Page 7: ...design It is to embroider the design in memory after scaling up down and or rotate it 14 Design operation With this the user can survey the memory directory and the information of design files in the...

Page 8: ...will stop with 19 Returning and patching When the thread breaks the user can choose automatic return of a certain stitches or press the stop button for manual return When the machine arrives at the s...

Page 9: ...BECS 129S Singular head Computerized Embroidery Machine 5 and Portuguese 23 Trimming In embroidery the user can choose the automatic trimming according to the function codes or stopping the machine t...

Page 10: ...Part II Control and Basic Operations BECS 129S Singular head Computerized Embroidery Machine 6 Part II Control Panel and Basic Operations 2 1 Control Panel LCD Panel...

Page 11: ...Part II Control and Basic Operations BECS 129S Singular head Computerized Embroidery Machine 7 Keyboard Style 1 Start Button Stop Button Emergency Stop Button 100...

Page 12: ...Part II Control and Basic Operations BECS 129S Singular head Computerized Embroidery Machine 8 Keyboard Style 2 Emergency Stop Button Start Button Stop Button...

Page 13: ...Part II Control and Basic Operations BECS 129S Singular head Computerized Embroidery Machine 9 Keyboard Style 3 Emergency Stop Button Start Button Stop Button...

Page 14: ...em status The icon means embroidery preparation status and means embroidery confirmation status The status is for preparation work and in status the user can press the start button to begin embroidery...

Page 15: ...hange manual start and manual color change manual start C It is for embroidery mode normal embroidery low speed idling or high speed idling Press the key to switch among them D This is to show whether...

Page 16: ...t s the number of the memory stored design like 05 in the above picture which is ready for embroidering immediately after start up The user can select a design number by performing design selection op...

Page 17: ...to reset the coordinate value clear the coordinates of frame Otherwise press to exit 5 Needle Pos It shows the current needle position Press the number key to change color and then current needle posi...

Page 18: ...scaling up down design direction rotation angle repetition priority repetition times repetition interval cyclic embroidery and work sequence The other page displays the standard data trim and machine...

Page 19: ...ess this key to switch states among normal embroidery high speed idling and low speed idling Numerical keys Keys are used for manual color changing inputting design number design name and various data...

Page 20: ...neighboring keys at the same time to move the frame in the direction of the angle bisector In all function and menu operations press is to move the cursor in the horizontal direction or to turn page w...

Page 21: ...n also manually turn the shaft to the right position if the main shaft fails to get the very position 2 5 Start and Stop Button The start button is on the operation box and it s for starting embroider...

Page 22: ...ry Then it s no longer permitted to perform the operation which will affect the embroidery such as design selection scale and repetition parameters input etc Under status press the key to enter the em...

Page 23: ...ser pressed the startup key the main rotates and the frame moves according to the design data At this time the stitches number is increasing and stitches are embroidered onto the fabric to form design...

Page 24: ...he stop button the frame and the main shaft will remain still and the stitch count is reduced and when the stop button is pressed the frame will move directly to the position corresponding to the curr...

Page 25: ...m the USB disk Machine embroidery is based on the design data in its memory So it s necessary to input design data from the floppy or USB disk to the machine memory before user carries out the embroid...

Page 26: ...ct the design then press to turn pages and press to confirm 4 The machine automatically provides and displays the smallest number available for the new memory design It s possible to input other numbe...

Page 27: ...y design name If it s the same to its disk name press otherwise move the cursor to the selected letter by press to input the letter and press to confirm the newly input name The user can press for re...

Page 28: ...ut if the system is under embroidery preparation status the system will ask the user whether to embroider the latest input design if it is under embroidery confirmation status If the user chooses No t...

Page 29: ...ration before embroidery You need to do the following works before embroidery Set the fabric ready and press to move the frame to the beginning position Ensure that the system is under normal embroide...

Page 30: ...he design operation menu Press to enter the first menu item and the following prompt will appear If you have known the number of the design intended to be embroidered in memory you can input the numbe...

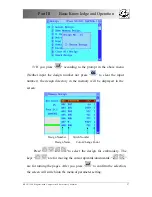
Page 31: ...r nor press to clear the input number the design directory in the memory will be displayed in the screen Press to select the design for embroidery The keys are for moving the cursor upwards downwards...

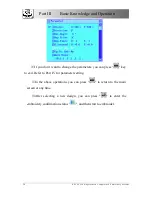
Page 32: ...you don t want to change the parameters you can press key to exit Refer to Part IV for parameter setting In the above operations you can press to return to the main screen at any time After selectin...

Page 33: ...ailable The parameters except the 7th and 8th in the first page such as scale parameter repetition parameter and work sequence parameter are stored with each design separately When you select to embro...

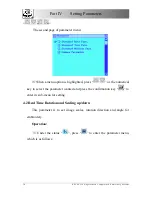
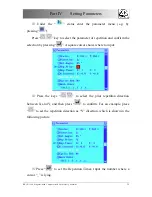
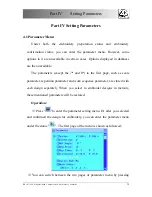
Page 34: ...highlighted press or the numerical key to select the parameter wanted and press the confirmation key to enter its sub menu for setting 4 2 Real Time Rotation and Scaling up down This parameter is to...

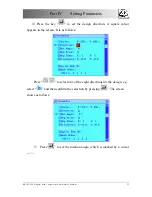
Page 35: ...ter Press to confirm the selection then you can change the parameter value Please read the following examples carefully In the above menu screen press to set the scale in the direction A cursor _ appe...

Page 36: ...s BECS 129S Singular head Computerized Embroidery Machine 32 Input the scale where there is a cursor _ It is as the followed Input numbers to set the Y scale 50 200 E g 1 6 and 0 are for 160 Press and...

Page 37: ...the key to set the design direction A square cursor appears in the screen It is as follows Press to select one of the eight directions for the design e g select and then confirm the selection by press...

Page 38: ...nd 5 are for 45 Then confirm it by pressing 4 3 Setting Repetition Embroidery The machine has the function of normal repetition embroidery the machine completes one design and then automatically moves...

Page 39: ...er of repetition and confirm the selection by pressing A square cursor shows where to input Press the keys to select the prior repetition direction between X and Y and then press to confirm For an exa...

Page 40: ...ar head Computerized Embroidery Machine 36 Input the normal repetition times in X direction between 1 and 99 E g press 3 and to set the time of repetition as 3 in X direction Input the new repetition...

Page 41: ...as followed Input the new X direction interval value between 999 9 and 999 9 mm E g press 1 and 2 to set the value as 12 mm and then press to confirm The system will hint you to set the new Y directio...

Page 42: ...the frame will stay at the offset point a before embroidery Press the start button and the frame will move automatically to the start point b Press the start point again and the embroidery will begin...

Page 43: ...u Press the keys or to move the cursor to option 7 and then press to enter the setting of offset point The hint is shown as below Press to move frame to the offset point and then press to confirm the...

Page 44: ...Work sequence is a function set for improving the embroidery efficiency and changing color automatically Basing on color blocks in design it can be set according to the colors in the design or the us...

Page 45: ...w you where to input which is shown as below Input the numbers for the number smaller than 10 the user can directly input it via the numeral keys while for the number larger than 10 the user shall inp...

Page 46: ...et as No the items unset in the work sequence will keep remained If it is set as Yes the entire unset items will be same to the value where the cursor is located 4 7 Standard Data Parameter This is to...

Page 47: ...hat at over frame The machine will automatically stop move frame and automatically start again Thread broken detect Options 3 7 No When this parameter is set as Yes the machine will automatically judg...

Page 48: ...T B D Options 0 15 This parameter is to decide not to check thread break in how many stitches when the machine start running T B Detect at Jump Options Yes No This is to decide whether to check thread...

Page 49: ...ng up down and rotation Its measurement unit is mm 4 8 Standard Trim Parameters These are the parameters concerning the trimming in Flat embroidery Refer to the appendix for their options and default...

Page 50: ...whether to lock stitch before trimming Lock Num Af Trim Options 0 1 2 This parameter is to set how many stitches to lock when the machine starts running after trimming Speed At Trimming It is set 120...

Page 51: ...ad Computerized Embroidery Machine 47 4 9 Standard Machine Parameters These are the machine parameters concerning the flat embroidery Refer to the appendix for their options and default values Maximum...

Page 52: ...the machine sets the rotation speed automatically according to the stitch length the stitches smaller than the Shift Sti Length will automatically set the speed as the Maximum Speed On the same premi...

Page 53: ...slow start up stitches are at the startup Acceleration Options 1 12 This parameter is to set the degree of acceleration after the slow startup stitches The larger the parameter value is the faster the...

Page 54: ...t for the machines equipped with sequin embroidery devices The parameter should be set as Yes for the machines equipped with such devices Otherwise it should be No Sequin Needle Set Options A B This p...

Page 55: ...Options 1 needle number No This is to set the needle position of rope embroidery Set this parameter to enable rope embroidery in the machine with the rope embroidery device The setting links to anoth...

Page 56: ...or by step in case of jump stitch codes in designs The user can select the proper over frame mode according to their needs This operation is prohibited in embroidery confirmation status Overframe Spe...

Page 57: ...s to decide whether to transform the stop codes to color change codes when the designs are input from Usb disk Save to Work Sequence Options Yes No When the work sequence is not effective the user wil...

Page 58: ...Origin Back Operation While the machine stops select Origin Back and click to confirm and then the machine will automatically return to the start point 5 2 Stop Back If the frame has been moved or ot...

Page 59: ...shaft will rotate to stop near 100 which can also be performed by pressing shortcut key on the panel At this time the indicator LED is on and the embroidery can start after the startup key is pressed...

Page 60: ...to exit the operation during the above process before the frame move he can press and the system will return to the main screen After selecting a design the user can use this operation to check if th...

Page 61: ...ess the manual operation key to enter the manual operation menu Then select Emb Range and press the key The system asks the user to input the stitch length for embroidering range Press the numerical k...

Page 62: ...n the main screen will change back to the former one after the embroidery 5 8 Forward Code Float This operation is to move the frame to the pointed position according to the stop code in the design qu...

Page 63: ...ckward to and stop at the pervious stop code or color changing code The second screen Enter the manual operation menu and turn to the second screen 5 10 Forward Sti Float Operation In the main menu an...

Page 64: ...e will act 5 11 Backward Sti Float In the main menu and under the embroidery confirm status press the key to enter the manual operation menu Press the key to enter the second screen Press the key to s...

Page 65: ...B disk and the floppy disk which uses the Usb interface floppy disk drive Operation When the main screen is being displayed press the key to enter the disk management menu Press the key 1 and the conf...

Page 66: ...FDR format disks automatically and to input the design files to the machine memory After this operation the scale parameter will be restored to the standard value refer to appendix and its X Y repeti...

Page 67: ...At this moment the system will provide and display an available design number minimum which the user can change For example if the system provides a minimum number 4 but the user wants to use 15 the...

Page 68: ...he name or press to input a new name The system starts to input the selected design file A progress bar is displayed during the inputting process After the input the system will ask the user whether t...

Page 69: ...Singular head Computerized Embroidery Machine 65 Press to select Yes then press and the system will enter the parameter setting operation 6 3 Des Output to USB Disk This is to save the memory designs...

Page 70: ...ement menu then press key 3 to select the item of Des Output To U The following interface will be displayed 2 Press and then the system will ask user to input the memory No of the design for output Pr...

Page 71: ...ame press the key Otherwise the user shall press and to select characters and then press to confirm the input name or press to cancel and input a new name When the output begins a progress bar will ap...

Page 72: ...tion 1 Under the status in the main screen and press the key Press 5 enter the option Delete U Design 2 Press and the to enter the directory of U disk The machine reads the directory of the USB disk a...

Page 73: ...the memory design operation menu under both the embroidery preparation status and the embroidery confirmation status But some menu options are displayed in darkness in some cases when they are unavai...

Page 74: ...roidery preparation status Operation Under the embroidery preparation status press the key to enter the design operation menu on the main screen Press the confirm key to enter the first menu option Th...

Page 75: ...r or having pressed to cancel the input number the directory of memory designs will be displayed on the screen Press keys to select a design intended for embroidery is for moving the cursor upward and...

Page 76: ...to quit to the main screen at any time 7 3 Show Memory Design This operation is to list the designs in memory and show their parameters Operation Under the main screen press to enter the memory design...

Page 77: ...he stop point number of design colors and number of stitches The design can also be displayed in different ways to show details clearly 7 4 U Des Input This operation is the same to U Des Input in dis...

Page 78: ...r uses the disk name as memory name he can press the key Otherwise he shall press the keys to select a character and then press the key to input After inputting the name the user shall press to confir...

Page 79: ...status Operation Under the status press to enter the memory design operation menu on the main screen Press the key 4 and and the following screen will appear Select the design Press numerical keys to...

Page 80: ...ion Copy Design Press and the system will ask for the memory number of the design to copy Press the numerical keys to input the memory number of the target design or select it by pressing to enter the...

Page 81: ...ult number the system will carry out the copy work without the above operation After copying the system will return to the design editing menu During the above operation the user can press to quit to...

Page 82: ...n directory and then select Refer to Part III Press the key If the selected design number doesn t exist the confirmation will fail Otherwise the system will ask user to input the design number of the...

Page 83: ...omputerized Embroidery Machine 79 4 The user can also input a new number by pressing numerical keys and If the number has been used by another design the confirmation will fail Otherwise the system wi...

Page 84: ...After this operation the system will return to the design editing menu 7 8 Divide Design This operation is to divide one design into two and save them in the memory as two new designs Operation Under...

Page 85: ...the stitch number 1 60000 of the dividing point in the target design Press and the system will provide and display a minimum available design number automatically Confirm the system provided number or...

Page 86: ...stem provided number or input a new number and confirm Then the system will ask user to confirm or input the name of the second new design Press the confirmation key or input a new name and confirm Th...

Page 87: ...r can use this operation to check whether the design is correct and judge the cause of malfunction Operation Under the main screen press to enter the memory design operation menu Press to select Check...

Page 88: ...ll appear Input a new design name for the selected design Press the confirmation key to confirm the input and the system will complete the change and return to the design operation menu 7 12 Expand Sa...

Page 89: ...This enables to widen or narrow the satin stitch to the desired width 7 13 Design letter pattern This system has 28 different fonts for the 26 letter English alphabet capital and small and digits 0 9...

Page 90: ...is percentage for X Y scales and Satin Stitch Density mm for X Y Space degree for Angle After setting the user can press to enter the next step When Arrange is selected for Arc the computer will ask...

Page 91: ...nd then press to enter the next step The system creates the letter design and display it in the screen Press to exit the display The system ask whether to save the letter design No is to cancel this a...

Page 92: ...ubmenus To exit from the assistant management menu press key to return to the main screen 8 1 Set soft Limit This function is to set the embroidery range of the frame by software so that the embroider...

Page 93: ...ss to set the point as the bottom right point Now the software embroidery limitation is fixed 8 2 Frame Restore Accidental power off may take place during embroidery When power is on again embroidery...

Page 94: ...the position where it was when power off 8 3 Default Setup This operation is to set the parameter or variable values as the default or standard ones Some default setup Current stitch 0 Stitches count...

Page 95: ...ment menu Press keys or press 4 to select the option Change UI Language and then press You can choose several kinds of language as follows Chinese English Turkish Spanish and Portuguese 8 5 Set Frame...

Page 96: ...tion 8 6 Machine Self Test and Test Machine Parts These functions are provided for machine maintenance Machine Self Test is to check the computer control s circuits And Test Machine Parts is to check...

Page 97: ...ort Setting IP address is to configure network It includes see the above diagram IP address it s the IP address of the local machine It s allocated by the network administrator The IP address is exclu...

Page 98: ...esult shows in the F area of the main screen refer to the main screen composition in Chapter 2 2 The icon indicates successful link while means failure If the parameter is set as No the machine will n...

Page 99: ...tion to link manually If it fails repeatedly please check whether all the premises for successful link are fulfilled Or try again after resetting power off and on the computer control system Note In o...

Page 100: ...sponding to the needle with serial number from 1 to 15 Select Set Design Showing Color and press the key The interface is shown as followed The 15 color blocks are corresponding to the needle position...

Page 101: ...the color which you want And press the key to confirm Once the color is selected the color on the corresponding needle position will be changed to the selected color For example the No 1 needle positi...

Page 102: ...ion Rotation angle 0 89 0 Repetition Parameters Parameter Choice Standard value Rep Prior Rep Times X 1 99 1 Rep Times Y 1 99 1 Repetition Interval X 999 9 999 9 0 Repetition Interval Y 999 9 999 9 0...

Page 103: ...disk directory E 06 No free space in disk E 07 Formatting fail E 08 No design end code E 11 Startup without embroidery confirm E 12 Already return to origin point E 13 Not exit embroidery confirm E 1...

Page 104: ...Needle position abnormal E 58 Main motor exceed 2 sec E 59 Color change motor reverse E 61 Frame software limit E 63 Frame moving angle inquiry overtime E 70 No zero point signal E 74 Cutter not in t...

Page 105: ...rmat of the disk you can format the disk with the tool provided by embroidery machine s computer system E 03 No disk In case the machine is unable to find any valid floppy disk in the floppy driver pl...

Page 106: ...re E 10 Emergency stop Reset button Press the reset button in case of emergency stop To resume you have to turn the button according to the direction printed on the upper bottom of the button E 11 Sta...

Page 107: ...r input equipment E 17 No free design numbers The system can have 99 memory design numbers at most If more than 99 designs are input no matter there is free space in the memory or not the system won t...

Page 108: ...between motor shaft and the mechanical shaft of the main shaft E 53 Stepping motor abnormal The malfunctions on the stepping motor have resulted in overflow or over temperature Check the connection o...

Page 109: ...tat and the mechanical installation E 57 Needle position abnormal The needle position in the color change shows as The user can manually turn the color change cam to the right position If such problem...

Page 110: ...ounded E 70 Zero point signal inquiry overtime This may be caused by 1 damaged zero position optical coupler 2 damaged motor encoder 3 separation between the motor axis and mechanical axis of the main...

Page 111: ...ords E 130 No Respond from U disk Something is wrong with the MASTER module so that it is unable to carry out the orders from the computer E 131 Rsp Disagree Command This may be caused by 1 MASTER mod...

Page 112: ...eated file name is the same to an existing file name in the USB disk E 154 File Not Found The file wanted doesn t exist in the USB disk E 157 File Not Open The file hasn t been opened successfully E 1...

Reviews: