background image

WEEBILL-S

User Guide

ZHIYUN-EN-v1.20

Summary of Contents for CR110

Page 1: ... Quick Keyword Search Enter the keyword in the search box and hit the search button Quick Jump between Chapters Click the title of a specific chapter on the Contents to jump to it Reading software such as Adobe Reader is needed to support the functions above ...

Page 2: ...WEEBILL S User Guide Z H I Y U N E N v 1 2 0 ...

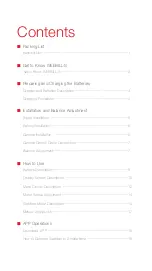
Page 3: ...n and Balance Adjustment Tripod Installation 5 Battery Installation 6 Camera Installation 6 Camera Control Cable Connection 7 Balance Adjustment 7 How to Use Buttons Description 9 Display Screen Description 10 Menu Option Description 12 Motor Torque Adjustment 14 Stabilizer Mode Description 14 Manual Angle Lock 17 APP Operations Download APP 18 How to Connect Stabilizer to Smartphone 18 ...

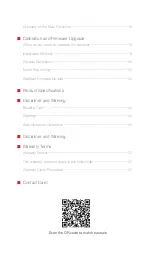
Page 4: ...alibration 20 Motor Fine tuning 22 Stabilizer Firmware Update 22 Product Specifications Disclaimer and Warning Reading Tips 24 Warnings 24 Safe Operation Guidelines 24 Disclaimer and Warning Warranty Terms Warranty Period 27 This warranty does not apply to the followings 27 Warranty Claim Procedure 27 Contact Card Scan the QR code to watch tutorials ...

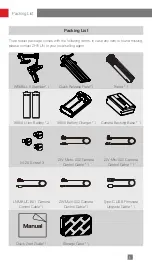
Page 5: ... agent WEEBILL S Stabilizer 1 Quick Release Plate 1 Tripod 1 18650 Li ion Battery 2 18650 Battery Charger 1 Camera Backing Base 1 1 4 20 Screw 3 ZW Micro 002 Camera Control Cable 1 ZW Mini 002 Camera Control Cable 1 LN MBUC B01 Camera Control Cable 1 ZW Multi 002 Camera Control Cable 1 Type C USB Firmware Upgrade Cable 1 Quick Start Guide 1 Storage Case 1 ...

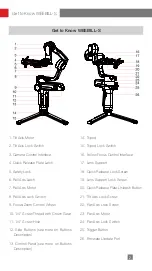
Page 6: ...4 Screw Thread with Crown Gear 11 1 4 Screw Hole 12 Side Buttons see more on Buttons Description 13 Control Panel see more on Buttons Description 14 Tripod 15 Tripod Lock Switch 16 Follow Focus Control Interface 17 Lens Support 18 Quick Release Lock Screw 19 Lens Support Lock Screw 20 Quick Release Plate Unleash Button 21 Tilt Axis Lock Screw 22 Pan Axis Lock Screw 23 Pan Axis Motor 24 Pan Axis Lo...

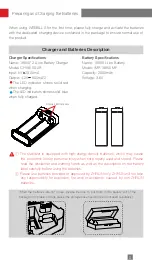
Page 7: ... IMR 18650 MP Capacity 2600mAh Voltage 3 6V Battery Specifications Status LED Indicator The stabilizer is equipped with high energy density batteries which may cause fire economic loss or personal injury when not properly used and stored Please read the disclaimer and warning herein as well as the description on the battery label carefully before using the batteries Please use batteries provided o...

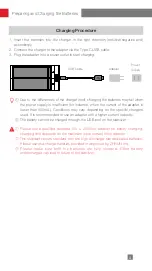
Page 8: ...dard 5V 2000mA adapter for battery charging charging time depends on the maximum input current of the adapter This stabilizer comes standard with two high discharge rate dedicated batteries Please use and charge batteries provided or approved by ZHIYUN only Please make sure both the batteries are fully charged Either battery undercharged can lead to failure of the stabilizer USB Cable Adapter Powe...

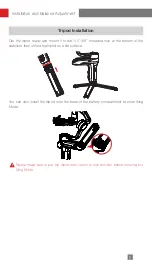
Page 9: ...ilizer then unfold the tripod on a flat surface Tripod Installation You can also install the tripod onto the base of the battery compartment to enter Sling Mode Please make sure to put the tripod lock switch to lock position before entering into Sling Mode Installation and Balance Adjustment ...

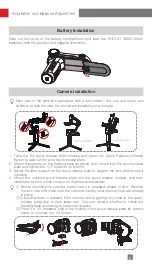
Page 10: ...e and then install and lock the whole module on the three axis stabilizer 安装锁定姿态 收纳锁定姿态 Before mounting the camera make sure it is prepared ahead of time Remove the lens cap and make sure the camera s battery and memory card are already in place A backing base is required if the camera lens is getting too close to the quick release plate due to their large size You can decide whether to install th...

Page 11: ... the form are only for reference When controlling a Sony camera via a control cable please power on the stabilizer before powering on the camera Please make sure the camera is fully charged The optical zoom is available if using a motorized lens and the digital zoom is available if using a non motorized lens You can set in the camera menu For the full camera compatibility list please visit ZHIYUN ...

Page 12: ...sh the camera to move left or right until the camera can stay still and horizontal to the ground as shown below Complete this step by tightening up Roll Axis Lock Latch Unlock the tilt axis and Quick Release Plate Latch push the camera to move forward or backward until the camera can stay still and almost level with its lens facing front as shown below Complete this step by tightening up Quick Rel...

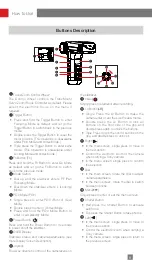
Page 13: ... seconds to power on off the stabilizer OLED Display Stabilizer status and camera parameters see more Display Screen Description Joystick Four way direction control of the camera lens on the stabilizer Video Single press to start end video recording LV Button LV Single Press the LV Button to make the camera enter or exit the Live Preview mode Double press the LV Button to lock all buttons on the f...

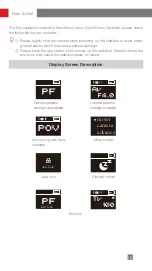
Page 14: ...era damage Please keep the grip stable when turning on the stabilizer Shakes during the power on may cause the stabilizer power on failure Display Screen Description motor camera advance axislock keylock PF PF Camera params settings unavailable Camera params settings available Connecting with Sony cameras Axis lock Key lock Menu screen Standby mode motor camera advance axislock keylock PF PF axis ...

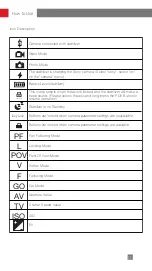
Page 15: ...This icon prompts when the axis is locked and the stabilizer will make a beep sound Please unlock the axis and long press the POV Button to resume operation Stabilizer is on Standby Buttons are locked when camera parameter settings are unavailable Buttons are locked when camera parameter settings are available Pan Following Mode Locking Mode Point Of View Mode Vortex Mode Following Mode Go Mode Ap...

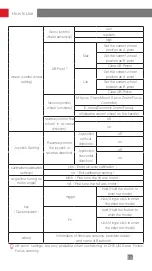
Page 16: ...n sony off Charging is off on Charging is on panaso Panasonic ccs Stabilizer params settings speed Control speed of joystick Tilt Axis Roll Axis Pan Axis Follow speed of motor Tilt Axis Roll Axis Pan Axis smooth Tilt Axis Roll Axis Pan Axis deadband Tilt Axis Roll Axis Pan Axis default restore default settings yes no How to Use Menu Option Description ...

Page 17: ...control wheel on the handle reverse control the wheel in reverse direction off on Joystick Setting Reverse control the joystick in reverse direction Joystick in vertical direction off on Joystick in horizontal direction off on calibration calibration settings yes Enter six side calibration no Exit calibration setting angle fine tuning on motor angle pitch Fine tune the tilt axis motor roll Fine tu...

Page 18: ...ion Operation Method Single press Menu Button and rotate the dial to motor then rotate the dial to custom and press the right side of the dial to confirm Press right again to select the corresponding axis and set the parameters via the dial Single press the left to exit then the stabilizer will save the parameter and a mark will appear on the display screen which means the auto parameter adjustmen...

Page 19: ...d pan axis Point of View Mode POV Single press the POV mode button This mode allows all three motors to rotate 360 following the movement of the stabilizer Vortex Mode Double press the POV mode button The camera tilts with a 90 angle and pans to follow the movement of the handle with unlimited 360 rotation while the roll axis is locked Push the joystick right left to control the rotation of the pa...

Page 20: ...otation of the roll axis Go Mode Press the Fn Button The camera pans left right and tilts up down following the movement of the stabilizer at faster speed while the roll axis is locked 手持模式 手提模式 Sling Mode Upright Mode Please make sure to put the tripod lock switch to lock position before entering into Sling Mode PF L Tilt Axis Roll Axis Pan Axis Tilt Axis Roll Axis Pan Axis ...

Page 21: ...anually rotate the camera to a certain angle then loosen your grip and the camera position will be fixed Under pan following mode you can manually adjust the angle of the tilt axis Under locking mode you can manually adjust the angle of the pan axis and tilt axis How to Use ...

Page 22: ...r Mode Stabilizer Parameters Settings Customized Scene Mode Stabilizer Calibration Video and Photo Timelapse Panorama ZY Play 1 Power on the stabilizer and connect the stabilizer with your camera with a camera control cable Turn on your phone Bluetooth 2 Open ZY Play and choose the corresponding product page for WEEBILL S Tap Connect to connect with the stabilizer via the corresponding Bluetooth n...

Page 23: ...n used for a long time 3 The stabilizer undergoes significant temperature differences in operating environments Six side calibration A slight deviation is found in the tilt or roll angle of the camera in level position after initialization and six side calibration of the stabilizer Fine tune motor force Initialization Method 1 Correctly install the batteries 2 Hold the camera mounting plate with o...

Page 24: ...ase conduct the process according to the following steps A mark will appear after the calibration is completed 3 Six side calibration via OLED display guide Power on the stabilizer and enter standby mode then press menu and rotate the dial to calibration option Single press Right to confirm the selection and single press yes to start Conduct the steps appearing on the stabilizer display screen Aft...

Page 25: ...21 Calibration and Firmware Upgrade STEP 3 STEP 4 STEP 5 STEP 6 ...

Page 26: ...firmware update according to the operations in the firmware update tutorial Method 2 Update via APP According to the method introduced in APP Operations connect the stabilizer to APP If a firmware update prompt pops up on APP please tap to update Before the firmware update please ensure that the power level of both stabilizer and phone remain above 50 Do not exit APP or transfer APP to the backgro...

Page 27: ... 180g Bluetooth Bluetooth 5 0 Product Model CR110 Product Specifications Lab Data 1 The 12h runtime is concluded via a complete test session in which the stabilizer is well balanced with ILCE 7RM3 camera with Vario Tessar T FE 24 70mm F4 ZA OSS installed The ambient temperature is 25 and it is placed at rest throughout the test session Lab Data 2 This test is conducted with a 5V 2A rated power ada...

Page 28: ...IYUN TECH and its affiliates All product names or marks referred to herein are trademarks or registered trademarks of their respective holders Read the ENTIRE User Guide to become familiar with the features of this product before operating Failure to operate the product correctly can result in damage to the product or personal property and cause serious injury This is a sophisticated product It mu...

Page 29: ...teries from ZHIYUN s official website or authorized channels ZHIYUN takes no responsibility for any damage caused by non ZHIYUN batteries 5 Never use or charge swollen leaky or damaged batteries Never use or charge if the battery smells or overheats exceeding maximum temperature of 160 F 71 C If your batteries are abnormal contact ZHIYUN or a ZHIYUN authorized dealer for further assistance 6 The b...

Page 30: ...ure cord plug or other parts Never use a damaged charger Do not clean the charger with any liquid containing alcohol or other flammable solvents Disconnect the charger when not in use Battery Storage 1 Keep batteries out of the reach of children and pets 2 Do not leave the battery near heat sources such as a furnace or heater or inside of a vehicle on hot days Never expose the battery in any envir...

Page 31: ...s whose warranty has expired 4 Products damaged due to force majeure such as fire flood lightening etc 1 If failure or any problem occurs to your product after purchase please contact a local agent for assistance or you can always contact ZHIYUN s customer service through email at SERVICE ZHIYUN TECH COM or website at WWW ZHIYUN TECH COM 2 Your local agent or ZHIYUN s customer service will guide y...

Page 32: ...28 Contact Card Website Weibo Facebook Zhiyun Support Youtube Google Youku Vimeo Facebook Zhiyun Tech Wechat Instagram ...

Page 33: ...rial Zone Qixing District Guilin Guangxi China This product is confirmed to meet quality standards and permitted for sale after strict inspection CertificateofQuality QC Inspector Please download the latest version from www zhiyun tech com This document is subject to change without notice ZHIYUNTM is a trademark of ZHISHEN All other trademarks cited herein are the property of their respective owner...

Page 34: ......

Reviews: