background image

30

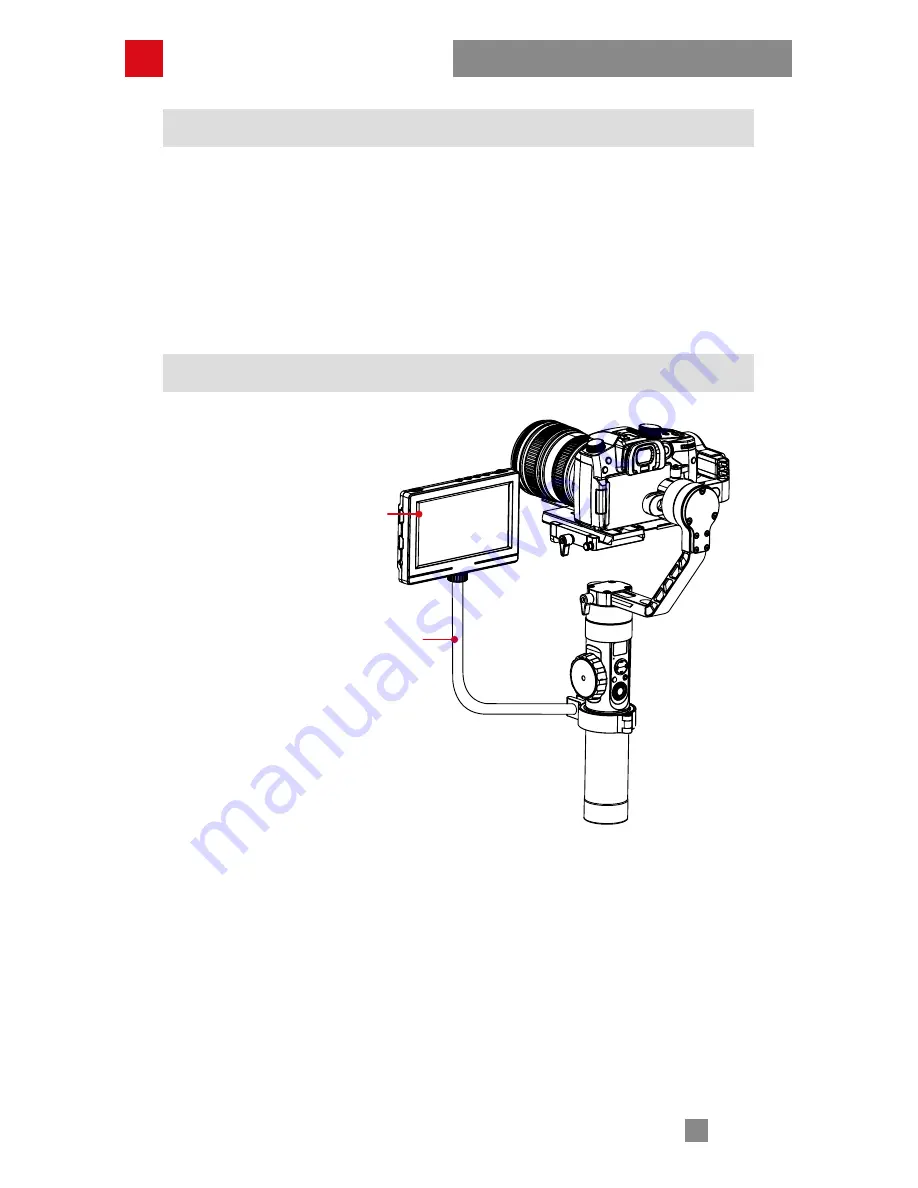
5.5" Mini Camera Monitor (sold separately)

5.5" Mini Camera Monitor (“Monitor”) supports 4K HDMI input. With the 8bit IPS 

LCD screen, the Monitor supports 1920*1080 resolution. The Monitor features 

accurate color reproduction and a wide viewing angle. It is also packed with 

powerful functions such as peaking focus assist/screen rotation/safe area, 

etc. The Monitor comes with a dedicated thin HDMI cable, which is perfect for 

connecting  the stabilizer. Designed exclusively for stabilizers, 5.5" Mini Camera 

Monitor enhances your experience in using the stabilizer.

Usage of Main Accessories

1/4 Thread Metal Holder with Flexible Pipe (sold separately)

The Flexible Pipe can be installed on CRANE 2 handle easily and its 1/4 thread 

hole can be mounted to 5.5" Mini Camera Monitor, supplement lamps or other 

camera equipment. The flexible pipe enables angle adjustment easily. 

TransMount 5.5” 

Display Monitor

1/4 Thread Metal Holder with 

Flexible Pipe

Summary of Contents for CRANE 2

Page 1: ...C R A N E 2 U s e r G u i d e Z H I Y U N E N v 2 2 0 ...

Page 2: ...ring and Charging the Batteries 6 Installation 8 Balance Adjustment 11 How to Use 14 APP Operations 23 Calibration and Firmware Upgrade 24 Usage of Main Accessories 28 Product Specifications 33 Disclaimer and Warning 34 Warranty Terms 37 Contact Card 38 ...

Page 3: ...y item is found missing please contact ZHIYUN or your local selling agent CRANE 2 Three axis Gimbal Stabilizer 1 18650 Li ion Battery 3 Canon Camera Control Cable ZW Mini 002 1 Panasonic Camera Control Cable ZW CTIA 002 1 Micro USB Cable 1 Shoulder Strap 1 Packing List ...

Page 4: ...2 Tripod 1 Battery Charger 1 Canon Camera Control Cable ZW Micro 002 1 Sony Camera Control Cable ZW MULTI 002 1 Storage Case 1 User Guide 1 Packing List ...

Page 5: ...3 Follow Focus Motor 1 Support Rod 1 ZW Micro 004 Data Cable 1 Follow Focus Ring 2 Allen Key 1 Packing List ...

Page 6: ...ew Tilt Axis Motor Horizontal Arm Thumb Screw Pan Axis Motor 1 4 3 8 Threaded Hole Lens Support Camera Mounting Screw Thumb Screw Follow Focus Controller Roll Axis Motor Quick Release Plate Safety Lock Mounting Plate Thumb Screw Vertical Arm Control Panel see more on Page 14 Get to Know CRANE 2 ...

Page 7: ...ging cameras like Canon 5D series see more on page 22 DC 8 0 V Power Outlet Usage Description Camera Control Interface 5V 1A 1 The camera control interface is connectable to camera control cable see more on page 10 ZHIYUN Camera Control Cable Description 2 It can also be used as a USB charging port for Sony mirrorless cameras C anon N ikon and Panasonic Cameras do not s u p p o r t U S B charging ...

Page 8: ...when fully charged Battery Specifications Name 18650 Li ion battery Model IMR 18650 Capacity 2000mAh Voltage 3 7V Preparing and Charging the Batteries Notice 1 Please read the disclaimer and warning herein as well as the description on the battery label carefully before using the batteries 2 The ZC 18650 3 charger is for charging ZHIYUN s IMR 18650 Li ion Battery only Do not charge batteries of ot...

Page 9: ... the current of adapter is below 1000mA Adapter with higher current capacity is re commended 3 The USB Port along side the stabilizer does not support charging to batteries 1 Please use qualified standard 5V 2000mA adapter for battery charging Charging time depends on the maximum input current of the adapter 2 The stabilizer comes standard with three high discharge rate dedicated batteries Please ...

Page 10: ...ight direction positive negative end then tighten the battery compartment Please use and charge batteries provided or approved by ZHIYUN only in case of accidents Get the tripod ready and tighten it to the 1 4 3 8 threaded hole at the bottom of the stabilizer then unfold the tripod on a flat surface Installation ...

Page 11: ...the quick release plate installed with the camera following the direction of the arrow mark on camera mounting plate then tighten the thumb screw to finish the installation of the quick release plate 4 Loosen the screw on lens support and adjust the support to keep the lens firm and stabilized then tighten the screw Note Do not power on stabilizer before finishing the camera installation Please ho...

Page 12: ... with MULTI interface GH3 GH4 GH5 Camera control cable model ZW Mini 002 ZW Micro 002 ZW MULTI 001 ZW MULTI 002 ZW CTIA 002 Camera control cable interface Micro USB to Mini USB Micro USB to Micro USB Micro USB to MULTI USB Micro USB to CTIA Photo Video Real time preview AV TV ISO EV Zoom AF Manual follow focus Camera charging Standard camera control cable Support to Nikon cameras requires firmware...

Page 13: ... the thumb screw on the quick release plate so that it can slide forward or backward Hold the horizontal arm on the tilt axis with one hand and adjust the position of the camera to find a level balance where the camera can stay still and almost level with its lens facing front complete this step by tightening up the camera mounting thumb screw Balance Adjustment ...

Page 14: ...es Adjust the tilt axis until the camera can stay still with the lens facing up i e the camera stays still and vertical to the ground complete this step by tightening up thumb screw Loosen the thumb screw on the roll axis Adjust the roll axis until the camera can stay still while keeping the horizontal arm level Complete this step by tightening up thumb screw Balance Adjustment ...

Page 15: ...plete balance adjustment by tightening up all thumb screws If the camera installed is too light that it s impossible to achieve balanced adjustment please purchase the dedicated counterweight 100g provided by ZHIYUN and install it under the camera mounting plate to finish balance installation Balance Adjustment If the camera hinders the rotation of the screw please pull out the screw before rotati...

Page 16: ... to revious option In menu screen single press to return to previous screen Right In main screen single press to move to next option In menu screen single press to confirm selection Shutter Release Halfway press the button to activate auto focus Full press the button to take single shots Dial In main screen rotate the dial to adjust camera parameters In menu screen rotate the dial to switch betwee...

Page 17: ...rt or end video recording ZHIYUN Sony Camera Control Function Description Please refer to the instruction on Camera Control Cable Configuration on page 18 to choose the right option for your camera 1 Shutter release Fully press Shutter Release button to realize auto focus and take single shots 2 Video recording Single press ON OFF Video button to start or end video recording 3 Zooming Press Left b...

Page 18: ...ttery Level stabilizer PF Pan Following Mode POV Point of View Mode F Following Mode L Locking Mode AV Aperture Value TV Time Value ISO ISO EV How to Use Icon Description CRANE 2 Canon Controllability Table Photo Video AV TV ISO EV AV A TV S M P Note For Canon 5D4 the EV can be adjusted by setting iso AUTO while the Mode Dial is set to M Canon cameras under real time preview can realize focus cont...

Page 19: ...r AB points priority Priority on Wheel handle Prioritize handle control external Prioritize external control2 off Disable handle wheel reverse Control the wheel in a reverse direction joystick Joystick settings reverse vertical joystick in vertical direction horizontal joystick in horizontal direction calibration Calibration settings yes Enter six side calibration no Exit calibration settings angl...

Page 20: ...te the dial to motor then press right to enter the motor setting 2 Rotate the dial to choose the appropriate motor force 3 levels press right to confirm the option How to Use Camera Control Cable Configuration 1 Single press Menu and rotate the dial to camera then press right to enter the camera setting 2 Rotate the dial to choose your camera brand press right to confirm the option and restart the...

Page 21: ...llowing mode and POV mode PF L Pan Following Mode Locking Mode F Following Mode POV Point of View Mode POV Mode How to Use Triple Press of Mode Button The pan axis rotates 180 without changing the current mode not available in locking mode Quadruple Press of Mode Button Reset the position of the tilt axis motor and the roll axis motor of the stabilizer ...

Page 22: ...h the joystick up down and left right allows manual control of the tilt axis and pan axis Roll Axis Tilt Axis Pan Axis Roll Axis45 Tilt Axis Pan Axis Point of View mode POV The mode allows the camera to roll left right at a max angle of 45 and pan left right or tilt up down with unlimited 360 rotation following the movement of the gimbal handle Following Mode F The camera pans and tilts following ...

Page 23: ...he balance condition of the camera For some cameras you may need to turn the stabilizer upside down first and then balance the camera before initiating the bottom up mode Manual Positioning Under pan following mode and locking mode you can manually rotate the camera to a certain angle then loosen your grip and the camera position will be fixed Under pan following mode you can manually adjust the a...

Page 24: ... 5D2 camera Powering on 1 Start up the stabilizer long press the mode button to enter standby mode 2 Connect the power input end of the connector to the DC 8 0V power outlet then connect the other end of the connector to the camera 3 Install the camera to the stabilizer and adjust gimbal balance 4 Power on the camera and long press mode button to activate the stabilizer Powering off First power of...

Page 25: ...sers can download the APP by searching ZY Play in APP Store The ZHIYUN APP is subject to regular update try out now to discover more functions Overview of Main Functions Connecting the Stabilizer to Smartphone 1 Power on the stabilizer and turn on Bluetooth on the phone 2 Open ZY Play App and click Please connect device Choose your stabilizer to connect Stabilizer parameters settings Stabilizer ca...

Page 26: ... deviation is still found in the tilt or roll angle of the camera in level position after the initialization and six side calibration of the stabilizer Fine tune motor force Calibration and Firmware Upgrade Please calibrate the stabilizer when necessary to ensure normal use Initialization Method 1 Correctly install the batteries 2 Hold the camera mounting plate with one hand long press the power b...

Page 27: ... standby mode press menu rotate the dial to calibration option press Right to enter the option 2 As seen below conduct the six side calibration following the 6 steps shown in the graphs finish by pressing any button to exit the menu Calibration and Firmware Upgrade STEP 1 STEP 2 STEP 3 ...

Page 28: ...zer to ZY Play Enter Calibration and finish the six side calibration following the APP instruction STEP 4 STEP 5 STEP 6 Six side calibration is to make all six sides of the camera mounting plate vertical to the level surface Calibration and Firmware Upgrade ...

Page 29: ... calibration 1 Visit ZHIYUN s offcial website www zhiyun tech com Click DOWNLOAD and find the Firmware Upgrade Tutorial package then download the driver calibration tool and latest firmware corresponding to your stabilizer USB driver installation is not needed for Mac and WIN 10 system 2 Connect the stabilizer to your computer via Micro USB cable power on the stabilizer and finish the installation...

Page 30: ...ote Control with Follow Focus is designed exclusively for CRANE 2 Through Bluetooth or cable connection to CRANE 2 you can realize comprehensive control on CRANE 2 The G Mode and Motion mode exclusive to this product can bring more inspiration to your operation on CRANE 2 Usage of Main Accessories ...

Page 31: ...on the Extended Handle easily and realize basic control on CRANE 2 Operating CRANE 2 with the Extended Handle is less physically demanding and more flexible with both hands on MODE Button Charging Indicator Power Shutter Dual function button Toggle Bluetooth Indicator Joystick Power Level Indicator Top down gesture Bottom up gesture Usage of Main Accessories ...

Page 32: ...th a dedicated thin HDMI cable which is perfect for connecting the stabilizer Designed exclusively for stabilizers 5 5 Mini Camera Monitor enhances your experience in using the stabilizer Usage of Main Accessories 1 4 Thread Metal Holder with Flexible Pipe sold separately The Flexible Pipe can be installed on CRANE 2 handle easily and its 1 4 thread hole can be mounted to 5 5 Mini Camera Monitor s...

Page 33: ...nt operation on CRANE 2 Using the Grip allows you to hold CRANE 2 easily in dif ferent shooting environment and get a smooth sports footage The Grip can be mounted to a monitor and a supplement lamp which give you more possibilities in creating footage Monitor Monitor Monitor Fill Light Usage of Main Accessories ...

Page 34: ... satisfies the need of long time physical demanding shooting CRANE 2 can rest on the Bracket when the shooting temporarily pauses The Bracket is widely used in outdoors filming wedding filming live streaming and movie making Zhiyun Telescopic Monopod is designed to optimize Crane series Mounted to CRANE 2 it allows you to move CRANE 2 with greater flexibility while saving effort Usage of Main Acce...

Page 35: ... Range 135 185 Roll Angle Range 360 Unlimited rotation Pan Angle Range 360 Unlimited rotation Following Deviation in Static State 0 01 0 03 Following Deviation in Motion State 0 05 0 1 Payload 500g 3200g Compatible Camera Sizes The max horizontal length from the point of camera gravity to the roll axis is 90mm from the 1 4 threaded hole to tilt axis 90mm and from gravity point to quick release pla...

Page 36: ...de and may make available ZHIYUN accepts no liability for damage injury or any legal responsibility incurred directly or indirectly from the use of this product Users shall observe safe and lawful practices including but not limited to those set forth herein ZHIYUN is the trademark of Guilin Zhishen Information Technology Co Ltd hereinafter referred to as ZHIYUN or ZHIYUN TECH and its affiliates A...

Page 37: ...xide fire extinguisher immediately to put out the fire Battery caused fire may lead to explosion Please extinct the fire by applying the methods recommended above according to the actual situation 4 Never use non ZHIYUN batteries If replacement or backup is needed please purchase new batteries from ZHIYUN s official website or authorized channels ZHIYUN takes no responsibility for any damage cause...

Page 38: ...fore use make sure there is no damage to the enclosure cord plug or other parts Never use a damaged charger Do not clean the charger with any liquid containing alcohol or other flammable solvents Disconnect the charger when not in use Battery Storage 1 Keep batteries out of the reach of children and pets 2 Do not leave the battery near heat sources such as a furnace or heater or inside of a vehicl...

Page 39: ...nauthorized alteration 2 Products subjected to improper use or whose labels or security tags have been torn off or altered 3 Products whose warranty has expired 4 Products damaged due to force majeure such as fire flood lightening etc Warranty Claim Procedure 1 If failure or any problem occurs to your product after purchase please contact a local agent for assistant or you can always contact ZHIYU...

Page 40: ...ing District Guilin Guangxi China Contact Card Search and follow Zhiyun Tech on Facebook Instagram Twitter YouTube and Vimeo to connect with us This product is confirmed to meet quality standards and permitted for sale after strict inspection Certificate of Quality QC Inspector Please download the latest version from www zhiyun tech com This document is subject to change without notice ZHIYUN is a...

Page 41: ......

Reviews: