background image

zhiyun-tech.com

Download  ZY Play  App

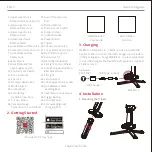
1. Upper-layer Quick 
     Release Plate Lock Switch
2. Upper-layer Quick 
     Release Plate Latch
3. Upper-layer Quick 
     Release Plate
4. Lower-layer Quick 
     Release Plate
5. Quick Release Plate Latch
6. Camera Installation Latch
7. Quick Release Plate 
     Safety Lock
8. Level Mount
9. Quick Release Plate 
     Leveling Base Latch
10. Pan Axis Lock Switch
11. Pan Axis Motor
12. Joystick
13. Photo/Video Button
14. Mode Switch
15. Gimbal Base
16. SmartSling 
       Handle Screw Hole
17. Tilt Axis Motor
18. Camera/Image 
       Transmission Control Port

ZY


Play

19. Audio Transmission 
       Port
20. Roll Axis Motor
21. Roll Axis Lock Switch
22. Display Screen
23. Gimbal Handle
24. Power Button
25. Tripod
26. Tilt Axis Lock Switch
27. Focus Motor Control Port
28. Built-in Microphone
29. Pan Axis Latch
30. Menu/Return Button
31. Fill Light Control Wheel
32. SmartSling Handle/Wrist 
       Rest Screw Hole
33. Fill Light
34. Lens Support
35. Lens Support Lock Screw
36. Quick Release Plate 
        Leveling Base
37. Level Mount Lock Screw
38. Trigger Button
39. Control Wheel
40. Firmware Upgrade/
        Charging Port

. Getting Started

EN 

Read Detailed 

User Guide

Watch Video 

Tutorials

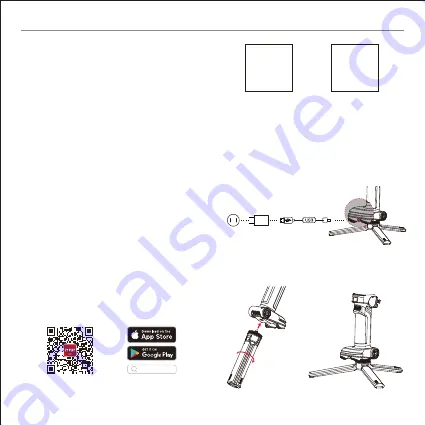
3. Charging

WEEBILL 

USB Type-C cable

USB Charger 

AC power

-

V)

WEEBILL 3 adopts built-in battery. Use provided USB 
Type-C cable to connect the USB charger (not included 
in the package) to charge WEEBILL 3. It is recommended 
to use USB chargers that meet the PD protocol. (support 
21.6W at most).

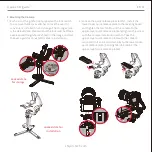
4. Installation

1.

Mounting the Tripod

Quick start guide

Summary of Contents for WEEBILL 3

Page 1: ...Quick start guide EN zhiyun tech com W E E B I L L EN Quick start guide Getting to Know WEEBILL 3...

Page 2: ...reen 23 Gimbal Handle 24 Power Button 25 Tripod 26 Tilt Axis Lock Switch 27 Focus Motor Control Port 28 Built in Microphone 29 Pan Axis Latch 30 Menu Return Button 31 Fill Light Control Wheel 32 Smart...

Page 3: ...r convenient camera installation Locked state for installation Locked state for storage Loosen the quick release plate latch install the lower layer quick release plate to the leveling base and tighte...

Page 4: ...iyun tech com EN Quick start guide Connect the camera control port and camera image transmission control port of the gimbal with a camera control cable There are four camera control cables Type C to M...

Page 5: ...lens facing up i e the camera stays still and vertical to the ground Complete this step by tightening up the screw EN zhiyun tech com Quick start guide 3 Roll Axis Balance Unlock the roll axis and loo...

Page 6: ...e motor torque needs to be adjusted for proper function It is recommended to adjust the motor torque via Auto Calibration in the display screen menu 6 Basic Operation Button Description Power Button L...

Page 7: ...Gimbal reposition Triple press Sel e mode Long press Enter Go mode Release to return to the previous mode Control Wheel Can be customized in the menu aperture shutter ISO digital focus focus motor con...

Page 8: ...er Guide to become familiar with the features of this product before operating Failure to operate the product correctly can result in damage to the product or personal property and cause serious injur...

Page 9: ...tery and never put the battery in a microwave oven or in a pressurized container 12 Do not place the battery on a conductive surface such as a metal desk surface eyeglasses watch jewelry etc 13 Preven...

Page 10: ...duct after purchase please contact a local agent for assistance or you can always contact ZHIYUN s customer service through email at info zhiyun tech com or website at www zhiyun tech com 2 Your local...

Reviews: