background image

MXK

24

MxK Hardware Installation Guide

Small form factor pluggables

Zhone Technologies supports a variety of small form factor pluggables (SFPs) 
which you select depending on the protocol, fiber type and distance 
requirements. Se

Chapter 15, Small Form Factor Pluggable (SFP) 

Connectors

 in the 

MXK Configuration Guide

.

MXK backplane

The MXK has a non-blocking architecture with a high-speed backplane. Each 
line card on the MXK had a dedicated backplane trace to each of the uplink 
cards.

Summary of Contents for MXK

Page 1: ...MXK Hardware Installation Guide For software version 2 1 July 2010 Document Part Number 830 01734 10 ...

Page 2: ...netic manual or otherwise or disclosed to third parties without the express written permission from Zhone Technologies Inc Bitstorm EtherXtend IMACS MALC MXK Raptor SLMS Z Edge Zhone ZMS zNID and the Zhone logo are trademarks of Zhone Technologies Inc Zhone Technologies makes no representation or warranties with respect to the contents hereof and specifically disclaims any implied warranties of me...

Page 3: ... MXK chassis 19 MXK 819 and 823 chassis 19 MXK 319 chassis 22 MXK slot cards 22 Uplink card guidelines 22 Add change or delete card profiles 23 Reset cards 23 Small form factor pluggables 24 MXK backplane 24 Chapter 2 Install the MXK 25 Pre installation preparation 25 Installation overview 25 General safety precautions 27 Safety 27 Prevent electrostatic damage 28 Power supply safety information 29...

Page 4: ...ower to the MXK 319 and ground the chassis 50 Chapter 3 System Cables and Connectors 55 Guidelines for cables 55 Cable descriptions 56 MXK alarm cable and contacts guidelines 56 Fiber optic maintenance and optical connections 59 Laser radiation 59 Handle optical fibers 60 Optical connections 60 Select cleaning materials 61 Clean a connector 61 Clean a receptacle 61 Report optical fiber breakage 62...

Page 5: ... instructional warns of potential damage to system equipment or data and warns of potential injury or death Carefully read and follow the instructions included in this document Caution A caution alerts users to conditions or actions that could damage equipment or data Note A note provides important supplemental or amplified information Tip A tip provides additional information that enables users t...

Page 6: ...installation information and for changes in features and functionality of the product if any Table 1 Typographical styles Bold Used for names of buttons dialog boxes icons menus and profiles when placed in body text and property pages or sheets Also used for commands options parameters in body text and user input Fixed Used in code examples for computer output file names path names and the content...

Page 7: ... the First Mile IAD Integrated access device MALC Multi access line concentrator MIB Management information bases OLT Optical line terminal ONT Optical network terminal ONU Optical network unit RIP Routing Information Protocol SFP Small form factor pluggable SDSL Symmetric digital subscriber line SHDSL Symmetric high bit rate digital subscriber line SLMS Single Line Multi Service SNMP Simple Netwo...

Page 8: ...contract please contact GSS or your local sales representative for a quote on a service plan You can view service plan options on our web site at http www zhone com support services warranty Technical support The Technical Assistance Center TAC is available with experienced support engineers who can answer questions assist with service requests and help troubleshoot systems If you purchased the pr...

Page 9: ... the RMA Request form http www zhone com account sr submit cgi or contact Zhone Support via phone or email Hours of operation Monday Friday 6 30am 5 00pm Pacific Time E mail support zhone com preferred Phone 877 946 6320 or 510 777 7133 prompt 3 2 Provide the part numbers and serial numbers of the product s to be repaired All product lines ship with a minimum one year standard warranty may vary by...

Page 10: ...About This Guide 10 MXK Hardware Installation Guide ...

Page 11: ...following sections MXK overview page 11 MXK features page 15 MXK hardware overview page 19 MXK overview The MXK platform provides high density subscriber access concentration in the Zhone Single Line Multi Service SLMS architecture Figure 1 describes a typical MXK scenario Figure 1 MXK access network ...

Page 12: ...am device such as an IP router The MXK supports GPON Active Ethernet ADSL and EFM SHDSL edge connection technologies and 100 1000 Ethernet and 10 Gigabit GE uplinks The redundant Ethernet uplinks on the MXK enable network providers to provision all classes of services in a single platform and leverage the existing copper infrastructure going to the Digital Loop Carrier DLC locations Figure 2 sugge...

Page 13: ...over 10 or 20 ports that provide either 10 100 1000 Base T fiber 100FX or 1 Gigabit Ethernet interfaces to support distances as high as 80km depending on the SFPs used The Active Ethernet cards are also interoperable third party Active Ethernet devices The Active Ethernet cards support Layer 2 bridging functions Layer 2 security functions Layer 3 routing functions and the Zhone Multimedia Traffic ...

Page 14: ...DSL2 SPLTR600 BCM 48 2S and MXK ADSL2 SPLTR900 BCM 48 2S cards support the ANSI T1 413 Issue 2 G 992 1 G dmt and G 992 2 G lite G 992 3 and G 992 4 ADSL2 G 992 5 ADSL2 Annex A standards and Annex M ADSL standards All ADSL cards support VoIP POTS services EFM SHDSL MXK EFM SHDSL 24 NTP MXK EFM SHDSL 24 NTWC The MXK EFM SHDSL 24 NTP card provides network timing reference and line power The timing re...

Page 15: ...lot card that supports 20 SFPs that can provide copper and fiber services and supports distances as high as 80 Km The 10 port Active Ethernet line card line card is a single slot card that supports Ethernet traffic over 10 ports that provide either 10 100 1000 Base T fiber 100FX or 1 Gigabit Ethernet interfaces to support distances as high as 80km depending on the SFPs used See Small form factor p...

Page 16: ... with each other to send coherent commands to the gateways under their control MGCP does not define a mechanism for synchronizing Call Agents MGCP is in essence a master slave protocol where the gateways are expected to execute commands sent by the Call Agents MGCP assumes a connection model constructed of endpoints and connections Endpoints are sources or sinks of data and could be physical or vi...

Page 17: ...aller is unlikely to know the IP address or host name of the called party and to pass on messages to other servers or SIP endpoints Other functions performed by the SIP servers are redirecting forking and registration Together these components make up a basic SIP infrastructure Application servers can sit above these components delivering SIP supplementary services to end users Redundancy The MXK ...

Page 18: ...warded to the appropriate output interface using the routing table rules Bridging incoming packets from an interfaces are forwarded based on MAC addresses or Layer 2 forwarding rules DHCP servers and relay for IP address configuration IP filtering IP filtering is typically performed to enhance network security by limiting access between two networks Numbered or unnumbered interfaces Bridging uplin...

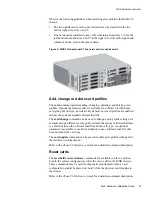
Page 19: ...factor pluggables page 24 MXK backplane page 24 MXK chassis The 8U 19 inch and 23 inch chassis and the 3U chassis are functionally equivalent the only difference is the number of slots supported You can install the uplink cards that provide the primary control and management functions for the MXK system in a redundant pair to provide card level redundancy Figure 4 shows the 19 MXK chassis with 14 ...

Page 20: ...upplied by dual 48V DC input power The airflow through the unit is from bottom to top The chassis is FCC UL CSA and CE compliant See Connect power to the front of the MXK and ground the chassis on page 42 or Connect power to the rear of the MXK 823 and ground the chassis on page 47 for connecting power instructions Figure 3 MXK chassis with cables and connectors Figure 5 shows the 23 MXK chassis w...

Page 21: ... 20 21 22 7 8 9 10 11 ACTIVE ETHERNET active fault pwr fail 1 2 3 4 5 6 12 13 14 15 16 17 18 19 20 21 22 7 8 9 10 11 ACTIVE ETHERNET active fault pwr fail mx0701 active fault pwr fail 1 2 3 4 10GIGE UPLINK CRAFT MGMT XFP XPP active fault pwr fail 1 2 3 4 10GIGE UPLINK CRAFT MGMT XFP XPP active fault pwr fail GPON 8 SFP 1 2 3 4 5 6 7 8 active fault pwr fail GPON 8 SFP 1 2 3 4 5 6 7 8 active fault p...

Page 22: ... Connect power to the MXK 319 and ground the chassis on page 50 for instructions for connecting power MXK slot cards Uplink card guidelines Observe the following guidelines when installing slot cards into the MXK 819 and MXK 823 chassis The two uplink cards are the only cards that can be installed in the two middle slots slots a and b Line cards can be installed in any of the remaining slots and c...

Page 23: ...nabled and use the system assigned software load file The card change command can be used to change a card profile settings for example using a different card type By default the system validates that there is a match between the software load file and the card type An optional parameter is available to override validation to use a software load file that does not match the card type The card upda...

Page 24: ...FPs which you select depending on the protocol fiber type and distance requirements See Chapter 15 Small Form Factor Pluggable SFP Connectors in the MXK Configuration Guide MXK backplane The MXK has a non blocking architecture with a high speed backplane Each line card on the MXK had a dedicated backplane trace to each of the uplink cards ...

Page 25: ...view page 25 General safety precautions page 27 Installation precautions page 29 Environmental specifications page 30 Power requirements and specifications page 32 Grounding and isolation page 34 Select the system location page 34 Tools needed page 34 Compliance and certifications page 35 Installation overview Before preparing to install the MXK it is helpful to review this overview of MXK install...

Page 26: ...e card s active lights blink The amber fault light should stay on when first starting up because the link card s profile is not yet loaded 5 Conduct out of band management tests a See Log in to the serial craft port on page 65 b From the command line interface CLI enter the slots command to verify which cards are installed 6 Connect the cables Chapter 3 System Cables and Connectors on page 55 a Co...

Page 27: ...ommended by the manufacturer Dispose of used batteries according to manufacturer s instructions WARNING Do not stare into the optical interface laser beam or view it directly with optical instruments Caution Current limiting protectors The MXK is intended to be protected by 3 mil carbon blocks and current limiting protectors with a continuous carry current rating of 350 milliamperes The current li...

Page 28: ...otential between the earth grounds of two or more buildings If products installed in separate buildings are interconnected the voltage potential may cause a hazardous condition Consult a qualified electrical consultant to determine whether or not this phenomenon exists and if necessary implement corrective action prior to interconnecting the product Install the MXK in accordance with national and ...

Page 29: ... 550 C 1310 F The temperature of the rack environment may be greater than ambient room temperature when the system is installed in a closed or multiunit rack assembly Observe the maximum recommended operating temperature as indicated here Do not block system air vents this will deprive the system of the airflow required for proper cooling Sufficient clearance must exist on all sides of the rack to...

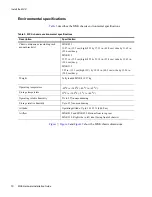
Page 30: ...by 11 65 in 29 6 cm deep MXK 819 13 97 in 35 5 cm high 8U by 21 18 in 53 8 cm wide by 11 65 in 29 6 cm deep MXK 319 5 22 in 13 3 cm high 3U by 18 18 in 46 2 cm wide by 11 34 in 28 8 cm deep Weight fully loaded MXK 819 37 kg Operating temperature 400 F to 1490 F 40 0 C to 65 0 C Storage temperature 230 F to 1040 F 5 0 C to 40 0 C Operating relative humidity 5 to 95 noncondensing Storage relative hu...

Page 31: ...Pre installation preparation MXK Hardware Installation Guide 31 Figure 7 MXK 819 chassis dimensions Figure 8 MXK 823 chassis dimensions ...

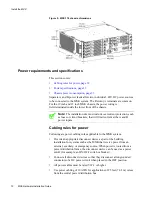
Page 32: ...s or circuit breakers that will limit current at the A and B power inputs Cabling rules for power Following are power cabling rules applicable to the MXK system Provide an appropriate disconnect device as part of the building installation for systems such as the MXK that receive power from an external auxiliary or emergency source When power is routed from a power distribution frame the disconnect...

Page 33: ... 823 630 watts maximum for MXK 319 Rated current 28A maximum for MXK 819 and MXK 823 15A maximum for MXK 319 DC input cable AWG 10 5 27 mm2 maximum Listed circuit breaker or fuse 35 A maximum for MXK 819 and MXK 823 20 A maximum for MXK 319 A listed circuit breaker or fuse must be installed from a central DC power source and wired in accordance with NEC ANSI NFPA 70 and Canadian electrical code Pa...

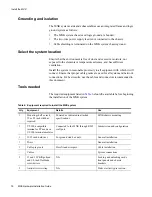
Page 34: ...lts use the cables and connectors recommended in this document Tools needed The required equipment listed in Table 6 should be available before beginning the installation of the MXK system Table 6 Equipment required to install the MXK system Qty Equipment Details Use 1 Mounting shelf or rack 19 or 23 inch width as required Powered as indicated in attached specifications MXK chassis mounting 1 VT 1...

Page 35: ... power information On system receipt check the shipping cartons for physical damage Unpack the shipping cartons and check the contents for physical damage If the equipment appears damaged immediately contact the shipping company to file a claim The shipping company representative will give instructions on how to submit a claim where to send the unit and any special instructions that may be require...

Page 36: ...tem chassis 1 Carefully place the system chassis right side up and facing forward on a clean flat sturdy work surface 2 Align the bracket so that the rack mount flange is toward the front centered vertically on the chassis and the 4 screw holes in the chassis align with the 4 screw holes in the bracket Note Use an 8 32 flathead UNC x 0 25 screw when attaching the brackets to the unit Using the wro...

Page 37: ...ront of the system facing outward 3 Secure the system chassis to the mounting rack with the screws provided in the installation kit Note Use a 12 24 UNC x 0 5 inch screw when mounting the system to the rack Using the wrong screw type will result in a poorly secured system These screws are provided in the installation kit Figure 10 Installing the MXK in a rack Mounting the MXK 319 system chassis in...

Page 38: ...r components on a printed circuit card and do not allow cards to come into contact with one another To prevent damage to slot cards when not in use store and handle the cards in their original containers Keep the cards in their original packing cartons to prevent damage caused by dust or dirt Be sure to store the cards in areas that are free from excessive humidity and temperatures Caution The MXK...

Page 39: ... application 4 Holding the card by its faceplate carefully insert the card into a slot Hold the bottom ejector open and slowly slide the card onto the backplane pins 5 Close the bottom ejector to firmly seat the card Caution To prevent damage to the backplane pins do not force cards onto the backplane pins when seating the cards If you have trouble seating a card check that it is in the correct sl...

Page 40: ... its faceplate carefully insert the card into a slot Hold the bottom ejector open and slowly slide the card onto the backplane pins 5 Close the ejector to firmly seat the card Caution To prevent damage to the backplane pins do not force cards onto the backplane pins when seating the cards If you have trouble seating a card check that it is in the correct slot pull the card out and try seating it a...

Page 41: ...Use the guidelines in this section to provide a system ground for the MXK Before concluding a MXK installation and applying DC power measure the impedance of the building ground reference and ensure that it is less than 25 ohms for safety Use an ECOS 1023 POW R MATE or an EMC Instrument Model 3710 or similar meter to do this Zhone recommends that the impedance be 5 ohms or less for proper equipmen...

Page 42: ...ible and accessible for maintenance purposes Tag ground connections clearly with a message such as CRITICAL CONNECTION DO NOT REMOVE OR DISCONNECT Although some electrical codes permit the use of a conduit as the sole ground conductor between equipment it is still recommended to use a separate insulated ground conductor through the same conduit The separate insulated ground conductor maintains the...

Page 43: ...assis on page 47 Connecting power and grounding the chassis to the front of the MXK Use the following procedure to connect the wiring between the MXK terminal block and the power supplies in the front of the MXK chassis 1 Remove the MXK lower bezel Figure 14 2 Remove the air filter Figure 14 Figure 14 Removing the front bezel and air filter 3 Locate the terminal block in the lower portion of the c...

Page 44: ...ote Some MXK terminal blocks have a quarter turn screw For these units turn the screw 1 4 turn counterclockwise to loosen Note If the MXK is installed so that the thread hole on the side of the unit is inaccessible thread the power supply and grounding cables behind the front bezel as illustrated in Figure 16 Figure 16 Threading the power and grounding cables behind the front bezel 7 Connect the n...

Page 45: ... maximum size 6 wire from each chassis to a common 2 AWG frame ground collector that connects to the single point building ground in an IBN Be sure that all ground connections are bare metal to bare metal 14 Strip the conductor minimum 10 AWG and maximum size 6 wire and crimp a grounding lug to the end of the conductor 15 Attach the ground lug to the grounding lugs as shown in Figure 18 on page 46...

Page 46: ...in lbs Figure 18 Securing the terminal block and grounding the chassis Note Some MXK terminal blocks have a quarter turn screw For these units turn the screw 1 4 turn clockwise to tighten 18 Reinstall the air filter Figure 19 19 Replace the lower bezel Figure 19 Figure 19 Replacing the air filter and bezel m x 0 7 1 2 B B mx0710 ...

Page 47: ...e chassis This section describes connecting power to the rear of the chassis To provide redundant power supplies and easy access two terminal blocks side A and side B are located at the chassis rear To provide additional redundancy each terminal block contains four terminals two RTN for positive wires and two 48 DC for negative wires Located near each terminal block is a stud used to connect the g...

Page 48: ...itive and negative wires to the proper terminals as shown in Figure 22 Note For the power terminal 1 4 20 studs and hex nuts the recommended torque is 32 to 36 in lbs a Connect the negative wire from power supply A to the terminal marked 48 DC b Connect the positive wire from power supply A to the terminal marked RTN c Connect the negative wire from power supply B to the terminal marked 48 DC d Co...

Page 49: ...d hex nuts the recommended torque is 12 to 16 in lbs 5 Strip the 10 AWG conductor and crimp a grounding lug to the end of the conductor Figure 23 Figure 23 Crimp grounding lug 6 Secure the nuts to the chassis 7 Connect the ground cable s already routed and tighten the bolt Figure 24 Note For the 8 32 ground stud and hex nuts the recommended torque is 12 to 16 in lbs Figure 24 Connect ground wire 8...

Page 50: ... unit should be solid green indicating power is normal For information on the chassis LEDs see Read the LEDs on page 63 Connect power to the MXK 319 and ground the chassis Connecting power to the MXK 319 and grounding the chassis 1 On the rear of the MXK 319 chassis remove the eight screws which attach the clear protective cover 2 The MXK 319 chassis will accept dual redundant power feeds A B Loos...

Page 51: ... terminals using insulated 6 ring lugs with the negative wire on terminal 48V and the positive wire on terminal RTN In the same way dress the power supply B wires through the lower chassis openings and connect them to the lower B power terminals 4 Tighten the wire clamp screws Tighten the wire clamp screws using a suitable torque driver to 8 1 inch lbs 0 9 0 1 N m Do not overtighten ...

Page 52: ...This procedure is service affecting and requires that ground be isolated from the equipment Perform this procedure during a maintenance window 8 Turn on the power to power supply A and to power supply B if present using 30 A maximum fuses The system is now live and ready to initialize the slot cards as they are installed Verifying proper grounding between the chassis and the rack Proper grounding ...

Page 53: ...MXK MXK Hardware Installation Guide 53 The impedance should be less than 1 ohm 2 Test the impedance from the MALC chassis point 3 in the graphic to the grounding rack The impedance must be less than 0 25 ohms 1 2 3 ...

Page 54: ...Install the MXK 54 MXK Hardware Installation Guide ...

Page 55: ...ast two inches away from the communication cables This can be accomplished by tie wrapping and routing the power lines behind the rack route the communication cables in front of the rack Note To comply with FCC regulations cables and connectors must be shielded If you intend to install cable covers the maximum height of the connector head and cable should be two inches If the MXK is going to be in...

Page 56: ...tween J1 J2 When a major minor alarm is present there is a connection between J4 J5 When a critical alarm is present there is no connection between J2 J3 Table 8 Summary of cable specifications Cable description Interfaces the MXK to Cable type Connector type Chassis alarms Alarm relay contact on chassis MXK 823 or MXK 819 Alarm relay contact on TAC Ring FC card 20 AWG minimum 0 8 mm 24 AWG 0 5 mm...

Page 57: ...ctor The minimum gauge for this cable is 20 AWG 24 AWG recommended To limit alarm cable signal losses its length should not exceed 60 feet Alarm relay contacts are rated at 62 5 VA defined as being capable of switching 1 amp at 62 5 volts The maximum switching current of the relay is 1 amp Table 10 to Table 14 describe the MXK chassis alarms Table 9 MXK alarm connections table Alarm state J1 J2 st...

Page 58: ...own Major Table 13 Uplink card alarms Event Type of alarm Card up down Critical if nonredundant Minor if redundant Network clocking fault Critical if no fallback provided Minor if fallback provided by internal clock Flash memory threshold Minor Internal BITS clock fault Minor if fallback to line clocking is provisioned or if the clock source is currently provisioned as secondary source Table 14 TA...

Page 59: ... 21 CFR 1040 of the U S Bureau of Radiological Health requires manufacturers to certify each laser product as Class I II III or IV depending upon the characteristics of the laser radiation emitted In terms of health and safety Class I products present the least hazard none at all while Class IV products present the greatest hazard Read and observe the following precautions to decrease the risk of ...

Page 60: ...rd any loose optical fiber ends Wear rubber gloves when you clean optical connectors The gloves prevent direct contact with the isopropyl alcohol and prevent contamination of the ferrules with skin oils Place all optical fiber clippings in a plastic container provided for that purpose Handle optical fibers with caution Place the optical fibers in a safe location during installation Protect all opt...

Page 61: ...for proper system function Optical cleaning kits are available from optical supply sources Clean a connector Cleaning a connector 1 Disconnect the cable end to be cleaned 2 Using inert dusting gas blow accumulated dust and debris off the cylindrical and end face surfaces of the connector 3 Apply optical grade isopropyl alcohol to a cleaning tissue 4 Gently wipe the tissue over the cylindrical and ...

Page 62: ...cohol wipe out the optical port 3 Recap or reconnect the receptacle promptly to avoid contamination Check for proper system function Report optical fiber breakage Reporting optical fiber breakage When an accidental break in the fiber feeder cable occurs take the following steps 1 Notify both central office and field repair personnel of the problem 2 Identify to central office personnel what fibers...

Page 63: ... system LEDs are located on the front bezel see Figure 28 on page 63 Figure 28 MXK 819 and MXK 823 LEDs These LEDs illuminate to reflect the most significant alarm in the system For example if there were five major alarms and one critical alarm in the system only the critical LED would be lit Table 15 describes the MXK system LEDs m x 0 7 1 3 active fault pwr fail active fault pwr fail active faul...

Page 64: ... more slot cards is a major alarm OFF no alarm conditions Critical yellow ON the highest alarm being reported by one or more slot cards is a critical alarm OFF no alarm conditions Table 16 MXK card LED descriptions LED Description Active Green ON the card has booted properly BLINKING The card is booting Each uplink card has Active LEDs which illuminate to indicate their redundancy status A solid g...

Page 65: ...ection when handling system cards Installing a slot card in the MXK chassis Note You must install the uplink cards in middle slots A and B 1 Put on an antistatic wrist strap that touches the skin Make sure it is properly grounded to the ESD jack on the front of the unit 2 Carefully remove the card from its antistatic packaging 3 Visually inspect the card for damage Check the label and part number ...

Page 66: ...g a slot card from the MXK chassis 1 Put on an antistatic wrist strap that touches the skin Make sure it is properly grounded to the ESD jack on the front of the unit 2 Loosen the top and bottom screws of the slot card 3 Unscrew the top and bottom screws from the card 4 Lift the bottom ejector 5 Slide the card out Figure 30 illustrates removing slot cards Figure 30 Removing slot cards mx0803 mx080...

Page 67: ...he active uplink card by one of these two methods a Look the Active LED on the uplink card faceplate The uplink card with the Active LED solid green is the active uplink card The uplink card with the Active LED blinks once a second is the standby uplink card b Use the slots command to identify the active uplink card The active uplink card is marked with 3 To remove an active uplink card force this...

Page 68: ...tor open and slowly slide the card onto the backplane pins 3 Close the bottom ejector to firmly seat the card 4 Slide the card lock down 5 Tighten the top and bottom screws to seat the uplink card in the backplane Clean and replace the air filter Zhone recommends you clean or replace the MXK air filter every 3 to 6 months Cleaning the air filter Before cleaning the air filter visually inspect it f...

Page 69: ... procedure make sure the MXK connectors are securely fastened The MXK is designed so that the air filter can be removed without disturbing any of the cables 1 Put on an antistatic wrist strap that touches the skin Make sure it is properly grounded to the ESD jack on the front of the unit 2 Remove the bezel from the bottom of the MXK chassis by grasping both ends and gently pulling straight out Fig...

Page 70: ...chassis Remove the fan tray from the MXK and reinsert promptly after replacing a fan to ensure proper cooling to the MXK unit Removing the fan tray 1 Loosen and remove screws at either end of the upper activity lights facing 2 By using firm pressure on either end of the fan tray gently slide our the fan tray assembly m x 0 7 1 0 ...

Page 71: ...ghts facing and gently tighten 4 Verify the fans Once the fan tray is installed back on the chassis you should see the LEDs on the front powered on You can also run the CLI shelfctrl command to verify the fans are functional The display for the shelfctrl command shows the temperature status for fan power and fan status shown in bold zSH shelfctrl monitor Shelf uptime 32 days 23 hours 53 minutes Sh...

Page 72: ...fan alarm LED will come on The MXK 319 does not need to be powered down to remove the fan tray though the fan tray should only be removed long enough to replace it with another complete fan tray in order to avoid overheating the system This replacement should take less than a minute Removing the fan tray for the MXK 319 chassis 1 Using a screwdriver turn the screw lock mechanism near the top of th...

Page 73: ...vertighten 3 Verify the fans Because the fan LED on the front of the unit is an alarm the LED should not be lit You can run the CLI shelfctrl command to verify the fans are functional The display for the shelfctrl command shows the temperature status for fan power and fan status shown in bold zSH shelfctrl monitor Shelf uptime 1 day 2 hours 2 minutes Shelf start time 980414605 Shelf Monitor CPLD v...

Page 74: ...MXK Hardware Maintenance 74 MXK Hardware Installation Guide ...

Page 75: ...mperature 29 number per rack 30 operating altitude 30 operating humidity 30 operating temperature 30 rack installation 36 37 storage altitude 30 storage humidity 30 storage temperature 30 unpacking 35 weight 30 weight distribution 29 chassis alarms 56 chassis dimensions 30 circuit breaker specifications 33 cleaning components 59 common return 32 compliance specifications supported 35 connecting po...

Page 76: ...unting brackets chassis 36 installation procedure 36 MXK features 15 line cards overview 13 redundant uplinks 12 uplink card redundancy 17 uplink cards overview 12 MXK cards MXK ADSL2 BCM 48A 13 MXK ADSL2 POTS BCM 48A 2S 13 MXK ADSL2 SPLTR600 BCM 48A 2S 13 MXK ADSL2 SPLTR900 BCM 48A 2S 13 MXK AEX20 FE GE 13 MXK AEX20 FE GE 2S 13 MXK EFM SHDSL 24 NTP 14 MXK EFM SHDSL 24 NTWC 14 MXK GPONX4 IO 13 MXK...

Page 77: ... cards ESD 38 65 installation 38 65 removing 66 storing 38 65 specifications chassis dimensions 30 environmental 30 system cables 56 storing slot cards 38 65 system cables and connectors 55 environmental dimensions chassis 30 weight 30 input power 32 maximum temperature 29 unpacking 35 system environmental dimensions chassis per rack 30 operating altitude 30 operating humidity 30 operating tempera...

Page 78: ...Index 78 MALC Hardware Installation Guide ...

Reviews: