Install the MXK
34
MXK Hardware Installation Guide
Grounding and isolation
The MXK system cards and subassemblies use an integrated frame and logic
ground system as follows:
•
The MXK system chassis and logic ground are bonded.
•
The two-wire power supply feed is not connected to the chassis.
•
Cable shielding is terminated on the MXK system chassis ground.
Select the system location
Ensure that the environment is free of dust and excessive moisture, not
exposed to the elements or temperature extremes, and has sufficient
ventilation.
Install the system in reasonable proximity to all equipment with which it will
connect. Ensure that proper cable grades are used for all system and network
connections. For best results, use the cables and connectors recommended in
this document.
Tools needed
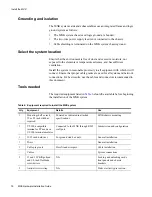
The required equipment listed in
should be available before beginning
the installation of the MXK system.
Table 6: Equipment required to install the MXK system
Qty
Equipment
Details
Use
1
Mounting shelf or rack,
19 or 23 inch width as
required.
Powered as indicated in attached
specifications.
MXK chassis mounting
1
VT-100-compatible
terminal or PC used as a
VT-100 terminal emulator
Connected to the MXK through RJ45
craft port.
Commission and configuration
1
11/32-inch nutdriver
For ground stud hex nuts.
General installation
1
Pliers
General installation
1
Cable prep tools
Pressfit and crimpers
Cable installation
-
Cables
System connections
2
#1 and #2 Phillips-head
and 1/8-inch flat-blade
screwdrivers
N/A
Locking and unlocking cards,
front panels and chassis
brackets
2
Antistatic wrist strap
N/A
Static electricity prevention


