Install a slot card
MXK Hardware Installation Guide
65
Install a slot card
Observe the following rules when handling MXK slot cards:
•
Handle each card by its front panel or stiffener. Never touch the solder
side, connector pins, or components on a printed circuit card, and do not
allow cards to come into contact with one another.
•
To prevent damage to slot cards when not in use, store and handle the
cards in their original containers. Keep the cards in their original packing
cartons to prevent damage caused by dust or dirt. Be sure to store the
cards in areas that are free from excessive humidity and temperatures.
Caution:
The MXK system slot cards are susceptible to electrostatic
discharge (ESD). ESD can cause component failure and degraded
system performance. Take adequate precautions to prevent
electrostatic discharge with these cards. Always wear a properly
grounded wrist strap, or equivalent protection, when handling system
cards.
Installing a slot card in the MXK chassis
Note: You must install the uplink cards in middle slots, A and B.
1
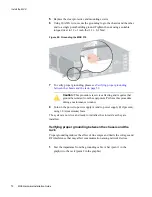
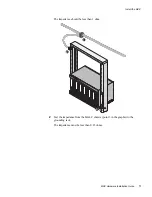
Put on an antistatic wrist strap that touches the skin. Make sure it is
properly grounded to the ESD jack on the front of the unit.
2
Carefully remove the card from its antistatic packaging.
3
Visually inspect the card for damage. Check the label and part number on
the card to verify the type of card being installed is the type needed for the
particular application.
4
Holding the card by its faceplate, carefully insert the card into a slot. Hold
the bottom ejector open and slowly slide the card onto the backplane pins.
5
Close the bottom ejector to firmly seat the card.
Caution:
To prevent damage to the backplane pins, do not force
cards onto the backplane pins when seating the cards. If you have
trouble seating a card, check that it is in the correct slot, pull the
card out, and try seating it again by pressing gently.
6
Slide the card lock down.
7
Tighten the top and bottom screws to seat the card in the backplane.
illustrates installing slot cards.


