☞
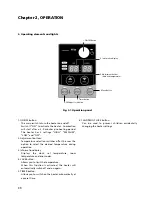
function (the CLOCK light and the information
display will start blinking). Next, set the hours using
the button on the left (
G
hour) and the minutes
using the button on the right (
H
min.). Press once
to increase the value by one step. When you hold
down the button, the value will continue going up,
until you release the button again. After
approximately 10 seconds the blinking will stop and
the setting will be locked. After switching off the
heater, the clock time will be displayed.
5. Igniting the heater
The heater is operated directly by the user. However,
the heat yield is controlled automatically in accordance
with the room temperature registered by the tempera-
ture sensor.
Step 1: Switch the heater ON
Press the ON/OFF button. The current room tempera-
ture and the set temperature are displayed on the
information display.
The ON/OFF light starts to flash, after which the heater
will switch on.
Note: (*) The start-up time depends on the room tem-
perature.
After 9-15 minutes, the heater will automatically select
the correct operating mode and the ON/OFF button will
now be illuminated continuously.
Room temperature:
under 0°C
11 minutes
0°C - 15°C
9 minutes
15°C
8.5 minutes
If no flames are visible after the start-up period, the
heater will deactivate and then restart automatically. If
flames are still not detected, the heater will deactivate
and will have to be restarted manually (error code E-2
on the information display).
Step 2: Setting the room temperature
The temperature setting can only be adjusted, when the
heater is burning. Use the adjustment buttons to adjust
the temperature. First press either of the two buttons to
switch on the function (the TEMP light next to the infor-
mation display will start blinking). Next, adjust the tem-
perature using the button on the right (
H
min.) to set the
temperature to a higher setting and the button on the
left (
G
hour) to lower the temperature. Press once to
increase the value one step. After approximately 10 sec-
onds the light will stop blinking and setting will be
locked. The available temperature settings range from
10°C minimum to 32°C maximum. When the heater has
been unplugged (or after a power failure), the tempera-
ture will reset to the factory setting of 20°C.
The operating mode is automatically controlled in accor-
dance with the room temperature detected by the room
temperature sensor. The heater works in the “HIGH”
operating mode until the room temperature has reached
the desired level.
When the room temperature reaches the chosen setting.
the heater automatically switches to the “MED” or
“LOW” operating mode in order to maintain the desired
temperature.
Step 3: The correct use of ‘SAVE’
The ‘SAVE’ function allows you to limit the temperature.
When this function is activated, the heater will automati-
cally switch off, when the room temperature exceeds the
set temperature by 2°C. Subsequently, when the room
temperature has dropped again to the set temperature,
the heater will automatically switch on again. Activate
the ‘SAVE’ setting by pressing the appropriate button.
The SAVE indicator light will light up. Switch off the
function by pressing the SAVE button once again.
Without the ‘SAVE’ setting your heater will
maintain the set temperature by approxima-
tion as well, by adjusting its heating capacity.
‘SAVE’ is an economy setting, which you can
use when, for instance, you are not present in
the room or to keep it frost-free.
Step 4: The ‘FUEL’ indicator light
When the FUEL indicator light lights up, it means that
there is only fuel left for 10 more minutes. The count-
down of the remaining heating time can be seen in the
information display. You remove the fuel tank and
refill it outside the living room. If you don’t refill it,
you will hear an alarm signal every two minutes, warn-
ing you to refill the removable tank and after 10 min-
utes the heater will switch off automatically.
41
Chapter 2, OPERATION


