background image

1 CONTROL 

PANEL

Before reading the manual, review the description 
of the stove given in the enclosed manual.

1.1 DESCRIPTION

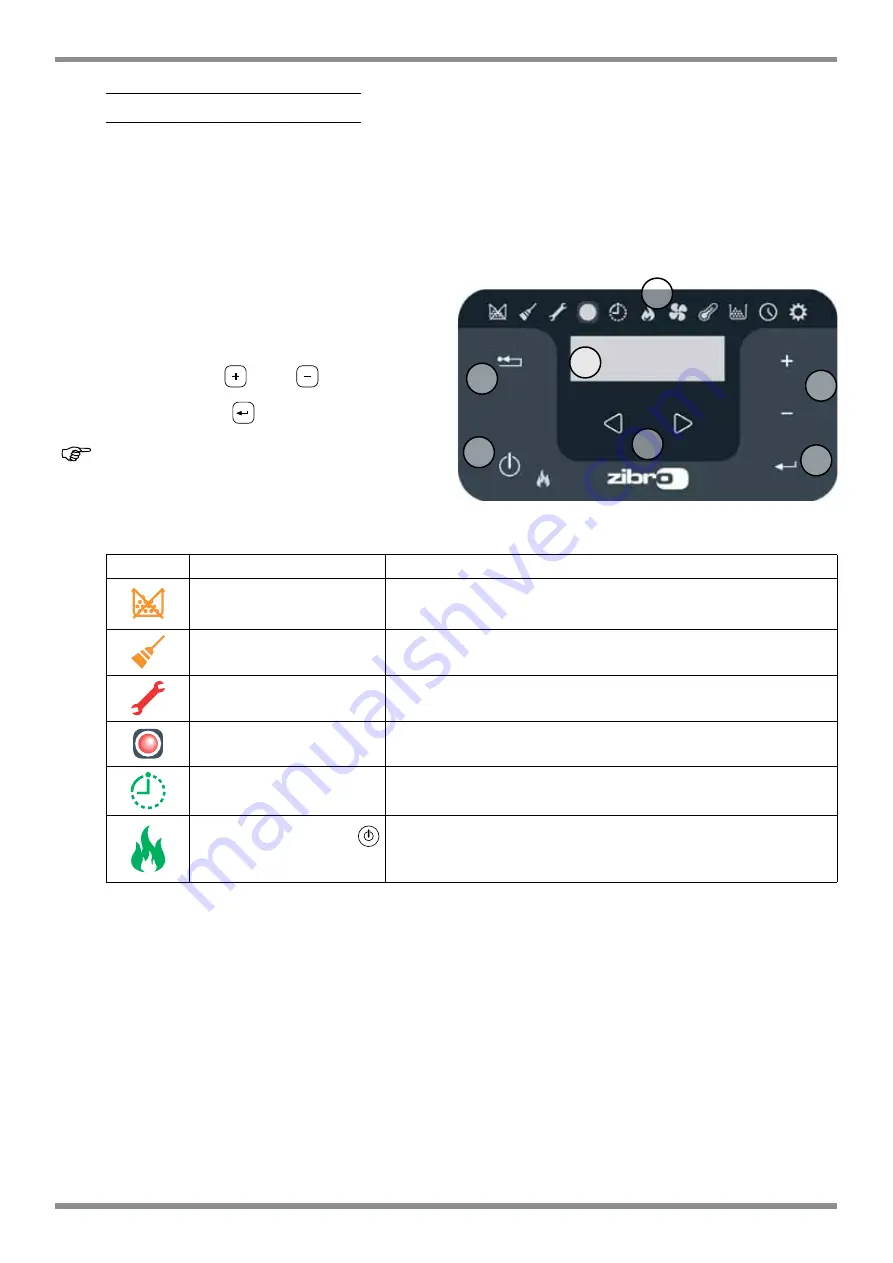
The control panel consists of:
A)  a top part with status LEDs and backlit icons 
that identify each function;

B)  LED display;

C)  ON button;

D)  “Cancel” and display “error” button;

E)  two arrow buttons to scroll between the various 
functions;

F)  two  buttons 

  and 

 to access the 

submenus and set the operating parameters;

G)  an enter button 

RFRQ¿UPWKHSDUDPHWHURU

the settings.


All the buttons are capacitive, therefore the functions 

are activated without needing to press hard on the 
buttons, rather by just touching the surface.

1.1.1 STATUS LEDS

ICON

WARNING

DESCRIPTION

Pellets running out

,QGLFDWHVWKDWWKHSHOOHWKRSSHUQHHGVWREHUH¿OOHG

Maintenance

Indicates the need to perform maintenance

Service

ndicates an error

Remote control receiver

OPTIONAL

Timer active

Indicates whether the timer function is active.

Status LED (near the


button)

LED on steady: stove on and operating

/('ÀDVKLQJVWRYHLQWKHLJQLWLRQVWDJHRULQVWDQGE\

LED off: stove off

Fig. 1.1

C

D

A

B

E

F

G

16

Summary of Contents for YUUKA

Page 1: ...egende Anleitung ist fester Bestandteil des Produkts Vor der Installation Wartung und Verwendung die Anleitungen stets aufmerksam durchlesen This manual is an integral part of the product Read the ins...

Page 2: ...stove please carefully follow the instructions provided in this manual Sehr geehrter Kunde Zuallererst m chten wir Ihnen f r den uns gew hrten Vorzug danken und Ihnen zur Wahl gratulieren Damit Sie I...

Page 3: ...USSCHALTEN 3 4 BETRIEB MIT RAUMTHERMOSTAT 3 5 BETRIEB MIT RAUMTEMPERATURF HLER AM OFEN 3 6 BETRIEB IN KOMBINATION MIT EINEM SPEICHER 3 7 BETRIEB IN KOMBINATION MIT DEM EVERSPRING SYSTEM 4 VERF GBARE F...

Page 4: ...der Betriebsparameter G eine Eingabetaste r die Best tigung des Parameters oder der Auswahl Alle Tasten sind kapazitiv d h zur Aktivierung m ssen sie nicht gedr ckt sondern lediglich ber hrt werden 1...

Page 5: ...das DVVHU JHVHW W QXU LQ GHU RQ JXUDWLRQ C 7 Funktion Eco Schaltet den Modus Eco frei bzw sperrt ihn wodurch das Ausschalten und Wiedereinschalten anhand der Raumtemperatur automatisch erfolgt Nur in...

Page 6: ...2IHQV N QQHQ YHUVFKLHGHQH 7HPSHUDWXUZHUWH JHlQGHUW ZHUGHQ a Mit den Tasten das Men Temperatur aufrufen und die Taste dr cken b Der aktuelle Wert blinkt Wert mit den Tasten ndern c Den eingegebenen Wer...

Page 7: ...orgung des Heizofens trennen 2 3 ANF NGLICHE EINSTELLUNGEN Vor dem Gebrauch des Ofens m ssen das Datum und die aktuelle Uhrzeit eingestellt werden 2 3 1 Uhrzeit und datum einstellen Zur nderung des Da...

Page 8: ...len und mit der Taste best tigen c Mit der Taste scrollen das Untermen 11 anw hlen und mit der Taste best tigen d Mit den Tasten und den gew nschten Helligkeitswert einstellen OFF 1 5 und mit der Tast...

Page 9: ...ingstm glichem Verbrauch zu halten Der Ofen wird automatisch wieder eingeschaltet wenn die Temperatur unter den am Raumthermostat eingestellten Wert abf llt Stromkreis geschlossen Bei erstmaliger Eins...

Page 10: ...e gew nschte Temperatur zu halten und verbraucht so wenig wie m glich Hat der Benutzer die Funktion Eco mode im Untermen 7 des Men s Setup DNWLYLHUW VFKDOWHW VLFK GHU Heizkessel beim Erreichen der ein...

Page 11: ...en i Der Wert der gew nschten Temperatur blinkt den Wert mit den Tasten und ndern j Die eingegebenen Daten mit der Taste best tigen 4 1 2 Zuordnen der programme an die tage Mit dieser Funktion k nnen...

Page 12: ...Setup aufrufen und die Taste dr cken b Mit der Taste das Passwort 7 anw hlen und mit der Taste best tigen c Das Untermen 10 w hlen und mit der Taste d IMit den Tasten einen der folgenden Werte eingebe...

Page 13: ...Setup aufrufen und die Taste dr cken b Mit der Taste das Passwort 7 anw hlen und mit der Taste best tigen c Das Untermen 8 anw hlen und mit der Taste best tigen d Der Wert blinkt den Wert mit den Tast...

Page 14: ...en verschlissen Ungen gende Verbrennungsluft Fehlbetrieb des Temperaturf hlers Wassertemperaturf hler am Vorlauf defekt Lufttemperaturf hler defekt E111 Fehlbetrieb des Abgasf hlers Abgastemperaturf h...

Page 15: ...3 3 SWITCHING OFF 3 4 OPERATION WITH ROOM THERMOSTAT 3 5 OPERATION WITH ROOM PROBE ON THE BOILER 3 6 OPERATION IN COMBINATION WITH A STORAGE TANK 3 7 OPERATION IN CONJUNCTION WITH THE EVERSPRING SYST...

Page 16: ...tton R FRQ UP WKH SDUDPHWHU RU the settings All the buttons are capacitive therefore the functions are activated without needing to press hard on the buttons rather by just touching the surface 1 1 1...

Page 17: ...the water supply RQO LQ FRQ JXUDWLRQ C 7 Eco function Enables or disables Eco Mode in which the stove automatically switches off and on based on room temperature only in FRQ JXUDWLRQ OFF Eco 8 Restar...

Page 18: ...1 3 2 Setting the temperature LIIHUHQW WHPSHUDWXUH YDOXHV FDQ EH VHW GHSHQGLQJ RQ WKH ERLOHU V FRQ JXUDWLRQ a Use the buttons to go to the temperature menu and press b 7KH FXUUHQW YDOXH ZLOO DVK FKDQJ...

Page 19: ...d 7KH KRXU YDOXH ZLOO DVK VHW WKH YDOXH XVLQJ WKH buttons and press e 7KH PLQXWHV YDOXH ZLOO DVK VHW WKH YDOXH XVLQJ WKH buttons and press f 7KH GD YDOXH ZLOO DVK VHW WKH YDOXH XVLQJ WKH buttons and p...

Page 20: ...RQ UP c Use the button to scroll to and select submenu 13 and press WR FRQ UP d Set the desired volume OFF 1 to 5 using the buttons and press WR FRQ UP 2 3 5 PSURYLQJ WKH FRPEXVWLRQ A good combustion...

Page 21: ...otection function can also be set in this con guration 3 STOVE OPERATION 3 1 STARTING THE STOVE Before every ignition be sure that burning pot is completely empty and properly positioned in its seat T...

Page 22: ...tain the desired temperature while minimising consumption KHUH WKH XVHU KDV HQDEOHG WKH FR PRGH IXQFWLRQ LQ WKH VXE PHQX 7 RI WKH VHW XS PHQX WKH ERLOHU LQVWHDG RI PRGXODWLQJ ZLOO VZLWFK RII ZKHQ WKH...

Page 23: ...UDWXUH YDOXH ZLOO DVK VHW WKH YDOXH XVLQJ WKH buttons and press j Press WR FRQ UP WKH VHWWLQJV 4 1 2 VVLJQLQJ WKH SURJUDPV WR VSHFL F GD V This function can be used to assign up to three different pro...

Page 24: ...QFWLRQ a Use the arrow buttons to go to the setup menu and then press b Use the button to select the password 7 and then press WR FRQ UP c Select submenu 10 DQG FRQ UP E SUHVVLQJ d Use the buttons to...

Page 25: ...go to the setup menu and then press b Use the button to select the password 7 and then press WR FRQ UP c Select submenu 8 and press WR FRQ UP d 7KH YDOXH ZLOO DVK FKDQJH LW XVLQJ WKH and buttons 0 40...

Page 26: ...KDXVW V VWHP GLUW Seal gaskets worn QVXI FLHQW FRPEXVWLRQ DLU Temperature probe malfunction Faulty outlet water temperature probe Faulty air temperature probe E111 Flue gas temperature probe malfuncti...

Page 27: ......

Page 28: ...nemann Vertriebs GmbH Ph 49 40 828357 www zibro ofenshop de Die Firma Toyotomi bernimmt f r eventuelle Fehler in diesem Heft keine Verantwortung und beh lt sich das Recht vor die Eigenschaften ihrer P...

Reviews: