background image

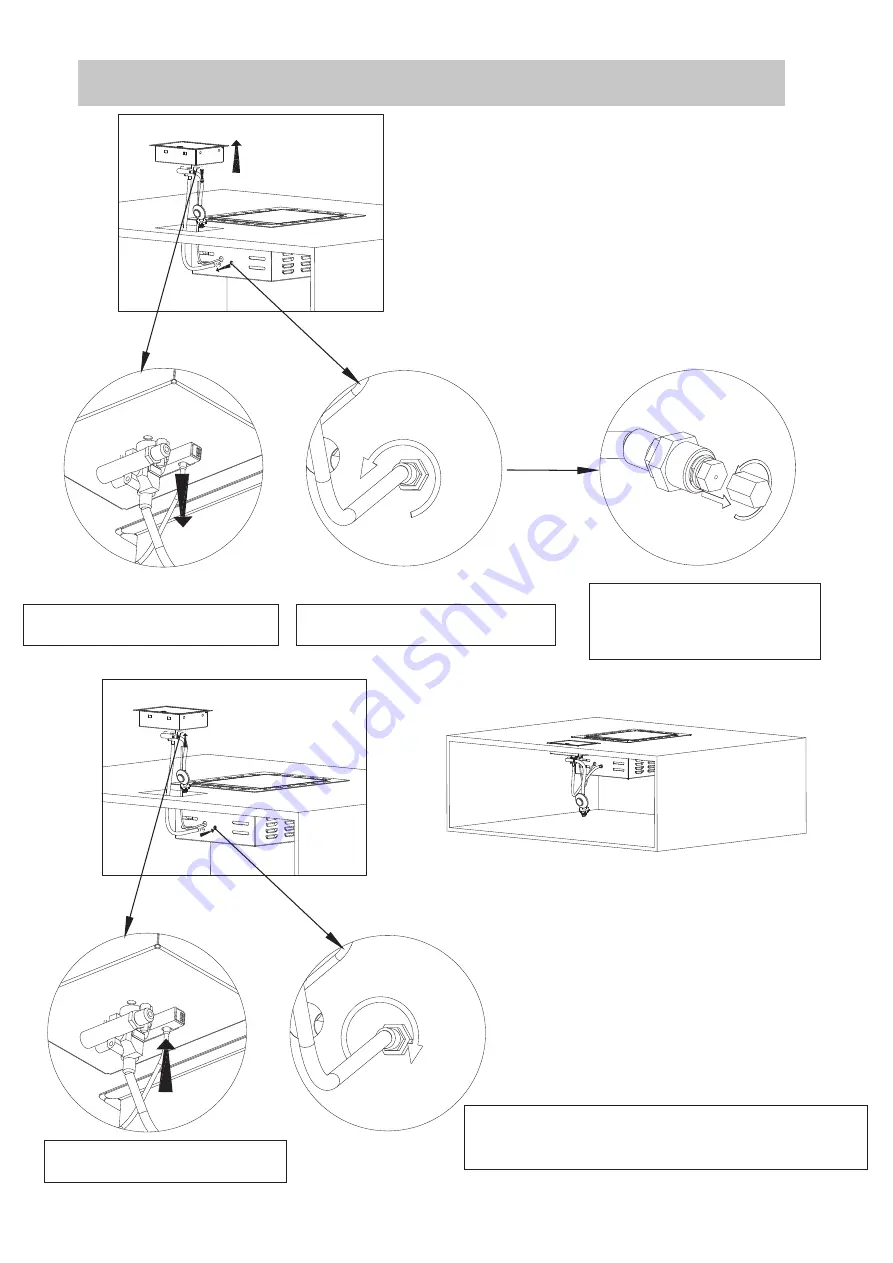
Step 1:Disconnect  ignition wire from 

the control box as above shown

Step 2:Disconnect  the corrugated 

pipe from the burner as above shown

Step 3:Disconnect the LP 
injector, leaving the 1.75mm 
NG exposed and in place as 
shown above.

Step 4

:

Reconnect


the


ignition


wire


to


the


control


box

.

Step 5

:

 Reconnect the corrugated pipe that 

now holds the new 1.75 mm injector back in 
place into the side burner.

13

TECHNICAL INFORMATION: Natural Gas Conversion (continued)

Summary of Contents for GRAND TURBO ZGGTSBBIL

Page 1: ...ZGGTSBBIL GRAND TURBO BARBEQUE DROP IN BUILD IN SIDE BURNER appliance 1 Natural Gas ...

Page 2: ...RAREA EXAMPLE5 30 percent or more total of the remaining wall area is open and unrestricted 30 percent or more total of the remaining wall area is open and unrestricted Open side at least 25 of total wall area Open side at least 25 of total wall area 2 FIGURE1 FIGURE2 no more than two walls ...

Page 3: ...EXPLODED VIEW carton 3 Most parts already pre assembled in the factory ...

Page 4: ...4 OUTER CADOU24621435NG NG INJECTOR INNER ...

Page 5: ...appliance appliance appliance inthe vicinityofthisappliance appliance appliance fireboxes periodically Keep 5 Always w appliance ...

Page 6: ...liance appliance appliance appliance appliance appliance appliance appliance appliance an adjacent cupboard the Connect the regulator end of the hose and regulator assembly to the cylinder as shown below 6 starting ...

Page 7: ...sh the control knob IN and keep pressing in whilst turning the control knob anti clockwise to HIGH a click will be felt This should light the burner 6 If the burner does not light turn the control knob clockwise to OFF wait 5 minutes and repeat step 5 If the burner does not light or does not stay alight repeat steps 5 and 6 7 If the burner fails to light or to stay alight after several attempts co...

Page 8: ...D IN DROP IN SIDE BURNER L SERIES Gas type Gas pressure Injector Gas consumption PROPANE NG 2 75kPa 1 0 kPa 1 12mm 1 75mm 15MJ h 14MJ h IAPMO Oceana Certification No GMK10138 Minimum clearance from combustible materials 1000mm overhead 300mm sides and rear 8 ...

Page 9: ...PRODUCT DIMENSIONS Check the product dimensions and cut out requirements BEFORE commencing any preparations to fit the appliance 9 ...

Page 10: ...mbustible materials 1000mm overhead 300mm sides and rear 10 Gas cylinder compartments must have permanent openings ventilating directly to the outside of the appliance and consisting of either a perforations uniformly distributed over the height of the enclosure and with a total free area of not less than 25 of the sidewall area or b separate openings at high and low level such that i the total fr...

Page 11: ...tion bring the pipe out through the control box hole fit the pipe to the control box then fit the control box into position ALWAYS TEST FOR LEAKS BEFORE LIGHTING A Connect the corrugated gas pipe to the firebox as shown Start by hand turn clockwise and then tighten firmly with a spanner as shown The injector must be engaged firmly and centrally into the firebox B Fix the ignition wire to the spark...

Page 12: ...e LPGas or NaturalGas ThenecessaryinjectortoconverttheapplianceforusewithnaturalGas isalreadyfactoryfittedbehindthe LPinjector For bayonetconnectiontoaNaturalGas supply connectionhosekitNGCK250VJQ isavailable separatelythroughBarbequesGalorestores andgassupplyisdisconnectedfromtheappliancepriortoperformingtheconversion valve 12 ...

Page 13: ...hown Step3 Disconnect the LP injector leaving the 1 75mm NG exposed and in place as shown above Step4 Reconnect the ignition wire to the control box Step5 Reconnect the corrugated pipe that now holds the new 1 75 mm injector back in place into the side burner 13 TECHNICAL INFORMATION Natural Gas Conversion continued ...

Page 14: ...Useda6mmflatheadscrewdriverandturntheadjustingscrew180degreesanticlockwise halfof onefullturn DONOTturn360degrees Step7 Changethegastypelabelto NATURALGAS Replacetheexisting PROPANEONLY gastypelabelinsidethelidwiththe NATURALGAS labelincludedwiththeconversionkit Step8 DisconnecttheLPgashoseandregulatorfromtheappliance Makesureallusersare awareofthenewgastype ConnectionoftheappliancetoNaturalGassup...

Page 15: ...move trivet and carefully remove burner 2 Check the burner for any blockages etc Some spider webs can be almost impossible to see but can stop the burner functioning Use a pipe cleaner to ensure the burner and burner ports are web free and unblocked 15 ...

Page 16: ...Burnerseasilyextinguishedinlowwind firebox 16 appliance ...

Page 17: ...appliance appliance appliance appliance appliance appliance appliance Frequent rinsing with fresh water will make a huge difference to corrosion prevention appliance 17 C appliance ...

Page 18: ...Firebox inner firebox outer lid and control box 18 C ...

Page 19: ...19 ...

Reviews: