background image

41

GB

13. Technical specifications

Wireless standard:   ZigBee 3.0 – 2.4 GHz  
Power supply:  

2 x AAA 1.5V 

operating time c. 6 months 
with ten times of use a day

Operating  
temperature:  

-20° to +40°C

Dimensions:  

L 151 x W 38 mm, H 15 mm

All information subject to change or correction. This 
product conforms to the CE requirements and other 
relevant standards. 
The  device  fulfils  the  fundamental  requirements 
pursuant  to  the  European  Parliament‘s  Radio  

Equipment  Directive  2014/53/EU  (RED).  The  full 


declaration of conformity can be requested from the 
address given on the reverse.

Customer service

If  you  have  any  other  questions  about  how  the  Q 

products  work  and  for  any  guarantee  matters,  
please contact our customer service hotline on:  

+49 (0) 2922 9721 9290 

or by mail: kundenservice@paul-neuhaus.de

Summary of Contents for Q-Remote

Page 1: ...2 ...

Page 2: ...rwendung der Mesh Netzwerk Technologie garantiert ZigBee einen kollisionsfreien Betrieb von smarten Leuchten und Elektrogeräten über entsprechende Apps bzw ZigBee fähige Steuergeräte und ist eine professionel le Funkbasis zur Vernetzung von smarten Haushalts geräten ZigBee nutzt das gleiche Frequenzband wie WLAN 2 4 GHz ZigBee unterstützt Mesh Networking und erweitert so die Reichweite innerhalb d...

Page 3: ...hern Die touchlink fähige Fern bedienung kann in bestehende ZigBee Systeme inte griert werden und ist die perfekte Ergänzung zu Smart Media Geräten Darüber hinaus lassen sich alle ZigBee fähigen Haushaltsgeräte über die Q Remote Fernbedienung an und ausschalten Hinweis ZigBee fähige Leuchten Geräte lassen sich nur über die Q Remote Fernbedienung steuern wenn diese zuvor an die Fernbedienung angele...

Page 4: ...insam gesteuert Verlaufsmodus Rot Blau Grün an aus Status LED stufenlose Farbtemperatur einstellung für CCT fähige Leuchten 1 3 Gruppen programmierbar Grundfarben RGB und autom Farbwechsel Szenensteuerung mit 2 Speicher plätzen heller dimmen dunkler dimmen RGB Touch Ring Batteriefach ...

Page 5: ...ie Tasten 1 2 3 oder die Taste 1 3 anwählen 1 Inbetriebnahme Fernbedienung Batterien einsetzen siehe Punkt 9 Tastengruppen 1 2 3 bitte erst Gruppe anwählen um Leuchten Geräte über die Fern bedienung zu schalten bzw zu dimmen Taste 1 3 alle Gruppen können gemeinsam gesteuert werden ...

Page 6: ... bzw dunkler gedimmt Ein kurzer Tastendruck bewirkt das schrittweise Dimmen um jeweils 10 ein langer Tastendruck ermöglicht das stufenlose Dimmen Bei gewünschter Helligkeit die Taste loslassen D Aus An Tasten zum Schalten der Q Artikel und von Geräten mit ZigBee Touchlink Funktionen Dimmtaste kurzer Tastendruck Leuchte wird in 10 Schritten gedimmt langer Tastendruck Leuchte wird stufenlos gedimmt ...

Page 7: ...ouch Feld reagiert auf Hautkontakt Um die Farbe der Q Leuchten im RGB Modus zu verändern einfach mit dem Finger auf dem Touch Feld rauf oder runterfahren Die Farbveränderung erfolgt gemäß der daneben stehenden Farbskala RGB Touch Ring mit dem Finger die gewünschte Farbe einstellen ...

Page 8: ... stufenweises Einstellen von rotem Licht grünem Licht blauem Licht RGB bzw automati schem Farbverlaufsmodus Verlaufsmodus Rot Blau Grün Darüber hinaus können Leuchten Geräte mit der Taste P aus den Gruppen Szenen entfernt werden siehe Punkt 6 D Taste P durch wiederholtes kurzes Drücken RGB Licht oder Farbverlaufsmodus aktivieren ...

Page 9: ...peratur von warmweiß bis kaltweiß Bei CCT Leuchten wird die Farbverschiebung von warmweiß zu kaltweiß nur über diese Taste gesteuert kurzer schneller Druck hintereinander 10 Schritte langer Druck stufenlose Farbtemperatureinstellung Richtungswechsel bei jedem erneuten Tastendruck Taste W die Lichtfarbe der CCT Leuchten wird nur über diese Taste gesteuert ...

Page 10: ...der aufblinkt bitte diesen Vorgang nicht unterbrechen Danach die Gruppentaste loslassen Status LED blinkt 1 Sek 2 Sek 3 Sek 4 Sek 5 Sek D Von der Leuchte bzw dem Gerät erfolgt als Rückmel dung ein dreimaliges kurzes Aufblinken und nach 1 3 Sek ein einmaliges Aufblinken Leuchte bzw Gerät sind nun erfolgreich verbunden Sollte die Leuchte nicht noch einmal aufblinken ist die Verbindung nicht erfolgt ...

Page 11: ...d oder Schnurschalter und nur den Artikel eingeschaltet lassen welcher entfernt werden soll Q Fernbedienung dicht an den Artikel halten 10 cm und die Taste P für fünf Sekunden gedrückt halten Nun blinkt die Leuchte Gerät auf und signalisiert das erfolgte Entfernen aus der Gruppe Tasten gruppen 1 2 3 bitte entspre chende Gruppe anwählen aus der Leuchten Geräte über die Fernbedienung entfernt werden...

Page 12: ...13 6 2 Gesamte Gruppe löschen Zum Löschen einer gesamten Gruppe bitte gleichzei tig die entsprechende Gruppentaste und die Taste P für fünf Sekunden gedrückt halten D ...

Page 13: ...ählen wie unter Punkt 1 bis 4 beschrie ben Anschließend eine der zwei Szenentasten der Q Fernbedienung für 5 Sek gedrückt halten Status LED blinkt 4 mal im Sekundentakt und danach 3 mal kurz hintereinander auf Die Szene ist gespeichert Tasten max 2 Szenen lassen sich auf den Szenen tasten abspeichern Szenen tasten zum Speichern min 5 Sek ge drückt halten bis Status LED blinkt Szenen über kurzen Ta...

Page 14: ...zustand bringen siehe unter Punkt 1 bis 4 Mit weiteren Leuchten Geräten wie beschrieben fortfahren Anschließend schalten Sie alle Leuchten Geräte die zur Szene gehören sollen ein und speichern die Szene ab Szene aufrufen Kurz auf eine der zwei Szenentasten drücken die Szene wird aufgerufen Szene löschen Soll eine Szene gelöscht werden entsprechende Sze netaste und die Taste P gleichzeitig für 5 Se...

Page 15: ...m und die An Taste der Q FB länger als 5 Sek gedrückt halten bis die Status LED aufblinkt Prüfen Sie ob der Anlernvorgang erfolgreich war indem Sie an der Q FB die Taste 1 3 drücken und anschließend die An bzw Aus Taste bedienen Werden die im Gateway angelernten Geräte geschal tet war der Vorgang erfolgreich Die Q FB ist nun mit dem Gateway verbunden Sollen Leuchten Geräte auch in vollem Umfang Sz...

Page 16: ...ien Typ AAA in der korrekten Position siehe Hinweise zur Polung im Batteriefach in die Fernbedienung ein D Hinweis Blinkt die Status LED nach dem Loslassen einer be liebigen Taste in drei Intervallen drei Mal kurz auf so sind die Batterien nahezu leer Bitte Batterien wechseln ...

Page 17: ...n schieben und mehr als 5 Sek gedrückt halten Status LED blinkt viermal auf dann zehnmal hintereinander 10 Zurücksetzen Reset der FB auf werkseitige Einstellung 1 Sek 5 Sek 2 Sek 3 Sek 4 Sek Die Fernbedienung ist nun auf werkseitige Einstellung zurückgestellt Rückstellung der Fernbedienung Reset Batteriefach ...

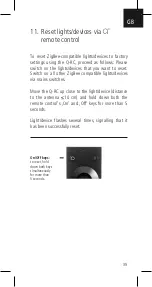
Page 18: ...te über Netzschalter anschal ten Q FB in unmittelbare Nähe zur Leuchte zum Gerät bringen Abstand zur Antenne 10 cm und beide An und Aus Tasten der Fernbedienung gleichzeitig für mehr als 5 Sek gedrückt halten Leuchte Gerät blinkt mehrmals auf und signalisiert das erfolgreiche Zurücksetzen 11 Zurücksetzen Reset der Leuchten Geräte über FB D Aus An Tasten zum Zurücksetzen beide Tasten gleich zeitig ...

Page 19: ...e Q FB angelernt bitte prüfen siehe Punkt 5 Leuchten Geräte sind über Wand Schnur oder Geräteschalter ausgeschaltet worden bitte prüfen Sie alle Leuchten Geräte auf Betriebsbereitschaft Q FB hat eine Störung der Betriebssoftware bitte nehmen Sie die Batterien heraus und setzen sie wieder ein Reagieren die eingeschalteten Leuchten Geräte weiterhin nicht auf die Q FB bitte die Fernbedie nung resette...

Page 20: ...gen und anderen relevanten Normen Das Gerät erfüllt die grundlegenden Anforderungen nach der Radio Equipment Direktive 2014 53 EU RED des Europäischen Parlaments über Funkan lagen Die vollständige Konformitätserklärung kann bei rückseitig angegebener Adresse angefordert werden Kundenservice Bei weiteren Fragen zur Funktionsweise der Q Artikel oder im Garantiefall wenden Sie sich bitte an unsere Se...

Page 21: ...22 14 Wandhalter für Fernbedienung ...

Page 22: ...g mesh network technology ZigBee guarantees non clashing operation of smart lights and electrical appliances via appropriate apps or ZigBee compatible controllers and represents a professional wireless basis for the networking of smart household devices ZigBee uses the same wave band as WLAN 2 4 GHz ZigBee supports mesh networking and thus extends the range within the house Range 8 12 m ZigBee pro...

Page 23: ...ave up to 2 scenes The remote control unit with Touchlink capability can be integrated into existing ZigBee systems and is the perfect complement to smart media devices In addition all ZigBee compatible household devices can be switched on and off via Q Remote Note ZigBee compatible lights devices can only be controlled via the Q Remote unit if they have previ ously been paired with it see point 5...

Page 24: ...er Blend mode Red Blue Green On Off Status LED Seamless colour temperature adjustment for lights with CCT capability 1 3 groups can be programmed Basic RGB colours and automatic colour change Scene control with 2 scene memory Brighter Darker RGB Touch Ring Battery compartment ...

Page 25: ...nt group via the 1 2 3 keys or select key 1 3 1 Remote control Getting started Insert batteries see point 9 Key groups 1 2 3 please first select group in order to dim switch lights devices on off via the remote control Key 1 3 all groups can be controlled together ...

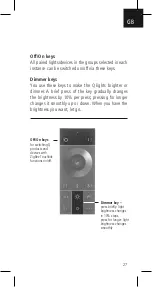
Page 26: ...ouchlink functions on off Off On keys All paired lights devices in the groups selected in each instance can be switched on off via these keys Dimmer keys You use these keys to make the Q lights brighter or dimmer A brief press of the key gradually changes the brightness by 10 per press pressing for longer changes it smoothly up or down When you have the brightness you want let go ...

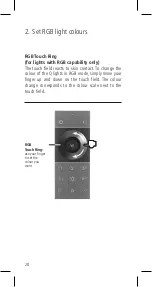
Page 27: ...ly The touch field reacts to skin contact To change the colour of the Q lights in RGB mode simply move your finger up and down on the touch field The colour change corresponds to the colour scale next to the touch field RGB Touch Ring use your finger to set the colour you want ...

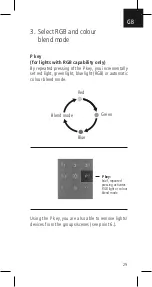
Page 28: ...ssing of the P key you incrementally set red light green light blue light RGB or automatic colour blend mode Blend mode Red Blue Green Using the P key you are also able to remove lights devices from the groups scenes see point 6 P key brief repeated pressing activates RGB light or colour blend mode ...

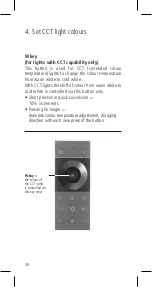
Page 29: ...ature from warm white to cold white With CCT lights the shift of colour from warm white to cold white is controlled via this button only Short presses in quick succession 10 increments Pressing for longer seamless colour temperature adjustment changing direction with each new press of the button W key the colour of the CCT lights is controlled via this key only ...

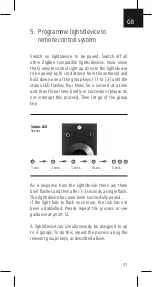
Page 30: ... this process Then let go of the group key As a response from the light device there are three brief flashes and then after 1 3 seconds a single flash The light device has now been successfully paired If the light fails to flash once more the link has not been established Please repeat the process or see guidance at point 12 A light device can simultaneously be assigned to up to 3 groups To do thi...

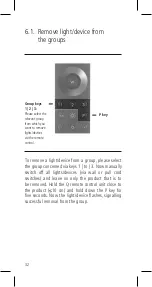
Page 31: ...a wall or pull cord switches and leave on only the product that is to be removed Hold the Q remote control unit close to the product 10 cm and hold down the P key for five seconds Now the light device flashes signalling successful removal from the group Group keys 1 2 3 Please select the relevant group from which you want to remove lights devices via the remote control P key ...

Page 32: ...33 GB 6 2 Delete whole group To delete an entire group please simultaneously hold down the P key and relevant group key for five seconds ...

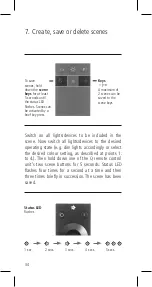
Page 33: ...hen hold down one of the Q remote control unit s two scene buttons for 5 seconds Status LED flashes four times for a second at a time and then three times briefly in succession The scene has been saved Keys A maximum of 2 scenes can be saved to the scene keys To save scenes hold down the scene keys for at least 5 seconds until the status LED flashes Scenes can be activated by a brief key press Sta...

Page 34: ...put it into the desired operating state see guidance at points 1 to 4 Continue as described with further lights devices Then turn on all lights devices to be included in the scene and save it Activate a scene Briefly press one of the two scene buttons the scene gets activated Delete scene If you want to delete a scene simultaneously hold down the P key and relevant scene key for 5 seconds The ligh...

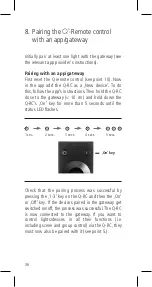
Page 35: ...he gateway 10 cm and hold down the Q RC s On key for more than 5 seconds until the status LED flashes Check that the pairing process was successful by pressing the 1 3 key on the Q RC and then the On or Off key If the devices paired in the gateway get switched on off the process was successful The Q RC is now connected to the gateway If you want to control lights devices in all their functions i e...

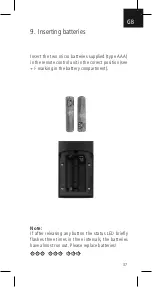
Page 36: ...upplied type AAA in the remote control unit in the correct position see marking in the battery compartment Note If after releasing any button the status LED briefly flashes three times in three intervals the batteries have almost run out Please replace batteries ...

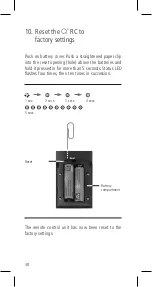
Page 37: ...e the batteries and hold it pressed in for more than 5 seconds Status LED flashes four times then ten times in succession The remote control unit has now been reset to the factory settings 10 Reset the RC to factory settings 1 sec 5 secs 2 secs 3 secs 4 secs Reset Reset Battery compartment ...

Page 38: ...ible lights devices via mains switches Move the Q RC up close to the light device distance to the antenna 10 cm and hold down both the remote control s On and Off keys for more than 5 seconds Light device flashes several times signalling that it has been successfully reset 11 Reset lights devices via remote control On Off keys to reset hold down both keys simultaneously for more than 5 seconds ...

Page 39: ...ve been switched off via wall pull cord or device switches please check that all lights devices are ready for use The Q remote control has an operating software fault Please take the batteries out and then put them back in If the lights devices are switched on and they still do not react to the Q RC please reset the remote control see point 10 NOTE Resetting deletes all saved groups and scenes Lig...

Page 40: ...ms to the CE requirements and other relevant standards The device fulfils the fundamental requirements pursuant to the European Parliament s Radio Equipment Directive 2014 53 EU RED The full declaration of conformity can be requested from the address given on the reverse Customer service If you have any other questions about how the Q products work and for any guarantee matters please contact our ...

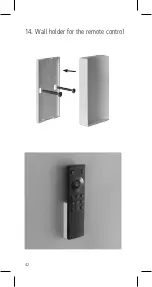
Page 41: ...42 14 Wall holder for the remote control ...

Page 42: ...a las instrucciones de manejo en su idioma entrando a la dirección de internet abajo indicada Eestikeelse kasutusjuhendi võite saada allolevalt internetiaadressilt Suomenkieliset käyttöohjeet löydät seuraavasta nettiosoitteesta Upute za uporabu na vašem jeziku možete preuzeti putem niže navedene internetske adrese Az Ön nyelvén íródott használati utasítás az alábbi internet címről tölthető le Le I...

Page 43: ...et aflată mai jos Инструкцию по эксплуатации на Вашем языке Вы найдете по адресу в Интернете ниже Návod na obsluhu vo vašom jazyku nájdete na dole uvedenej internetovej adrese Navodila za uporabo v svojem jeziku lahko prikličete s spodnjega spletnega naslova Uputstvo za upotrebu na Vašem jeziku može se naći na dole navedenoj internet adresi Du hittar bruksanvisningen på ditt språk via nedanstående...

Reviews: