Decoder-Update-and-Sound-Loading-device
MXULFA
, Test and Connection boards
MXTAPS, -V, MSTAPK, -G
Page 5
Decoder sound loading
over the
rail
with sound project on
USB stick
Decoder installed in locomotive or connected to a test and connection board MXTAP, MSTAP...
•
Prepare USB-Stick
:
Download the
sound project
from
www.zimo.at /
Update & Sound / ZIMO Sound Data-
base
and save it in the root directory of the USB stick (.zpp file), or multiple .zpp.
Note: in the case of a (chargeable) "coded" sound project, a "load code" must be programmed into the decoder in question
before the actual sound loading process. See info under
ZIMO Sound Database.
•
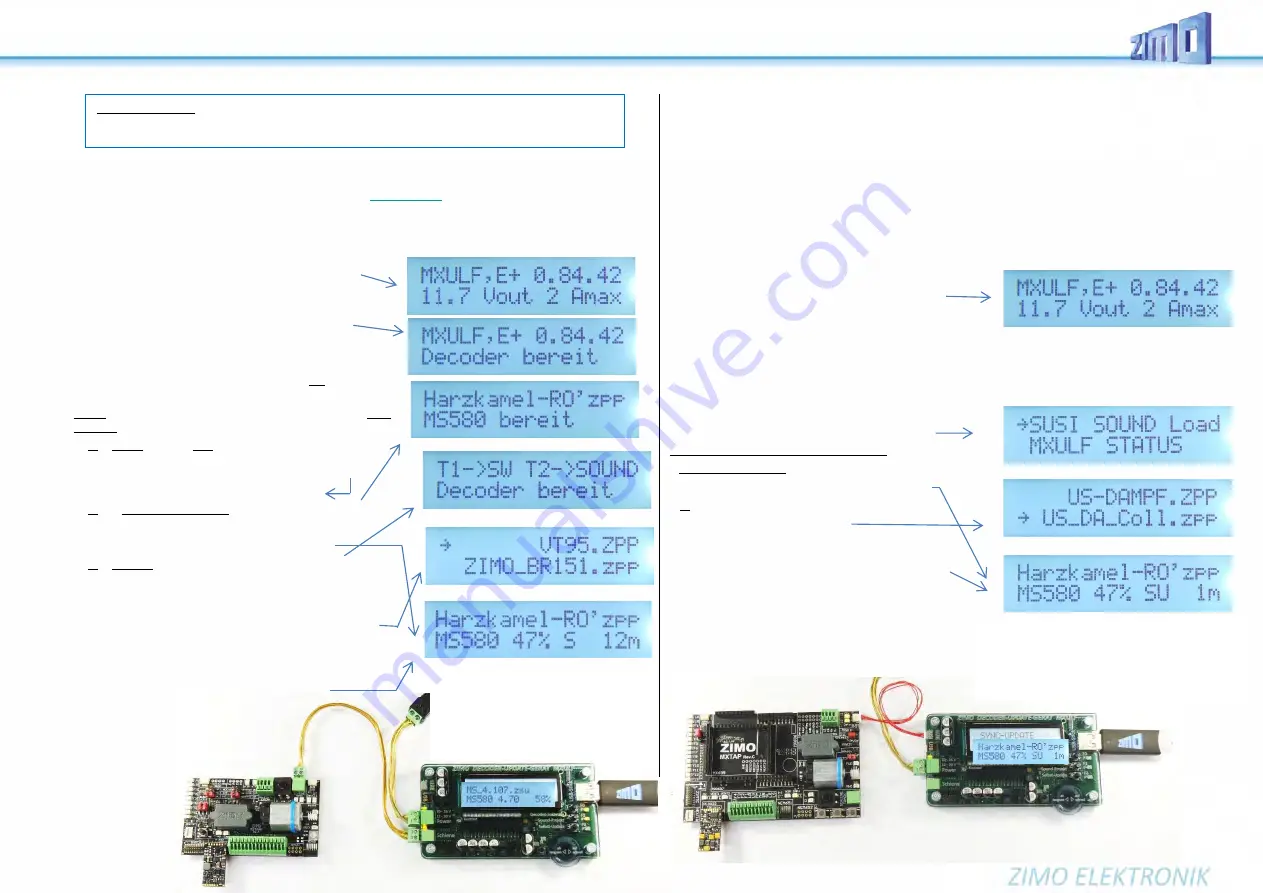
Prepare MXULFA: Connect "Power" (power supply or power
source according to the technical data) to the MXULF;
→
Start screen on the display
→
LED „Power“ green
.
Sequence of the following two steps as desired:
•
Connect rail to MXULFA, vehicle (with decoder) on rail (only
vehicle, only decoder)
OR: Connect MSTAP.. or MXTAP.. board (with decoder
plugged in or connected decoder) to MXULFA (rail)
→
second line "Decoder ready" or decoder type (display
depends on MXULF-SW version; sequence not dependent).
•
Insert
USB stick
(as prepared above) into USB socket
Three variants of the further process depending on the stick
content:
1. If single decoder SW collection file, i.e. .zsu file:
→
First line: Name of this file
→
LED „1“ yellow
Key 1
→
Start Decoder-Software-Update
see previous chapter
2. If a single sound project on the stick, so .zpp file:
→
First Line: Name of this file
→
LED „2“ yellow
Key 2
→
Start
decoder sound loading
3. If multiple files on the stick (.zsu and/or .zpp)
→
First line:
→
LED „1 and/or LED „2“ yellow
Note on keys - selection of further operation
Key 1
→
to the list of decoder SW collection files (.zsu)
Key 2
→
to the list of sound projects (.zpp files)
Scroll
(scroll wheel) in respective list; cursor on
selected file, depending on whether .zsu or .zpp:
Key 1
→
Start decoder software update, resp.
Key 2
→
Start decoder sound loading
•
Loading of the sound project
is running, with logging of the
most important steps (clear memory, etc.), progress display in %,
for sound loading also time prognosis in min.
When 100% is reached: remove the vehicle from the rail, and - if desired - connect/set up other decoder,
Key 2
→
Start
identical sound project (.zpp) file.
Decoder sound loading
via
SUSI
interface with sound project on
USB stick
SUSI plug or
solder pads directly to decoder or decoder plugged to test-and-connect board
SUSI loading is the
fast
alternative (approx. factor 10 compared to rail) for decoders which are
NOT in-
stalled
. Normally the slots (PluX, MTC, Next18, ...) on a test and connection board
MXTAP
or
MSTAP
are
used for contacting; but with wired decoders (also with NEM-651 or -652) wires have to be soldered to the
SUSI pads.
•
Prepare USB stick (same as for sound loading via rail):
download the desired sound project from www.zimo.at - Update & Sound - ZIMO Sound Database and
save it in the root directory of the USB stick (.zpp file), or several .zpp. files.
NOTE: in case of a (chargeable) "coded" sound project, a "load code" must be programmed into the de-
coder in question before the actual sound loading process. See info under
ZIMO Sound Database.
•
Prepare MXULFA (same as for sound loading via
rail), if not already switched on:
Connect "Power" (power supply unit, ...) to MXULF
→
LED „Power“ green.
•
Connect
connection board
(MXTAP.. or MSTAP..) by SUSI cable (i.e. SUSI connector on MXULFA to
SUSI connector on MSTAP.. or MXTAP.. board), but NOT "rail".
•
Connect the decoder
to a suitable interface (PluX, MTC, Next18, ... socket strip for large-scale decod-
ers) on MSTAP... or MXTAP..., or, in case of a wired decoder, connect SUSI pads with soldered wires
to SUSI pins on MSTAP... or MXTAP....
•
Insert USB stick
(as prepared above) into USB socket
•
R key
(long, approx. 3 sec)
→
opens the menu.
Scroll
(scroll wheel) to
"SUSI SOUND Load”
Two variants depending on stick content:
if single sound project on the stick (.zpp file):
R-Key
→
Start decoder sound loading
2. When multiple sound projects on the stick:
List of sound projects
Scroll
(scroll wheel) in list of sound projects,
cursor on selected project.
R-Key
→
Start decoder sound loading
•
Loading of the sound project
runs, with logging of the
most important steps (clearing memory, etc.), progress
display in %, time estimate for completion
in min.
•
When 100% is reached: Remove vehicle from rail, and - if desired - connect another decoder,
R-Key
→
Start identical sound project
MX decoder
only
: During update or sound loading the update lock is automatically deactivated.
(CV #144 = 0) and analog operation is disabled (CV #29, bit 2 = 0). After finishing the process
MXULFA tries to set the CVs back to the original values (this may fail!).
Typical arrangement for software update
and/or sound loading via "rail"; decoder is
located in the matching slot of a test and
connection board (..TAP.., in the picture be-
low MSTAPK); only connection between
MXULF - "rail".
and ...TAP... - "rail" necessary.
Typical arrangement for sound loading via "SUSI": De-
coder is located in the appropriate slot of a ..TAP., -
board (in the picture MXTAP); only SUSI cable ("rail"
must not be connected).
NOTE:
if decoder installed in locomotive,
only possible if SUSI connector is accessible.


