background image

Maintenance Instructions


Customer Helpline 01582 670100

12

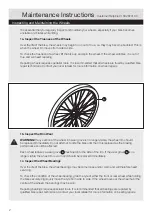
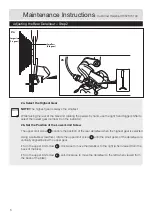
You should perform the following checks before riding your bike to ensure it is safe to use and 
operating correctly.

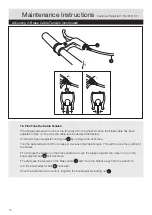
1. Is the Saddle Secure?

While standing next to the bike, try to move the saddle from side to side. If the saddle moves, you 
should retighten the seat post bolt or the saddle clamp bolts.

2. Are the Front and Rear Tyres In

fl

 ated Correctly?

Squeeze the sides of the front and rear tyres. If they are soft, they will need in

fl

 ating. Re-in

fl

 ate, to the 

pressure indicated on the sides of the tyres, using an approved bicycle pump.

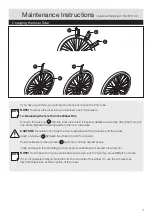
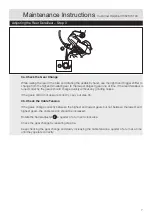
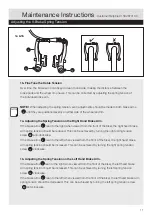
3. Are the Pedals Tight?

Using the supplied multi-tool, ensure both the left and right pedals are fully tight. Remember that the 
threaded shafts of the left and right pedals tighten in different directions.

4. Do the Brakes Work?

Stand next to the bike and apply the front brake and push forwards. If the wheels move, the front 
brake may not be working correctly. If required, adjust the front brake as described on pages 10-12.

Repeat the above check for the rear brake.

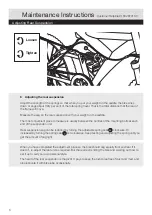
5. Do the Handlebars Move?

Hold the front wheel between your legs and try to move the handlebars. If the handlebars move, the 
stem bolt may have become loose. Re-tighten the stem bolt.

6. Is the Bike Clean?

The bike should be cleaned and re-oiled regularly to ensure it operates correctly

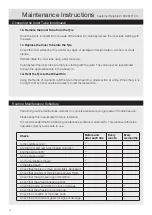
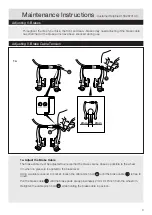
You should perform the following checks once a month or after long rides.

1. Check that the bike is Clean and Suitably Lubricated.

Thoroughly clean and degrease your bike. Ensure the chain is adequately lubricated using a suitable 
bicycle lubricant.

It is important to wipe off any excess lubricant as this will attract dirt and may prevent the bike from 
operating correctly.

2. Check that all Parts of the Bike are Securely Fitted.

It is essential for your safety that the securing nuts and bolts are fully tightened and have not become 
loose. Pay particular attention to the pedals, wheel nuts, seat post bolt and the stem bolt.

While holding the bike with one hand, vigorously rock the crank arms and wheels. If you notice any 
movement, the bearings may be worn.

Repairing bearings requires specialist tools. It is recommended that all bearings are repaired by 
quali

fi

 ed bike repair technicians. Contact your local retailer for more information on bearing repairs.

her

Every Month

Before and After Each Ride

Every Month

Summary of Contents for 332/4037

Page 1: ...in important information that will help you get the best from your bike ensuring safe and correct assembly use and maintenance If you need help or have damaged or missing parts call the Customer Helpl...

Page 2: ...wheel the bearings may be worn Repairing bearings requires specialist tools It is recommended that all bearings are repaired by qualified bike repair technicians Contact your local retailer for more i...

Page 3: ...the tyre levers and the wheel Insert a tyre lever between the wheel rim and the tyre wall Pull downwards on the tyre lever and hook onto the nearest spoke Insert and secure the remaining two tyre leve...

Page 4: ...fit the last section Performing routine maintenance correctly on your bike will ensure you get years of trouble free use Please keep this manual safe for future reference It is recommended that the fo...

Page 5: ...est gear Turn the lower limit screw clockwise to move the derailleur to the right when viewed from the back of the bike Turn the lower limit screw anti clockwise to move the derailleur to the left whe...

Page 6: ...when the highest gear is selected Using a suitable screwdriver rotate the upper limit screw until the small gears of the derailleur are vertically aligned below the upper gear Turn the upper limit sc...

Page 7: ...ises If the gears still do not operate correctly carry out step 3b 3b Check the Cable Tension If the gears change correctly between the highest and lowest gears but not between the lowest and highest...

Page 8: ...the mounting bolts at each end of the suspension unit Rear suspension sag can be reduced by turning the adjustable spring seat clockwise Or increased by turning the spring seat anti clockwise Keep te...

Page 9: ...Tension 1a Adjust the Brake Cable The brake cable must be adjusted to ensure that the brakes are as close as possible to the wheel rim when no pressure is applied to the brake lever Using a suitable s...

Page 10: ...rrel adjuster locking nut by turning it anti clockwise Turn the barrel adjuster bolt to increase or decrease the cable tension This will fine tune the position of the brakes To increase the tension on...

Page 11: ...ould be reduced This can be achieved by turning the right spring tension screw anti clockwise If the brake arms lean to the left when viewed from the front of the bike the right hand brake arm spring...

Page 12: ...s Move Hold the front wheel between your legs and try to move the handlebars If the handlebars move the stem bolt may have become loose Re tighten the stem bolt 6 Is the Bike Clean The bike should be...

Page 13: ...tightened by qualified bike repair technicians Contact your local retailer for more information on wheel repairs 1 Check the Frame and Forks for Signs of Damage Thoroughly check all the external surfa...

Reviews: