background image

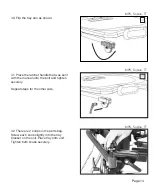
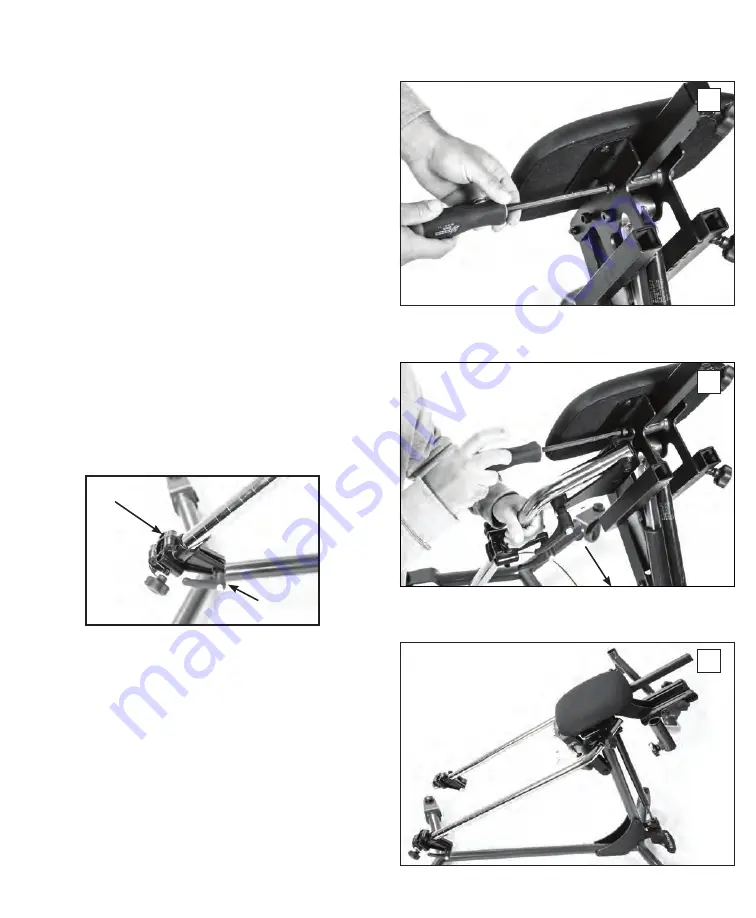
17. Place leg assembly onto unit as shown 

and line up holes. Making sure the ratchet 

handle and knee clamp are facing towards 

the rear of the unit. Insert both bolts and 

tighten securely. Repeat steps 16 and 17 for 

the other leg.

17

Knee Clamp

Ratchet Handle

Page 6

16. For the leg assembly, remove the two 

bolts behind the support pad. Set aside.

18. Legs should be installed as shown.

16

18

Summary of Contents for PB5500

Page 1: ...Pow r Up Lift PB5502 Zing Supine Gas Spring Lift PB5506 Zing Supine Pow r Up Lift PB5562 Zing MPS Tilt Table Gas Spring Lift PB5566 Zing MPS Tilt Table Pow r Up Lift PB5564 Zing Supine Tilt Table Gas...

Page 2: ...thorized representative for information concerning the decommissioning of your equipment SEE INSTRUCTIONS FOR USE TYPE BF APPLIED PART MANUFACTURER HUMIDITY ATMOSPHERIC PRESSURE MEDICAL DEVICE CONFORM...

Page 3: ...me IMPORTANT Zing Warranty Registration FREE GIFT Upon Completion warranty offer valid in the United States only To register online go to zingstanders com warranty or Scan the QR Code IMPORTANT Please...

Page 4: ...the box Remove all plastic wrap and parts from the boxes 2 Remove the bag of hardware from the wheelbase It contains the 4 bolts for the mast assembly 3 Position the mast as shown place the wheelbase...

Page 5: ...4B Once all 4 bolts have been started tighten them securely 5 Remove the foot pedal and bolts from the polly bag and place the foot pedal onto the bottom of the gas spring as shown 6 Line up holes an...

Page 6: ...y pulling the plunger see page 33 If the Gas Spring Lockout was not ordered remove the bolt from the lower part of the cylinder on the mast as shown discard bolt If the Pow r Up Lift was ordered plug...

Page 7: ...e mast to expand about 2 inches For the Pow r Up Lift use the controller to allow the unit to expand about 2 inches 12 Insert brace into the bracket and line up holes Insert washer in between the brac...

Page 8: ...the other side of the brace and line up holes You may need to use a flat head screwdriver to assist with the opening 14B Insert the bolt all the way through the holes You may need a rubber mallet to...

Page 9: ...nd knee clamp are facing towards the rear of the unit Insert both bolts and tighten securely Repeat steps 16 and 17 for the other leg 17 Knee Clamp Ratchet Handle Page 6 16 For the leg assembly remove...

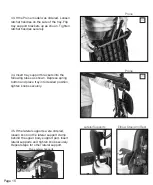
Page 10: ...ody support onto post as shown Depress spring button and place into position 21 Tighten knob securely Page 7 20 21 19 If a Tilt Table TT model was ordered skip to step 23 If a Prone model was ordered...

Page 11: ...If a Tilt Table TT model was ordered follow steps 23 27 remove the 6 bolts from the back of the upper body support pad 24 Place pad onto unit as shown Line up the 2 middle holes on the pad with the br...

Page 12: ...les on the bracket to access the lower holes in the pad 26 Place head support push handle bracket into support tube as shown 27 Line up 2 holes on the bracket with the 2 upper holes on the pad Insert...

Page 13: ...8B Position strap in the grooves on the support bracket as shown 29 If the Prone model was ordered follow steps 29 35 remove the cap on the support tube and discard A flat screw driver may be needed 3...

Page 14: ...ighten set screw 32 If the face aperture was ordered Depress the spring button and place it onto the support tube 33 If the push handle for the tray was ordered place tray as shown remove the 2 bolts...

Page 15: ...ther side of tray 36 If the tray with the arms was ordered place the tray upside down as shown Flip the chrome arms as shown remove 4 bolts from bottom of the tray Place arm brackets onto tray and lin...

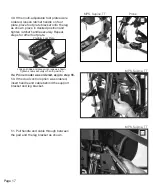
Page 16: ...n the tray brackets and flip open the gray latch all the way as shown below 38 Lock the casters insert the two tray arms into the tray bracket on the bottom of the tray as shown Flip gray latch closed...

Page 17: ...manual onto the bolt and tighten securely Repeat steps for the other side 40 41 Page 14 42 There are 2 knobs in the parts bag Screw each knob slightly into the tray bracket on the unit Place tray ont...

Page 18: ...upport 45 Page 15 43 If the Prone model was ordered Loosen ratchet handles on the side of the tray Flip tray support brackets up as shown Tighten ratchet handles securely 44 Insert tray support bracke...

Page 19: ...the multi adjustable knee pads were ordered loosen ratchet handles on the knee clamps Raise up into desired position and tighten ratchet handle securely Repeat steps for other knee clamp 47 Calf Pad w...

Page 20: ...50 51 49 If the multi adjustable foot plates were ordered loosen ratchet handle on foot plate place foot plate bracket onto the leg as shown place in desired position and tighten ratchet handle secure...

Page 21: ...ush handle 53 Remove bolt from the controller handle place controller handle onto the push handle as shown Insert bolt through the hole and tighten to the controller handle 53 52 54 Use zip tie to sec...

Page 22: ...onto the push handle as shown Insert bolt through hole and tighten to the controller handle 56 Guide the cable under the tray and use provided zip tie to secure the cable 55 56 57 Guide the cable fol...

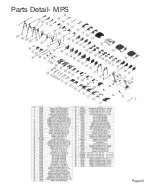
Page 23: ...Page 20 Parts Detail MPS...

Page 24: ...Page 21 Parts Detail Supine...

Page 25: ...Page 22 Parts Detail TT MPS...

Page 26: ...Page 23 Parts Detail TT Supine...

Page 27: ...Page 24 Parts Detail Prone...

Page 28: ...nual product improvement and reserves the right to change features specifications and prices without prior notification Check with AMI for latest info FORM ZING2ASSEM 120523 REV A Copyright 2023 Altim...

Reviews: