background image

3.


Commissioning 

Unpacking 

Remove the crate and check the compressor for damage, defect/missing parts etc.. In case of 
damage through transport or a defect part, immediately contact your Zionair retailer. 

Placement/installation of the compressor 

When placing/installing the compressor, always keep into account the following things: 

1.


Make sure there is enough free space around the compressor because of suction of air, 

cooling and it is also easier when carrying out maintenance/repair jobs. 

2.


Place the machine on a solid, level and clean surface. 

3.


The place of installation has to be well-vented, well-lit and dry. 

4.


Never use the compressor in the vicinity of explosive/inflammable substances and/or gases. 

5.


Keep the place where the compressor is installed clean. Moist, dust and dirt have a negative 

influence on both the efficiency and lifetime of the compressor. 

6.


Place the air filter on the compressor. 

Check before first use 

1.


Check if all bolts and nuts are firmly tightened. 

2.


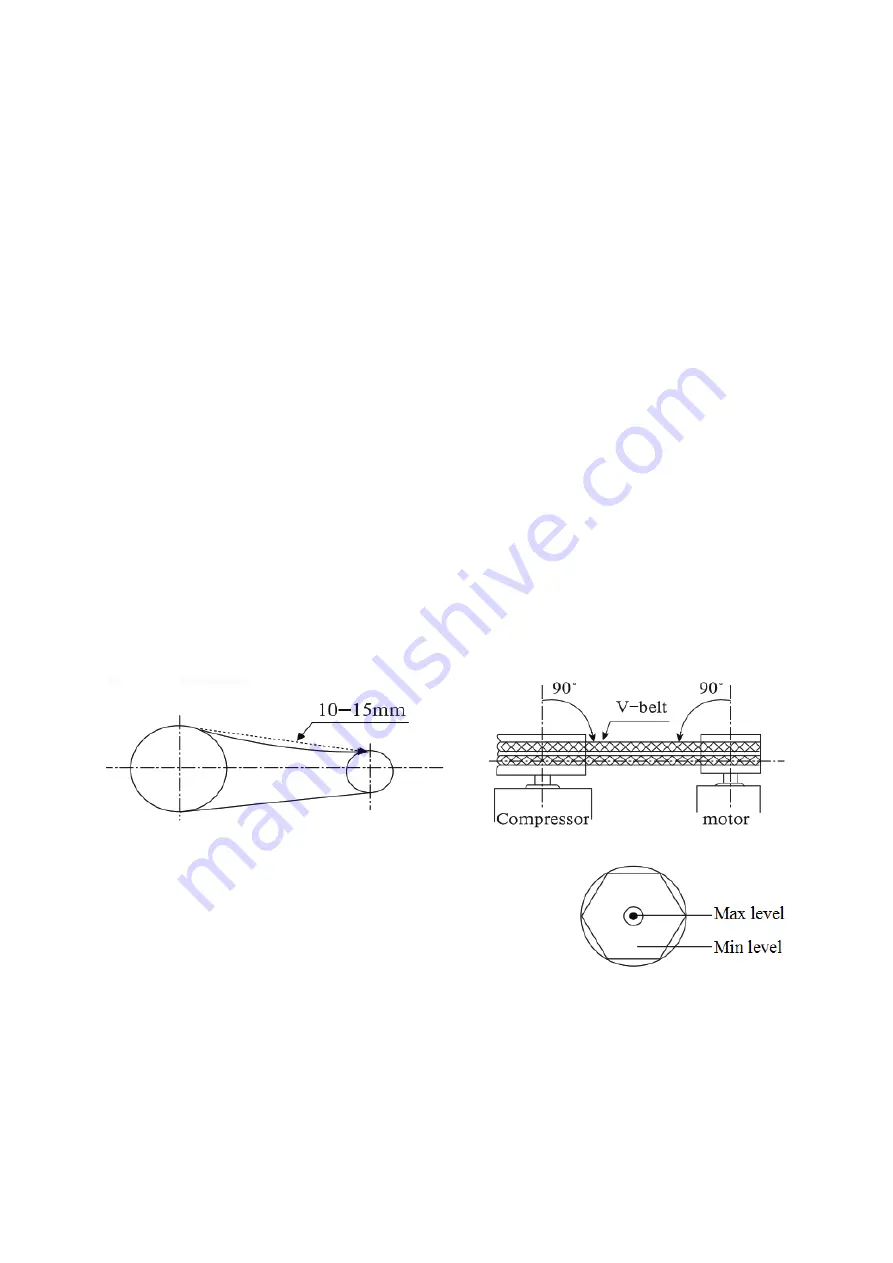
Check the belt tension and the angle of the belt opposed to the compressor and motor, the 

angle of the belt should be 90°, the belt must be able to move 10-15mm when pressed down 
(refer to below picture). 

PAY ATTENTION! Both too much tension and too less tension in the 

belt are bad for the compressor!


3.


Check if all pipes look good and if there are no damages. 

4.


Check the oil level, it should be upto the red dot in the 

middle of the oil viewing glass (refer to picture on the right) 

5.


Check if the electrical wiring is not damaged. 

6.


Check the power supply and check if the power´s voltage is 

correct. 

7.


Whether the belt pulley is easy to rotate by hand. 

8.


Pay attention to following points: 


Is the earth wire connected correctly? 


Carefully read the entire manual. 


Don´t hit, knock or bend any pipes 


Do not come near the fan with hands and clothes. 


Summary of Contents for CP222T01

Page 1: ...Compressor CP222T01 Montage en gebruiksinstructies Installation and operating instructions...

Page 2: ...mity EG Konformit tserkl rung Declaration de conformite Dichiarazion di conformita Declaracion de conformidad 16 Table of contents 1 General 9 2 Safety rules 9 3 Commissioning 10 Unpacking 10 Placemen...

Page 3: ...van de handleiding en welke op de hoogte zijn van de risico s die het werken met een compressor met zich meeneemt mogen gebruik maken van de compressor 2 Sluit de compressor aan volgens de voorschrift...

Page 4: ...oende ruimte vrij rondom de compressor dit vanwege het aanzuigen van lucht koeling en daarnaast is dit ook makkelijk wanneer men onderhoud reparatiewerkzaamheden uit moet voeren 2 Plaats de machine op...

Page 5: ...8 bar 6 Laat vervolgens de druk van de tank en controleer nu of de compressor weer aanslaat bij een druk van 5 bar 7 Zet de compressor vervolgens uit door de luchtschakelaar in te drukken LET OP Zet...

Page 6: ...olie 2 Reinig de luchtfilter zie afbeelding hiernaast na elke 50 draaiuren d m v perslucht indien de compressor in een stoffige omgeving staat dient dit vaker gedaan te worden Indien het filterelement...

Page 7: ...de klepzitting vast 2 Nieuwe koppakking Oververhitting van de compressor onderdel en van de compressor 1 Overmatige werkdruk 2 Te hoge omgevings temperatuur slecht geventileerde omgeving 1 Werkdruk n...

Page 8: ...en uitgevoerd 6 De garantie is niet van toepassing bij onoordeelkundig gebruik 7 Eventuele verzendkosten vallen niet onder de garantie bepaling 8 Reparaties dienen uitsluitend door Uw leverancier te g...

Page 9: ...tromotor this is shown on the electromotor with an arrow 4 Before carrying out maintenance and or repairs always disconnect the compressor from the power supply 5 Always release the pressure from the...

Page 10: ...n both the efficiency and lifetime of the compressor 6 Place the air filter on the compressor Check before first use 1 Check if all bolts and nuts are firmly tightened 2 Check the belt tension and the...

Page 11: ...nd working with them you should check the working pressure of the air tools and then adjust the outlet pressure on the compressor accordingly by means of the adjusting knob refer to picture on the rig...

Page 12: ...ssed air if the compressor is in a dusty environment this should be done more often If the filter element is seriously polluted this should be replaced with a new filter element 3 When there is not en...

Page 13: ...way it was designed for 5 No changes can be made to the product 6 The warranty does not apply in case of injudicious use 7 Possible shipping costs are not covered by the warranty 8 Repairs should exc...

Page 14: ...Onderdelentekening en lijst Parts drawing and list...

Page 15: ...Examination Legenda Naam gebruiker Name of user Adresgegevens Address data Datum van ingebruikname Date of commissioning Controle Inspection Datum Date In orde Okay Niet in orde ontmanteling Not okay...

Page 16: ...erland declaramos bajo nuestra exclusiva responsabilidad que el producto Type Model Type Type Tipo Tipo CP222T01 Beschrijving Description Beschreibung Description Descrizione Descripci n Compressor Me...

Reviews: