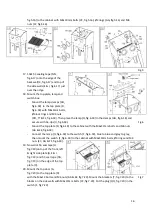
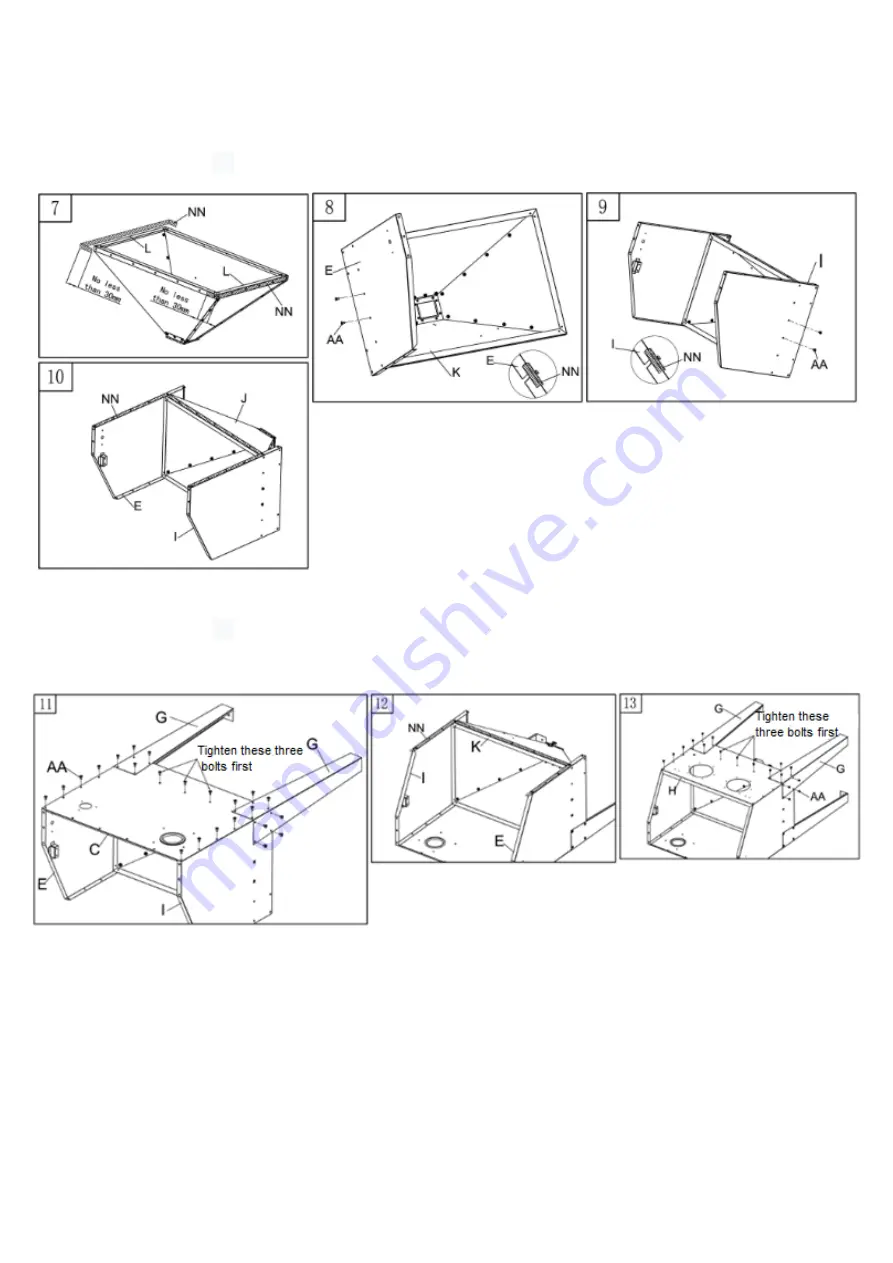
background image


9.


Monteer het rechter zijpaneel (I, fig.3.8) tegen de trechter met 2 M6x12mm bouten (AA, 
fig.3.8), draai deze nog niet volledig aan. 

10.


Plak nu 

δ3


afdicht tape (NN, fig.3.10) op de achterkant van de cabine (E, I & J, fig.3.10). 

11.


Monteer nu het achterpaneel (C, fig.4.11) en achterpoten (G, fig.4.11) tegen de cabine met 
M6x12mm bouten (AA, fig.4.11), draai de 3 middelste bouten het eerste vast. 

12.


Plak nu 

δ3


afdicht tape (NN, fig.3.12) tegen de voorkant van de cabine (E, I & K, fig.2.10). 

13.


Monteer het voorste paneel (H, fig.4.11) en voorpoten (G, fig.4.11) tegen de cabine met 
M6x12mm bouten (AA, fig.4.11), draai de 3 middelste bouten het eerste vast. 

14.


Zet de kast nu rechtop op de poten, plaats nu het rooster, aanzuigbuis en straalpistool. 
-


Plaats de aanzuigslang (door het rooster) aan de aanzuigbuis (O, fig.5.14) en monteer de 
aanzuigbuis op het voorste paneel van de trechter (K, fig.5.14) met 2 M6x12mm bouten 
(AA, fig.5.14) en M6 moeren (EE, fig.5.14). 

-


Verbindt de koppeling van de luchtslang met de moer, gebruik teflon tape om deze 
koppeling luchtdicht te maken. 

15.


Monteer de handschoenen (R, fig.5.15), plaats eerst de handschoenringen (V & U, fig.5.15). 
en bevestig vervolgens de handschoenen (R, fig.5.15) aan de ringen (V, fig.5.15) met de 
klemmen (S, fig.5.15). 

Fig.3 

Fig.4 

Summary of Contents for SB22AB

Page 1: ...Zandstraalcabine 220L Sandblasting cabinet 220L SB22AB Montage en gebruiksinstructies Assembly and user instructions...

Page 2: ...nda Wartung Inspektion Legende 20 EG verklaring van overeenstemming Declaration of conformity EG Konformit tserkl rung 21 Table of contents 1 General 11 2 Safety rules 11 General safety regulations 11...

Page 3: ...mene veiligheidsvoorschriften 1 Alvorens men met deze machine aan de slag gaat dient men de volledige gebruikers handleiding gelezen en begrepen te hebben 2 Controleer de machine voorafgaand aan ieder...

Page 4: ...ngen 5 Gebruik de machine nooit in de buurt van explosieve licht ontvlambare stoffen en of gassen vonken die ontstaan binnenin elektrische onderdelen kunnen ontvlambare gassen of stoffen ontsteken 6 O...

Page 5: ...mblage Uitpakken Verwijder het karton en controleer de zandstraalcabine op schade missende onderdelen etc In geval van schade of defecten doortransport onmiddellijk contact opnemen met uw Zionair verk...

Page 6: ...de zijplaten met M6x12mm bouten AA fig 1 2 en M6 moeren EE fig 1 2 5 Plak 3 afdicht tape NN fig 2 5 op de bodem van de trechter en monteer vervolgens het bodemplaatje van de trechter Y fig 2 5 op de t...

Page 7: ...ten G fig 4 11 tegen de cabine met M6x12mm bouten AA fig 4 11 draai de 3 middelste bouten het eerste vast 14 Zet de kast nu rechtop op de poten plaats nu het rooster aanzuigbuis en straalpistool Plaat...

Page 8: ...DD TT FF fig 6 18 Plaats de lamp Q fig 6 18 in de klemmen HH fig 6 18 en zet deze vast met tie rips II fig 6 18 Monteer de bovenste plaat D fig 6 18 op de cabine met M6x12mm bouten en M6 moeren AA EE...

Page 9: ...e cabine Houdt het straalpistool nooit in een hoek van 90 t o v het werkstuk hierdoor kaatst het straalgrit terug in de straal waardoor de effectiviteit van de straal minder wordt Daarnaast veroorzaak...

Page 10: ...r Dit kan komen door Diameter luchtslang te klein Verstopte koppeling drukregelaar reduceerventiel Verstopte geknikte leiding Afstand tussen persluchtbron en straalcabine te groot TIP De diameter van...

Page 11: ...den uitgevoerd 6 De garantie is niet van toepassing bij onoordeelkundig gebruik 7 Eventuele verzendkosten vallen niet onder de garantie bepaling 8 Reparaties dienen uitsluitend door Uw leverancier te...

Page 12: ...ns of the equipment described in this manual 2 Safety rules General safety regulations 1 Before operating the machine make sure you have fully read and understood the entire contents of this user manu...

Page 13: ...compressed air is to be free of water oil and other pollutions 5 Never use the machine near explosive highly flammable liquids and or gases sparks that might occur in electrical parts could ignite fla...

Page 14: ...13 3 Assembly Unpacking Remove the carton and check the sandblasting cabinet for damage defect parts etc In case of damage through transport or defect parts immediately contact your Zionair retailer...

Page 15: ...the M6x12mm bolts AA fig 1 2 and M6 nuts EE fig 1 2 5 Stick 3 sealing tape NN fig 2 5 on the bottom of the funnel and then mount the bottom plate of the funnel Y fig 2 5 to the funnel with the 8 M4x1...

Page 16: ...ened first 14 Now put the cabinet on its legs now mount the grid pickup tube and sandblasting gun Connect the sand hose place through grid to the pickup tube O fig 5 14 and mount the pickup tube to th...

Page 17: ...Mount the top plate D fig 6 18 to the cabinet with the M6x12mm bolts and M6 nuts AA EE fig 6 18 Connect the lamp Q fig 6 18 to the switch F fig 6 18 blue to blue and grey to grey then mount the switc...

Page 18: ...ess effective spray This also causes extra wear to the gun and viewing glass 2 The blasting gun should always point away from the operator towards the work piece 3 It is strongly forbidden to start sa...

Page 19: ...e cabinet by excessive dust this could have the following causes Air inlet top left of the pressure regulator is blocked Dust extractor is full and is to be cleaned emptied Filter of dust extractor is...

Page 20: ...warranty does not apply in case of injudicious use 7 Possible shipping costs are not covered by the warranty 8 Repairs should exclusively be carried out by your supplier Repair s carried out by others...

Page 21: ...des Nutzers Adresgegevens Address data Anschriftdaten Datum van ingebruikname Date of commissioning Datum der Inbetriebname Controle Inspection Kontrolle Datum Date Datum In orde Okay In Ordnung Niet...

Page 22: ...esponsabilidad que el producto Type Model Type Type Tipo Tipo SB22AB Beschrijving Description Beschreibung Description Descrizione Descripci n Zandstraalkast Sandblasting cabinet Sandstrahlcabine Merk...

Reviews: