background image

8

INSTRUCTIONS FOR USE

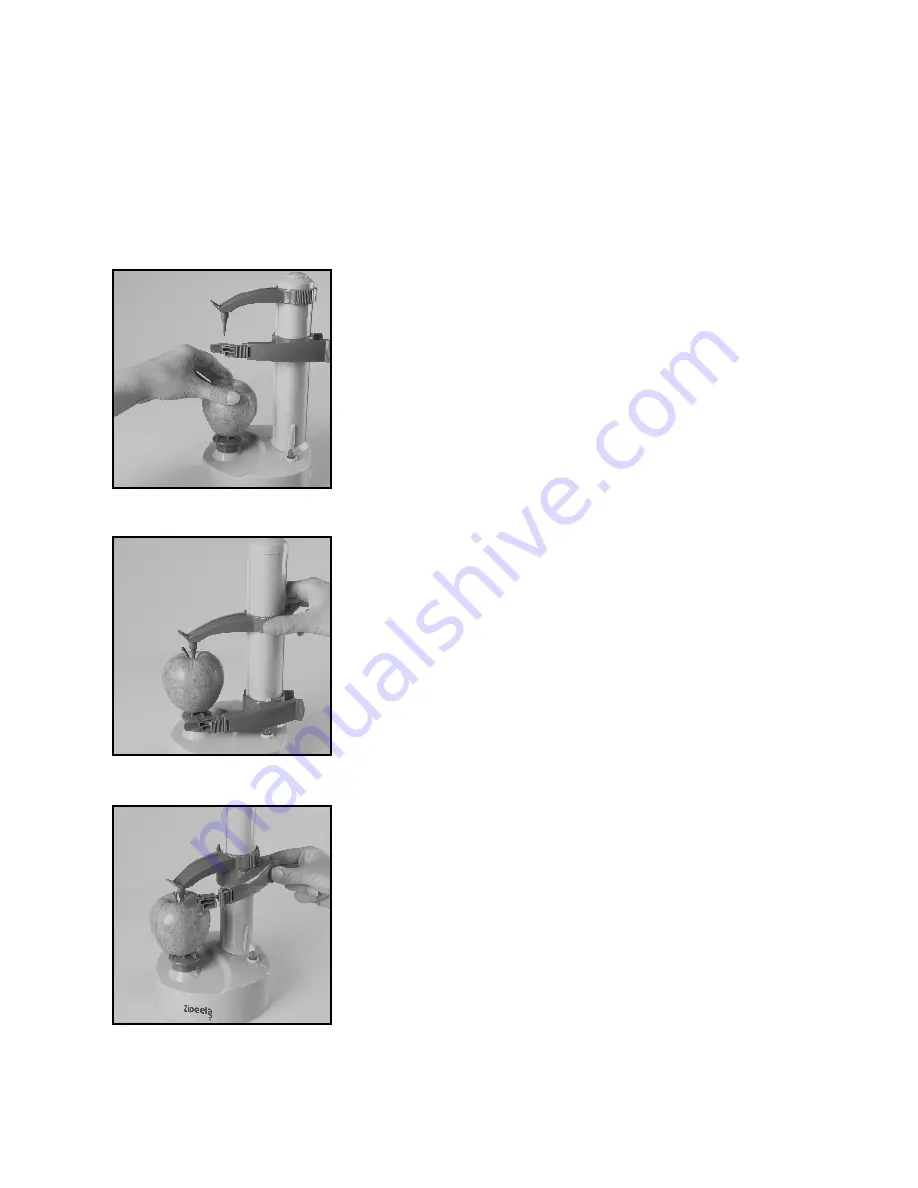
2.  Take your fruit or vegetable, press it down firmly on the 

prong. You may need to chop off the end of your fruit 
or veg if it is not flat enough.

3.  Slide the clamp down the support so the spike  

secures your fruit or veg firmly in place.


4.  Hold the base with one hand to secure, squeeze the 

lever together with your other hand. Move the peeler 
arm to the top of your fruit or veg.

WARNING:

 To reduce the risk of injury and damage to the appliance, do not touch  

or put utensils near the peeler blade during use. 

1.  Place the Zipeela on a clean, flat surface near a socket. Add a bowl or plate  

underneath the blade to catch your peel.

Summary of Contents for 70978

Page 1: ...INSTRUCTION BOOKLET Model 70978...

Page 2: ...fries so there is less waste Here at Lakeland our award winning family owned business still offers the same excellent quality value for money and exceptional customer service as when we founded the co...

Page 3: ...5 Lever 6 Blade release 7 Blade holder 8 On Off button 9 Prong 10 Port 11 Blade storage compartment 12 Battery compartment batteries not included 13 Adaptor 14 Paring tool 15 Paring tool storage 16 P...

Page 4: ...ays inspect the appliance before use for noticeable signs of damage Do not use if damaged or has been dropped In the event of damage or if the appliance develops a fault contact the Lakeland customer...

Page 5: ...of Domestic Electrical Appliances WARNING A cut off plug inserted into a 13amp socket is a serious safety shock hazard Ensure the cut off plug is disposed of safely CAUTION The plastic bags used to wr...

Page 6: ...NG THE ZIPEELA WITH BATTERIES Always remove the power adapter before using batteries Check that the On Off button is clicked down in the Off position Open the battery compartment underneath the base o...

Page 7: ...used for a long time Ensure the battery compartment is secure If you have any doubts about the installation seek the services of a qualified installer USING THE ZIPEELA WITH THE POWER ADAPTER Always...

Page 8: ...s your fruit or veg firmly in place 4 Hold the base with one hand to secure squeeze the lever together with your other hand Move the peeler arm to the top of your fruit or veg WARNING To reduce the ri...

Page 9: ...n and automatically stop When you lift the peeler arm the Zipeela will start again automatically To turn off simply raise the peeler arm and quickly press the On Off button underneath before moving it...

Page 10: ...base well away from the cutting edge when handling and cleaning 1 Make sure the Zipeela is switched off and unplugged at the socket Turn the peeler upside down and open the blade storage compartment i...

Page 11: ...lade holder should point up 5 Line up the new blade with the ridges on the blade holder Slide the blade onto the holder until it firmly clicks into place Make sure it is securely attached 6 To reattac...

Page 12: ...and pepper and bake on 200 C until crispy When peeling sweet potatoes ensure they have been scrubbed washed and dried to remove any dirt Dirt will prevent the peeler from working properly Grapefruit...

Page 13: ...ur over potatoes Top with cheese and bake under a grill for a few minutes Potatoes should be washed and dried prior to peeling for best results Also potatoes that are more uniform in shape will peel b...

Page 14: ...the peeler arm up and peel the surface again Question The top and bottom of my fruit or veg is not peeled Answer The blade will not reach the very top or bottom of your fruit and veg These can be trim...

Page 15: ...e slipping Answer If the blade skips carefully remove the blade holder and rinse You may use the paring tool to remove any residual peel from the blade Question Why is the peeler getting stuck or the...

Page 16: ...e after every few uses Do not use abrasive cleaner or steel wool Never immerse the base in water or any other liquid To clean the outer surfaces wipe with a clean damp cloth and dry thoroughly before...

Page 17: ...g with many other high street retailers Lakeland has joined a scheme whereby customers can take their unwanted electricals to recycling points set up around the country Visit www recycle more co uk to...

Page 18: ...18...

Page 19: ...19 GEBRAUCHSANWEISUNG Zipeela Obst und Gem sesch ler Modell 71021...

Page 20: ...em seschalen lassen sich in Salaten verarbeiten oder im Ofen zu knusprigen Chips r sten sodass weniger Abfall entsteht Unser mehrfach ausgezeichneter Familienbetrieb legt heute genauso viel Wert auf e...

Page 21: ...freigabe 7 Klingenhalter 8 Ein Austaste 9 Zinken 10 Anschluss 11 Aufbewahrungsfach f r Klingen 12 Batteriefach Batterien nicht inbegriffen 13 Netzkabel stecker 14 Schneidwerkzeug 15 Aufbewahrungsfach...

Page 22: ...Ingebrauchnahme alle Verpackungsmaterialien sowie Werbeetiketten vom Ger t Vergewissern Sie sich stets vor Gebrauch des Ger ts dass es keine erkennbaren Sch den aufweist Verwenden Sie das Produkt nic...

Page 23: ...rungen der EMV Richtlinie 2004 108 EG elektromagnetische Vertr glichkeit und der Niederspannungsrichtlinie 2006 95 EG Sicherheit elektrischer Betriebsmittel WARNHINWEISE Bei einem abgeschnittenen Stec...

Page 24: ...er Der Zipeela funktioniert bei manchen Obst und Gem sesorten besser mit dem Netzkabel bei anderen im Batteriebetrieb Auf den Seiten 30 32 finden Sie weitere Informationen hierzu VERWENDUNG DES ZIPEEL...

Page 25: ...en verwendet werden Laden Sie nicht wiederaufladbare Batterien nicht auf Entfernen Sie leere oder ersch pfte Batterien aus dem Produkt Entfernen Sie die Batterien wenn das Ger t f r einen langen Zeitr...

Page 26: ...e das Ger t mit einer Hand am Sockel fest und dr cken Sie den Hebel mit der anderen Hand zusammen Bewegen Sie den Sch lerarm an den oberen Rand des Obst oder Gem sest cks WARNHINWEISE Um K rperverletz...

Page 27: ...utomatisch ausgeschaltet Wenn Sie den Sch lerarm heben schaltet sich der Zipeela automatisch wieder ein Zum Ausschalten heben Sie einfach den Sch lerarm an und dr cken Sie schnell die Ein Austaste dar...

Page 28: ...sreichender Entfernung von den scharfen Kanten an 1 Vergewissern Sie sich dass das Ger t ausgeschaltet und nicht mit der Stromversorgung verbunden ist Drehen Sie das Ger t auf den Kopf und ffnen Sie d...

Page 29: ...ken im Klingenhalter m ssen nach oben zeigen 5 Richten Sie die neue Klinge an den Rippen des Klingenhalters aus Schieben Sie die Klinge auf den Halter sodass sie fest einrastet Vergewissern Sie sich d...

Page 30: ...ollten vor dem Sch len abgeb rstet gewaschen und getrocknet werden um jeglichen Schmutz zu entfernen Bei schmutzigen Schalen funktioniert der Sch ler nicht richtig Grapefruit Orangen Zitronen Batterie...

Page 31: ...h vermengen und ber die Kartoffeln gie en K se dar ber streuen dann ein paar Minuten unter den Grill stellen Kartoffeln sollten vor dem Sch len gewaschen und getrocknet werden Je ebenm iger die Form d...

Page 32: ...eidwerkzeug das Sie im Ger tesockel finden oder bewegen Sie den Sch lerarm nach oben und f hren Sie einen neuen Sch lvorgang durch Obst Gem se Netzanschluss Batteriebetrieb Rezeptideen Tipps und Trick...

Page 33: ...nde mit dem Schneidwerkzeug aus der Klinge entfernen Frage Warum h ngt der Sch ler fest f llt die Klinge ab Antwort Dr cken Sie die Klinge nicht in das Obst oder Gem se hinein Setzen Sie sie so an da...

Page 34: ...enden Sie keine Scheuermittel oder metallenen Scheuerschw mme Tauchen Sie den Sockel niemals in Wasser oder andere Fl ssigkeiten ein Sie k nnen das Ger t au en mit einem sauberen feuchten Tuch abwisch...

Page 35: ...35...

Page 36: ...Lakeland Alexandra Buildings Windermere Cumbria UK LA23 1BQ Tel 44 0 15394 88100 www lakeland co uk Tel 0800 444 1500 www lakeland de D...

Reviews: