ASSEMBLY
ZIPPER MASCHINEN GmbH www.Zipper-Maschinen.at
27
ZI-RMM94H
27
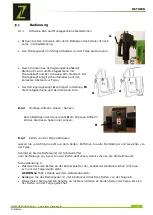
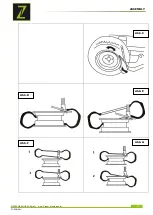
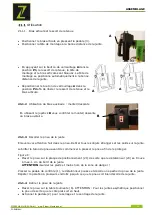
See Figure D:
Pull the outer tire bead with the tire iron over the mounting head.
With the auxiliary mounting arm (15), you can use the pressing plate (16) or of the press
roller (22) the tire bead into the rim to push the tire bead easy to lift over the rim flange.
Activate the control pedal (4) to rotate the turntable clockwise until the tire was completely
drawn over the rim. To prevent damage to a possibly existing hose, position the wheel so that
the valve is about 10mm from the mounting head.
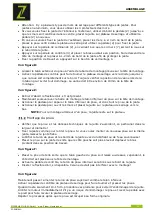
Siehe Figure E:
First, remove the hose, if available.
Now lift the mounting iron the bottom bead over the mounting head.
Depress the pedal (4) to solve the lower tire bead and thus the whole tire from the rim.
Depress the pedal (2) to open the jaws and take the rim from the turntable down.
NOTE: For subsequent mounting of a tire, the rim remains on the turntable
.
Frosting rim
Check that the tire and rim fit in size to each other!
Tension. Rim just as when removing the tire If you want to frost the same rim new, let
clamped the rim.
Lubricate the tire bead and the rim edges with a lubricant or soapy water.
Place the tire on the rim so that the left side is higher and move the pan back into working
position.
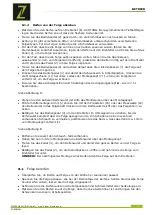
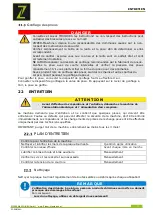
See Figure F:
Position the tire so that the tire bead is higher than the left (Fig. 1 F), however, but under the
right side (Fig. 2 F) of the mounting head.
With the auxiliary mounting arm (15) you can push the tire bead into the rim to easily lift the
tire bead to the mounting head over the rim flange with the press plate (16) or of the press
roller (22).
Activate the control pedal (4), the inner tire bead is pulled under the outer edge of the rim.
Insert the inner tube, if available. This should not interfere with the installation!
See Figure G:
Now go for mounting the upper bead the same way as in the lower bead.
NOTE
:
The bead press roller (22) or tire pressure block (23) is used to facilitate the assembly and
disassembly operations. With the standard tires can and must at the UHP tires bead breaker be
used
Press the operating pedal (4) to turn the rotary plate (5) and press the bead breaker roller
onto the tyre with the mounting arm.
If only about 10-15cm are left, proceed more carefully to avoid possible damage to the
tyre bead. Stop the engine immediately if there is a risk of damaging the tyre and lift the
pedal (4) with your foot to turn the turntable back.
Repeat the process after the tire has regained its original shape.
Inflate the tires
D A N G E R
Check and follow the instructions! Non-compliance can lead to serious injury or death! ZIPPER
machines cannot be held liable for accidents if safety instructions are not be followed!
Double-check the rim and tire size to determine that they match.
Before inflating sure the tire and the rim are undamaged and properly mounted.
NEVER exceed the inflation pressure recommended by the tire pressure.
Inflate the tire in short intervals and check often the pressure of the tire. Check again the tire
mold for any abnormalities.
Be careful when tire inflation. Keep hands and other body parts while inflating the tire away!
Connect the supplied filler with pressure gauge reading on the air hose adapter.
Connect the filler to the tire valve. By pressing the push lever, air is pumped into the tire.

