background image


ASSEMBLY 

ZIPPER MASCHINEN GmbH     www.Zipper-Maschinen.at



26   

ZI-RMM94H

26


Operation 

15.1.1


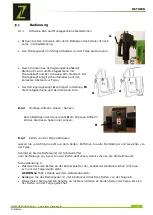
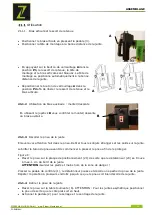
Clamp swivel arm and mounting rail 


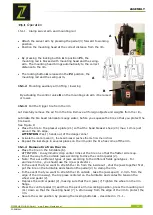
Attach the swivel arm by pressing the pedal (3) forward to working 

position. 


Position the mounting head at the correct distance from the rim. 


By pressing the locking button A to position P1, the 

mounting rail is blocked with mounting head and the swing-

arm. The mounting head brings automatically to the correct 

distance to the rim. 


The locking button A released in the P2 position, the 

mounting rail and the swing-arm. 


15.1.2


Mounting auxiliary arm lifting / lowering 


By actuating the control valve B on the mounting sub arm it be raised 
or lower. 


15.1.3


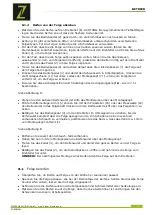
Pull the trigger tire from the rim 

Let Carefully remove the air from the tire. Remove all foreign objects and weights from the rim. 
 
Lubricate the tire bead lubricantor soapy water, before you squeeze the tire so that you protect the 
tire bead. 


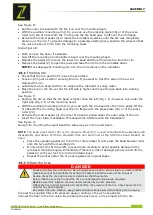
See Figure C: 


Place the tire to the pressure plate (21) so that the bead breaker shoe (20) max. 1cm is just 
around the rim edge. 
ATTENTION: Feet / hands out of the danger zone! 


Activate the control pedal (1), the bead breaker pushes the tire from the rim from.


Repeat the last steps in several places on the rim until the tire has come off the rim. 

15.1.4


Remove tire from the rim 


Place the tire on the turntable (6).  
ATTENTION : In asymmetric drop center rims set the tire on so that the flatter side is up. 


Do all the way to the outside jaws according to drive the control pedal (2). 


Note: There are different types of jaws according to the different fields genotypes . For 
aluminum rims , you should use the 4 jaw protectors . 


In the event that you want to stretch the rim from the inside out , shut the jaws together first , 
put the tire on the turntable and stand on the pedal (2) to clamp the rim. 


In the event that you want to stretch the rim outside , take the jaws apart ( 2 -3cm from the 
edge of the rim away), the tire place centered on the turntable and contact to tension the 
wheel and pedal (2). 


Depress the control pedal (2), making sure that the 4 jaws (7) Tighten the wheel on the rim 
flange. 


Press the control pedal (3) and thus the pivot arm in working position, press the mounting rail 
(11) down so that the mounting head (7) 1-2mm away from the edge of the rim to protect the 
rim. 


Secure the work position by pressing the locking button A  - described in 7.1.1 -  


Summary of Contents for 9120039230306

Page 1: ...fassung DE BETRIEBSANLEITUNG REIFENMONTAGEMASCHINE Übersetzung Translation EN USER MANUAL TYRE CHANGER FR Manuel d utilisation CHANGER DE PNEUS IT Manuale d uso originale MACCHINA SMONTAGOMME ZI RMM94H_400V EAN 9120039230306 ZI RMM94H_230V EAN 9120039230313 ...

Page 2: ... prüfen 12 Der Arbeitsplatz 12 Elektrischer Anschluss 13 Druckluftanschluss 13 Betriebsprüfung 13 8 BETRIEB 13 Bedienung 15 8 1 1 Schwenk Arm und Montageschiene festklemmen 15 8 1 2 Montage Hilfsarm Heben Senken 15 8 1 3 Reifen von der Felge abdrücken 15 8 1 4 Reifen von der Felge abziehen 16 Felge bereifen 16 Reifen aufpumpen 17 9 REINIGUNG WARTUNG LAGERUNG ENTSORGUNG 18 Reinigung 18 Wartung 18 9...

Page 3: ...comprimé 33 Test de bon fonctionnement 33 21 FONCTIONNEMENT 33 Utilisation 35 21 1 1 Bras articulé et ressort de retenue 35 21 1 2 Utilisation du bras auxiliaire monter descente 35 21 1 3 Décoller le pneu de la jante 35 21 1 4 Retirer le pneu de la jante 35 Montage du pneu 36 Gonflage des pneus 37 22 ENTRETIEN 37 PLAN D ENTRETIEN 37 Nettoyage 37 Contrôler le niveau d huile moteur 38 Vérifier la te...

Page 4: ... cinghia di trazione 47 Stoccaggio 47 Smaltimento 48 29 RISOLUZIONE DELLE ANOMALIE 48 30 ELEKTRISCHE SCHALTUNGEN ELECTRIC DIAGRAM 49 31 ERSATZTEILE SPARE PARTS 50 Ersatzteilbestellung spare parts order 50 Explosionszeichnung Exploded View 51 Spare Parts List 54 32 KONFORMITÄTSERKLÄRUNG DECLARATION OF CONFORMITY CERTIFICATE DE CONFORMITÉ 56 33 GEWÄHRLEISTUNG DE 57 34 WARRANTY GUIDELINES EN 58 35 GA...

Page 5: ...P FEET AND OTHER BODY PARTS AWAY FROM THE WHEEL PRESSING UNIT DURING OPERATION FR RISQUE D ÉCRASEMENT GARDER LES PIEDS ET TOUTE AUTRE PARTIES DU CORP ÉLOIGNÉ DE L UNITÉ DE PRESSE DURANT LE FONCTIONNEMENT DE LA MACHINE IT PERICOLO DI SCHIACCIAMENTO TENERE I PIEDI E LE ALTRE PARTI DEL CORPO LONTANI DAL MECCANISMO DI RILASCIO DURANTE L USO DE QUETSCHUNGSGEFAHR HÄNDE WÄHREND DEM BETRIEB VOM DREHTELLER...

Page 6: ...ne dispositivi di protezione dell udito DE Warnung vor elektrischer Spannung EN Warning of electrical voltage FR Avertissement de voltage électrique IT Attenzione Corrente elettrica DE Explosionsgefahr Überschreiten Sie niemals 3 5 bar 50PSI während des Aufblasens Lesen und beachten Sie die Gebrauchsanweisung EN Explosion Hazard Never exceed 3 5 bar 50PSI while seating beads or inflating Read and ...

Page 7: ...zio 8 10 bar Abdrückkraft forcing pressure Pressure de force Forza di pressione 10bar 2500 kg Felgenspannbereich aussen outside rim clamping range Mors de serrage extérieur Area di serraggio cerchio esterno 10 22 Felgenspannbereich innen rims inner clamping range Mors de serrage intérieur Area di serraggio cerchio interno 12 24 Felgenbreite rim widht Largeur de jante Largehzza cerchio 3 14 Reifend...

Page 8: ...e Cilindri di serraggio 17 Abdrückerhebel Door latch lever Levier de détalonneur Leva meccanismo di rilascio 6 Drehteller turntable Plateau tournant Tavolo rotante 18 Schmierfettbehälter Grease container Réservoir d huile Contenitore grasso lubrificante 7 Klemmbacken jaws Mors Ganasce 19 Montageeisen mounting iron Levier de montage Ferro di montaggio 8 Befüllschlauch filling hose Flexible d air Tu...

Page 9: ...n Abbildungen und Inhalte geringfügig abweichen Sollten Sie Fehler feststellen informieren Sie uns bitte Technische Änderungen vorbehalten Kontrollieren Sie die Ware nach Erhalt unverzüglich und vermerken Sie etwaige Beanstandungen bei der Übernahme durch den Zusteller auf dem Frachtbrief Transportschäden sind innerhalb von 24 Stunden separat an uns zu melden Für nicht vermerkte Transportschäden k...

Page 10: ... Entfernen der an der Maschine angebrachten Sicherheitskennzeichnungen Verändern umgehen oder außer Kraft setzen der Sicherheitseinrichtungen der Maschine Die nicht bestimmungsgemäße Verwendung bzw die Missachtung der in dieser Anleitung dargelegten Ausführungen und Hinweise hat das Erlöschen sämtlicher Gewährleistungs und Schadenersatzansprüche gegenüber der Zipper Maschinen GmbH zur Folge Anford...

Page 11: ...der verheddertes Kabel erhöht die Stromschlaggefahr Behandeln Sie das Kabel sorgfältig Benutzen Sie das Kabel niemals zum Tragen Ziehen oder Abtrennen des Elektrowerkzeugs Halten Sie das Kabel vor Hitze Öl scharfen Kanten oder beweglichen Teilen fern Vorschriftsmäßige Stecker und passende Steckdosen reduzieren die Stromschlaggefahr Wasser das in Elektrowerkzeug eindringt erhöht die Stromschlaggefa...

Page 12: ... auf Für einen ordnungsgemäßen Transport beachten Sie auch die Anweisungen und Angaben auf der Transportverpackung bezüglich Schwerpunkt Anschlagstellen Gewicht einzusetzende Transportmittel sowie vorgeschriebene Transportlage etc Transportieren Sie die Maschine in der Verpackung zum Montageort Zum Manövrieren der Maschine in der Verpackung kann z B ein Paletten Hubwagen oder ein Gabelstapler mit ...

Page 13: ...chädigtes Kabel ist umgehend zu erneuern Druckluftanschluss Schließen Sie die Maschine beim Druckluftanschluss 24 an Ihre Druckluftvorrichtung an Bitte beachten Sie die ZI RMM94H darf nur an einen Druckluftanschluss mit 8 10 Bar angeschlossen werden Betriebsprüfung Prüfen Sie die Funktion der Pedale sowie die des Druckluftanschluss Bei Funktionsstörungen sind die jeweiligen Anschlüsse nochmals nac...

Page 14: ...BETRIEB ZIPPER MASCHINEN GmbH www Zipper Maschinen at 14 ZI RMM94H14 Abb C Abb D Abb E Abb F Abb G ...

Page 15: ...age Hilfsarm Heben Senken Durch Betätigen des Steuerventil B am Montage Hilfsarm könnes Sie diesen heben oder senken 8 1 3 Reifen von der Felge abdrücken Lassen Sie vorsichtig die Luft aus dem Reifen Entfernen Sie alle Fremdkörper und Gewichte von der Felge Schmieren Sie die Reifenwulst mit Schmiermittel oder Seifenlauge ein bevor Sie den Reifen abdrücken damit schonen Sie die Reifenwulst Siehe Ab...

Page 16: ... Verriegelungsknopf A wie in 7 1 1 beschrieben Siehe Abbildung D Ziehen Sie den äußeren Reifenwulst mit Hilfe des Montiereisen über den Montagekopf Mit dem Hilfsmontage Arm 15 können Sie mit dem Pressteller 16 oder der Presswalze 22 den Reifenwulst in das Felgenbett drücken um den Reifenwulst leicht über das Felgenhorn zu heben Betätigen Sie das Bedienpedal 4 um den Drehteller im Uhrzeigersinn zu ...

Page 17: ...e dabei auf den Reifen Sind nur noch etwa 10 15cm übrig fahren Sie vorsichtiger fort um etwaige Beschädigungen der Reifenwulst zu vermeiden Stoppen Sie den Motor sofort falls Gefahr besteht den Reifen zu beschädigen und heben Sie das Pedal 4 mit dem Fuß um den Drehteller wieder zurückzudrehen Wiederholen Sie den Vorgang nachdem der Reifen seine ursprüngliche Form zurückerlangt hat Reifen aufpumpen...

Page 18: ...n umgehend zu beseitigen Prüfen Sie vor jedem Betrieb den einwandfreien Zustand der Sicherheitseinrichtungen Kontrollieren Sie die Verbindungen zumindest wöchentlich auf festen Sitz Überprüfen Sie regelmäßig den einwandfreien und lesbaren Zustand der Warn und Sicherheitsaufkleber der Maschine Entlüften sie die Maschine 3 4 mal jährlich 9 2 1 Wartungsplan Art und Grad des Maschinenverschleisses hän...

Page 19: ...zw Wartungsarbeiten immer von der Stromversorgung Viele mögliche Fehlerquellen können bei ordnungsgemäßem Anschluss der Maschine an das Stromnetz bereits im Vorfeld ausgeschlossen werden Sollten sie sich außer Stande sehen erforderliche Reparaturen ordnungsgemäß zu verrichten und oder besitzen sie die vorgeschriebene Ausbildung dafür nicht ziehen sie immer einen Fachmann zum Beheben des Problems h...

Page 20: ...htly However if you discover any errors inform us please Technical specifications are subject to changes Please check the product contents immediately after receipt for any eventual transport damage or missing parts Claims from transport damage or missing parts must be placed immediately after initial product receipt and unpacking before putting the product into operation Please understand that la...

Page 21: ...chine Operating the machine outdoors Operating the machine in a potentially explosive environment Operation of the machine without functioning or missing guards Remove the safety markings attached to the machine Modify circumvent or disable the safety devices of the machine The prohibited hazardous use or disregard of the information and instructions presented in this manual will result in the voi...

Page 22: ...hine if you are tired not concentrated or under the influence of medication alcohol or drugs Do not use the machine in areas where vapours from paints solvents or flammable liquids represent a potential danger danger of fire or explosion Do not smoke in the immediate vicinity of the machine fire hazard Make sure that the ON OFF switch is in the OFF position before connecting the machine to the pow...

Page 23: ...y dangerous situation which if not avoided may result in property damage Irrespective of all safety regulations their sound common sense and corresponding technical suitability training are and remain the most important safety factor in the error free operation of the machine Safe working depends first and foremost on you 13 TRANSPORT WARNING Damaged or insufficiently strong hoists and load slings...

Page 24: ...grounding conductor must not be connected to an under voltage can Check with a qualified electrician or service that the grounding instructions are understood and the machine is grounded A damaged cable must be replaced immediately Compressed air connection Connect the machine with the compressed air connection 24 to your pneumatic device Please note the ZI RMM94H must only be connected to a compr...

Page 25: ...ASSEMBLY ZIPPER MASCHINEN GmbH www Zipper Maschinen at 25 ZI RMM94H25 Abb C Abb D Abb E Abb F Abb G ...

Page 26: ...er zone Activate the control pedal 1 the bead breaker pushes the tire from the rim from Repeat the last steps in several places on the rim until the tire has come off the rim 15 1 4 Remove tire from the rim Place the tire on the turntable 6 ATTENTION In asymmetric drop center rims set the tire on so that the flatter side is up Do all the way to the outside jaws according to drive the control pedal...

Page 27: ...e rim flange with the press plate 16 or of the press roller 22 Activate the control pedal 4 the inner tire bead is pulled under the outer edge of the rim Insert the inner tube if available This should not interfere with the installation See Figure G Now go for mounting the upper bead the same way as in the lower bead NOTE The bead press roller 22 or tire pressure block 23 is used to facilitate the...

Page 28: ...check that the safety devices are in perfect condition Check the connections for tightness at least once a week Regularly check that the warning and safety labels on the machine are in perfect and legible condition Vent the machine 3 4 times a year 16 2 1 Maintenance schedule The type and degree of machine wear depend on the operating conditions The following intervals apply when the machine is us...

Page 29: ...to correct the problem Trouble Possible cause Solution Machine does not start Emergency stop switch to switch off switch or a phase is broken Overload protection is triggered Safety fuse is blown Open cover plate for saw blades Turn the emergency OFF switch to the right to unlock to Repair the defective circuit or the faulty phase Wait until the engine cools down Replace the fuse Cover plate close...

Page 30: ...ilisateur En raison des progrès constants dans la conception des produits les photos et le contenu peuvent varier légèrement Cependant si vous constatez des erreurs merci de nous en informer Les spécifications techniques sont soumises à changements Merci de vérifier le contenu du produit immédiatement après réception pour un éventuel dommage de transport ou de parties manquantes Les revendications...

Page 31: ... toute garantie et réclamation de dommages Une diminution de la concentration par la fatigue l influence de l alcool ou de la drogue rend toute utilisation de la machine interdite La machine ne peut être utilisée que par un personnel qualifié Les personnes non autorisées en particulier les enfants et le personnel non qualifié doivent être tenus à l écart de la machine en fonctionnement Attention L...

Page 32: ...quent ne jamais sur dépasser la pression de gonflage du pneu recommandé Contrôler le bon état du pneu et de la jante avant de procéder au gonflage de ce dernier Pendant le gonflage contrôler le bon déroulement de l opération Risque de choc électrique Lorsque la machine est connectée électriquement il y a risque de choc électrique via un contact avec des parties de la machine conductrice Ces risque...

Page 33: ...e conducteur de terre est vert jaune En cas de réparation ou de remplacement du conducteur de mise à la terre ne pas connecter électroniquement la machine Consulter un électricien ou un service qualifié afin que les instructions de mise à la terre soit bien comprises et que la machine est bien mise à la terre Un câble endommagé doit être remplacé immédiatement Connexion air comprimé Connecter la m...

Page 34: ...ASSEMBLAGE ZIPPER MASCHINEN GmbH www Zipper Maschinen at 34 ZI RMM94H34 Abb B Abb C Abb D Abb E Abb F Abb G ...

Page 35: ...onter descente du bras auxiliaire 21 1 3 Décoller le pneu de la jante Enlever avec attention l air dans le pneu Retirer tous les objets étrangers et les poids sur la jante Lubrifier le talon du pneu avant de commencer à presser le pneu afin de le protéger Figure C Placer le pneu sur la plaque de positionnement 21 de sorte que le détalonneur 20 se trouve à max 1 cm du bord de la jante ATTENTION Gar...

Page 36: ...aintenant soulever avec la barre de montage le talon inférieur du pneu sur la tête de montage Actionner la pédale pour séparer le talon inférieur du pneu et donc tout le pneu de la jante Actionner la pédale pour ouvrir les mors et placer la jante sur le plateau de serrage vers le bas NOTE Pour le montage ultérieur d un pneu la jante reste sur le plateau Montage du pneu Vérifier que le pneu et les ...

Page 37: ...r du gonflage à l air le pneu se gonfle 22 ENTRETIEN ATTENTION Avant d effectuer les réparations et l entretien débranchez la machine de l alimentation électrique et l alimentation d air comprimé La machine demande peu d entretien et ne contient que quelques pièces qui doivent être entretenus Fautes ou défauts qui peuvent affecter la sécurité de la machine doit être éliminé immédiatement Les répar...

Page 38: ...t tenu de recycler votre vieille machine professionnellement 23 DÉPISTAGE DE PANNE Avant de commencer le travail sur l élimination des défauts débrancher la machine de l alimentation électrique problème Cause possible Solution La plaque tournante tourne seulement dans une direction Commutateur cassé Changer le commutateur La plaque tournante ne tourne pas Courroie défectueuse cassée Courroie non t...

Page 39: ... gravi lesioni A causa del costante sviluppo dei nostri prodotti è possibile che le immagini e i contenuti siano leggermente differenti Qualora si riscontrino eventuali errori si prega di informare la società Zipper Modifiche tecniche riservate Controllare immediatamente la merce alla ricezione e far annotare sulla lettera di vettura eventuali contestazioni dall addetto al recapito al momento dell...

Page 40: ...ntuali modifiche e manomissioni non autorizzate apportate alla macchina nonché l uso non conforme alle disposizioni invalidano immediatamente il diritto alla garanzia e al risarcimento danni Utilizzare la macchina solo in condizioni di luce sufficienti non lavorare dopo il crepuscolo In caso di stanchezza mancanza di concentrazione o se si è sotto l effetto di farmaci alcool o droga è vietato lavo...

Page 41: ... rotante e dal meccanismo di rilascio Perlustrare l area di lavoro alla ricerca di corpi estranei che possono provocare lesioni Tenere i pantaloni all interno delle scarpe di sicurezza Non tenere i lacci delle scarpe slacciati Pericolo di bruciature in caso di contatto con componenti della macchina ad alte temperature in particolare con lo scarico Pericolo di gravi lesioni con possibile decesso in...

Page 42: ... caso di riparazione o sostituzione il conduttore di terra non deve essere collegato a una presa sotto tensione Accertarsi che una eventuale prolunga sia in buono stato e idonea per il trasferimento di potenza Un cavo sottodimensionato riduce il trasferimento di potenza e si riscalda molto Un cavo danneggiato deve essere sostituito immediatamente Attacco aria compressa Collegare la macchina al dis...

Page 43: ...MONTAGGIO ZIPPER MASCHINEN GmbH www Zipper Maschinen at 43 ZI RMM94H43 Fig B Fig C Fig D Fig E Fig F Fig G ...

Page 44: ...cio di montaggio È possibile sollevare o abbassare il braccio di montaggio azionando la valvola di manovra B sullo stesso 27 1 3 Rilasciare lo pneumatico dal cerchio Far fuoriuscire l aria dallo pneumatico con cautela Rimuovere eventuali corpi estranei e pesi dal cerchio Lubrificare il tallone dello pneumatico con del lubrificante o dell acqua saponata prima di rilasciarlo in modo tale da protegge...

Page 45: ...tsrato al punto 7 1 1 Cfr Figura D Tirare il tallone esterno dello pneumatico con l ausilio del ferro di montaggio sulla testa di montaggio Mediante il braccio di montaggio 15 è possibile con il regolatore di pressione 16 o il cilindro di pressione 22 premere il tallone dello pneumatico all interno del canale del cerchione per sollevare il suddetto tallone più facilmente sullo stesso Azionare il p...

Page 46: ...a 10 15 cm procedere con cautela per evitare eventuali danni al tallone dello pneumatico Arrestare immediatamente il motore qualora vi sia pericolo di danneggiare lo pneumatico e sollevare il pedale 4 con il piede per ruotare in direzione contraria il tavolo rotante Ripetere l operazione dopo che lo pneumatico è tornato nella sua forma originaria Pompare lo pneumatico PERICOLO Verificare e seguire...

Page 47: ...enti a vite una volta al mese Controllo del serraggio della cinghia di trazione una volta al mese Pulizia Pulire il tavolo rotante regolarmente dopo l uso da impurità e residui NOTA L uso di solventi prodotti chimici aggressivi o prodotti abrasivi causa danni materiali alla macchina Pertanto vale la regola Per la pulizia utilizzare esclusivamente acqua e se necessario detergenti delicati Controllo...

Page 48: ...a cinghia Far sostituire il commutatore di polarità Far misurare da un elettrico l alimentazione di corrente e il motore Se il motore è difettoso far sostituire il motore Il tavolo rotante si blocca durante la sostituzione dello pneumatico La cinhgia scivola Pulire serrare la cinghia Le ganasce si aprono chiudono troppo lentamente Marmitta Pulirla una volta ottenuto l accesso alla cinghia e alla m...

Page 49: ...ELEKTRISCHE SCHALTUNGEN ELECTRIC DIAGRAM ZIPPER MASCHINEN GmbH www Zipper Maschinen at 49 ZI RMM94H49 30 ELEKTRISCHE SCHALTUNGEN ELECTRIC DIAGRAM ELECTRICAL PNEUM DIAGRAMS 230V 1PH 400V 3PH ...

Page 50: ...t drawing with the spare part order on which the required spare parts are clearly marked You will find the ordering address under customer service addresses in the foreword to this documentation FR Pour les machines ZIPPER utiliser toujours des pièces de rechange pour réparer la machine Le réglage optimal de pièces réduit le temps d installation et préserve la vie de la machine IMPORTANT L install...

Page 51: ...ERSATZTEILE SPARE PARTS ZIPPER MASCHINEN GmbH www Zipper Maschinen at 51 ZI RMM94H51 Explosionszeichnung Exploded View ...

Page 52: ...ERSATZTEILE SPARE PARTS ZIPPER MASCHINEN GmbH www Zipper Maschinen at 52 ZI RMM94H52 ...

Page 53: ...ERSATZTEILE SPARE PARTS ZIPPER MASCHINEN GmbH www Zipper Maschinen at 53 ZI RMM94H53 ...

Page 54: ...pin 1 602 End cap 1 130 gasket M12 1 604 Washer 1 131 screw M12 20 1 605 6010 bearing 1 201 hexagon screw M10 30 1 606 Shaft of gear box 1 202 Cap 1 607 Flat key 1 203 antiskid nuts 1 608 Bearing 1 204 arm cover 1 609 Gear 1 206 Locking plate 1 610 Up cap of gear box 1 208 215 pneumatic locking switch 1 611 Hexagon screw 1 218 jackscrew 4 612 Washer 1 219 mounting head 1 613 Hexagon screw 1 220 22...

Page 55: ...430 PU tube 1 24 switch plate 1 431 Coupler 1 25 shaft 1 432 Piston of small cylinder 1 26 29 screw 4 433 Nut M8 1 30 elbow 1 434 Cap of small cylinder 1 31 joint 1 435 Joint bar of caps 1 32 pressing roller 1 436 Barrel of small cylinder 1 33 gasket 1 437 Cap of small cylinder 1 34 nut 1 438 Sliding block 1 35 roller lever 1 439 Exhaust valve 1 36 gasket 1 501 Lever of bead breaker 1 37 plastic P...

Page 56: ...ungen an der Maschine vorgenommen werden die nicht mit uns abgestimmt wurden EN Hereby we declare that the above mentioned machines meet the essential safety and health requirements ofthe above stated EC directives Any manipulation or change of the machine not being explicitly authorized by us in advance renders this document null and void FR Nous déclarons par la présente qu en raison de leur con...

Page 57: ...chem Treibstoffen Frostschäden in Wasserbehältern Treibstoff über Winter im Benzintank des Gerätes c Ausgeschlossen sind Defekte an Verschleißteilen wie Kohlebürsten Fangsäcke Messer Walzen Schneideplatten Schneideeinrichtungen Führungen Kupplungen Dichtungen Laufräder Sageblätter Spaltkreuze Spaltkeile Spaltkeilverlängerungen Hydrauliköle Öl Luft u Benzinfilter Ketten Zündkerzen Gleitbacken usw d...

Page 58: ...n water tanks leaving fuel in the tank during the winter etc c Defects on wear parts are excluded e g carbon brushes collection bags knives cylinders cutting blades clutches sealings wheels saw blades splitting crosses riving knives riving knife extensions hydraulic oils oil air fuel filters chains spark plugs sliding blocks etc d Also excluded are damages on the machine caused by incorrect or ina...

Page 59: ... Défauts des pièces d usure sont exclus par exemple balais en charbon sacs d aspirateur lames cylindres lames embrayages joints roues lames de scie cales de division lame inciseur extensions de cale de division huiles hydrauliques les filtres à huile air carburant des chaînes des bougies des blocs coulissantes etc d Sont également exclus les dommages sur la machine causés par une mauvaise manipula...

Page 60: ...rbatoio della benzina della macchina durante l inverno c Sono escluse anomalie ai componenti soggetti a usura quali spazzole di carbone sacchi di raccolta lame cilindri inserti dispositivi di taglio guide attacchi guarnizioni rotori lame di seghe spaccatronchi coltelli divisori prolunghe di coltelli divisori oli idraulici filtri dell olio dell aria e della benzina catene candele di accensione patt...

Page 61: ... Quality Management policy Your opinion is essential for further product development and product choice Please let us know about your Impressions and suggestions for improvement experiences that may be useful for other users and for product design Experiences with malfunctions that occur in specific operation modes We would like to ask you to note down your experiences and observations and send th...

Page 62: ...PRODUKTBEOBACHTUNG PRODUCT MONITORING ZIPPER MASCHINEN GmbH www Zipper Maschinen at 62 ZI RMM94H62 ...

Reviews: