background image


ZIPPER MASCHINEN GmbH     www.Zipper-Maschinen.at



67   

ZI-RPE120GYN 

40.3


Ersatzteil-Liste / Spare Parts List 

N°.  Description 

Qty.  N°.  Description 

Qty. 

BOLT , FLANGE 

38 

KEY 

COVER COMP ., HEAD 

39 

RING SET 

PACKING , HEAD COVER 

40 

CLIP , PISTON PIN 

BOLT , FLANGE  

41 

PISTON 

RETAINER , VALVE SPRING ,EX 

42 

PIN , PISTON 

RATATOR , VALVE 

43 

ROD ASSY ., CONNECTING 

RETAINER , VALVE SPRING ,EX 

44 

BOLT,CONNECTING ROD 

SPRING , VALVE 

45 

GOVERNOR GEAR ASSY. 

SEAL , GUIDE 

46 

BOLT , DRAIN PLUG 

10 

ARM COMP. 

47 

WASHER , DRAIN PLUG 

11 

NUT , PIVOT ADJUSTING 

48 

CRANK CASE 

12 

PIVOT , ROCKER ARM 

49 

PACKING , INSULATOR 

13 

ARM , VALVE ROCKER 

50 

INSULATOR , CARBURETOR 

14 

BOLT , PIVOT ARM 

51 

PACKING ., CARBURETOR 

15 

PLATE , PUSH ROD GUIDE 

52 

CARBURETOR 

16 

PLUG , SPARK 

53 

CARBURETOR'S NOUMENON 

17 

BOLT , STUD , EX. 

54 

STARTING PUMP 

18 

HEAD COMP .,CYLINDER 

55 

BOLT ,DRAIN 

19 

BOLT , STUD , IN. 

56 

LEVER ASSY.,CHOKE 

20 

GASKET , CYLINDER 

57 

VALVE  , FLOAT 

21 

PIN , DOWEL 

58 

SPRING , VALVE SET 

22 

VALVE COMP. 

59 

PIN , FLOAT 

23 

ROD , PUSH 

60 

FLOAT 

24 

LIFTER , VALVE 

61 

GASKET , OIL CUP 

25 

NUT, HEX. 

62 

OIL CUP 

26 

MUFFLER ASSY. 

63 

GASKET , OIL CUP BOLT 

27 

GASKET , MUFFLER 

64 

BOLT , OIL CUP 

28 

CAMSHAFT ASSY. 

65 

GASKET , DRAIN BOLT 

29 

GAUGE ASSY., OIL LEVEL 

66 

BOLT , FLANGE  

30 

BOLT , FLANGE  

67 

SPACER COMP ., AIR CLEANER 

31 

CASE COVER  

68 

AIR CLEANER ASSY 

32 

OIL SEAL  

69 

ALART UNIT ,OIL 

33 

BEARING , RADIAL BALL 

70 

OIL LEVEL SWITCH 

34 

PIN , DOWEL 

71 

CLIP,ONE WAY VALVE 

35 

PACKING , CASE COVER 

72 

NUT , FLANGE  

36 

KEY 

73 

COVER,EXHAUST PIPE 

37 

CRANKSHAFT COMP 

74 

CLIP , TUBE 

Summary of Contents for ZI-RPE120GYN

Page 1: ...ATTE Übersetzung Translation EN USER MANUAL PLATE COMPACTOR ES MANUAL DE INSTRUCCIONES PLACA COMPACTADORA FR MODE D EMPLOI COMPACTEUR À PLAQUE ACHTUNG Öl kontrollieren Motor startet nicht bei Ölmindermenge ATTENTION Check Oil Engine doesn t start at low oil level ZI RPE120GYN EAN 9120039234090 ...

Page 2: ...me 15 7 1 2 Hinweise zu ersten 20 Betriebsstunden 15 7 2 Betriebshinweise 15 7 3 Maschine starten 16 7 4 Maschine stoppen 17 7 4 1 Not Aus 17 7 4 2 Ausschalten 17 8 WARTUNG 17 8 1 Instandhaltungs und Wartungsplan 17 8 1 1 Maßnahmen Tabelle 17 8 2 Öl der Rütteleinheit wechseln 17 8 2 1 Erreger Öl Wechsel 18 8 3 Motoröl wechseln 18 8 4 Luftfilter reinigen 19 8 5 Keilriemen und Kupplung überprüfen un...

Page 3: ...ario 37 23 3 Instrucciones generales de seguridad 38 23 4 Instrucciones especiales de seguridad para ZI RPE120GYN 38 23 5 Instrucciones de seguridad para máquinas con motor de combustión interna 39 23 6 Riesgos residuales 39 24 MONTAJE 40 24 1 Montaje 40 24 1 1 Entrega de la mercancía 40 24 1 2 Montaje 40 24 2 Comprobaciones preliminares 41 24 2 1 Comprobar el nivel de aceite del motor 41 24 2 2 C...

Page 4: ... 4 Arrêt de la machine 58 34 4 1 Arrêt d urgence 58 34 4 2 Arrêt normal de la machine 58 35 ENTRETIEN 58 35 1 Plan d entretien 58 35 1 1 Contrôles de maintenance 58 35 2 Changement d huile du groupe vibrant 59 35 2 1 Changement d huile du groupe vibrant 59 35 3 Changement d huile moteur 59 35 4 Nettoyage du filtre à air 60 35 5 Vérifier et changer la courroie trapézoïdale et l embrayage 60 35 5 1 ...

Page 5: ...ores o cerca de ventanas abiertas o ventilaciones FR Empoisonnement Ne pas utiliser à l intérieur ou près de fenêtres ouvertes et de ventilation DE Warnung vor heißer Oberfläche DE Sicherheitsabstand einhalten EN Hot Surface EN Keep safe distance ES Advertencia de superficie caliente ES Mantenga una distancia segura FR Avertissement de surface chaude FR Garder la distance de sécurité DE Persönlich...

Page 6: ...er Gummimatte metal bars for fastening the rubber mat Rieles de montaje para colchoneta de goma Rails de montage pour tapis en caoutchouc 2 pcs D Trichter funnel Embudo Entonnoir 1 pc E Gummi Matte zum Anrütteln von Pflastersteinen etc rubber mat for vibrating paving stones etc Colchoneta de goma Tapis caoutchouc 1 pc F Kleinteile und Schraubenschlüssel Set set of small parts and wrenches Kit de h...

Page 7: ...it de carburant CLOSE vodoravno zaustavite gorivo 7 Griff der Luftklappe Choke lever Ručica za dekompresiju Palanca de cebador Starter Choker Used in the starting of a cold engine or in cold weather conditions The choke enriches the fuel lever Usado en el arranque de un motor frío o con tiempo frío El estrangulador enriquece el nivel de combustible Utilisé pour démarrer un moteur froid ou par temp...

Page 8: ...fugalkraft centrifugal force fuerza centrífuga force de compactage kN 26 max Vorschub Gehgeschw max feed walking speed Avance max Vitess maxi m min 25 Vibrationsstöße Vibration shocks vibración por minuto vibration par minutes vpm 4700 Verdichtungstiefe compaction depth profundidad de compresión profondeur de compactage mm 300 max zulässige Schräglage des Motors max permissible inclination of the ...

Page 9: ...ungen und Inhalte geringfügig abweichen Sollten Sie Fehler feststellen informieren Sie uns bitte Technische Änderungen vorbehalten Kontrollieren Sie die Ware nach Erhalt unverzüglich und vermerken Sie etwaige Beanstandungen bei der Übernahme durch den Zusteller auf dem Frachtbrief Transportschäden sind innerhalb von 24 Stunden separat an uns zu melden Für nicht vermerkte Transportschäden kann Holz...

Page 10: ... enthält Entfernen der an der Maschine angebrachten Sicherheitskennzeichnungen Verändern umgehen oder außer Kraft setzen der Sicherheitseinrichtungen der Maschine Nutzen der Maschine zum Transport von Personen Die nicht bestimmungsgemäße Verwendung bzw die Missachtung der in dieser Anleitung dargelegten Ausführungen und Hinweise hat das Erlöschen sämtlicher Gewährleistungs und Schadenersatzansprüc...

Page 11: ...daushebungen oder Baugruben dass die Wände stabil sind und nicht Gefahr laufen wegen der Vibration einstürzen Halten Sie sich von Kanten und Gräben fern und vermeiden Sie Situationen in denen die Rüttelplatte umkippen könnte Übermäßiger Lärm kann zu Gehörschäden und temporären oder dauerhaften Verlust der Hörfähigkeit führen Tragen Sie einen nach Gesundheits und Sicherheitsregelungen zertifizierte...

Page 12: ...ation hin die zum Tod oder zu schweren Verletzungen führt wenn sie nicht gemieden wird WARNUNG Ein solcherart gestalteter Sicherheitshinweis weist auf eine möglicherweise gefährliche Situation hin zu schweren Verletzungen oder sogar zum Tod führen kann wenn sie nicht gemieden wird VORSICHT Ein auf diese Weise gestalteter Sicherheitshinweis weist auf eine möglicherweise gefährliche Situation hin di...

Page 13: ...stigen sowie Transporteinrichtung montieren siehe Abbildung links 6 2 Maßnahmen vor jeder Verwendung HINWEIS Der Einsatz von Farbverdünnern Benzin aggressiven Chemikalien oder Scheuermitteln führt zu Sachschäden an den Oberflächen Für die der Reinigung deshalb nur milde Reinigungsmittel verwenden Beachten Sie die Sicherheitshinweise am Anfang des Handbuchs Reinigen Sie die Maschine und entfernen S...

Page 14: ...men ca 0 5 Liter 6 Öl Messstab wieder einschieben und festdrehen 6 2 2 Füllstand des Kraftstofftanks überprüfen HINWEIS Beachten Sie die Sicherheitsvorschriften zur Kraftstoffkontrolle Filtern Sie den Kraftstoff beim Tanken um zu verhindern dass Fremdpartikel in den Verbrennungsraum gelangen Wischen Sie ausgelaufenen Kraftstoff auf 1 Tankdeckel sitzt auf dem Kraftstofftank aufschrauben 2 Füllstand...

Page 15: ...em Ölstand der Motor nicht mit genug Schmierung versorgt sein könnte In der Richtung der Vorrückbewegung der Rüttelplatte und innerhalb eines Bereichs von einem Meter um den Rüttler darf niemand außer dem Bediener stehen Während des Verdichtens und Erhöhens eines Erdbauwerks sollte zuerst zirka 10 bis 15 cm innerhalb des Randes zwei bis dreimal verdichtet werden dann wird der Rand verdichtet Wenn ...

Page 16: ... den Choke Hebel in die Position Geschlossen nur für kalten Motor 4 Stellen Sie den Gashebel auf Halbgas Mittelstellung zwischen schnell und langsam Hinweis Ziehen Sie das Starterseil nicht bis zum Ende durch und lassen Sie es nach dem Ziehen nicht zurückschnellen sondern nur zügig zurückspulen 5 Fassen Sie den Startergriff und ziehen Sie ihn langsam heraus Der Widerstand wird an einer bestimmten ...

Page 17: ... unbeabsichtigte Wiederinbetriebnahme 8 1 Instandhaltungs und Wartungsplan 8 1 1 Maßnahmen Tabelle Was Häufigkeit Intervall Kraftstoffstand überprüfen vor jeder Inbetriebnahme Motoröl Stand überprüfen vor jeder Inbetriebnahme Kontrolle der Bedienelemente vor jeder Inbetriebnahme Kontrolle auf beschädigte Teile vor jeder Inbetriebnahme Kontrolle auf lockere oder verlorene Schrauben vor jeder Inbetr...

Page 18: ...Errger 5 wieder montieren und festziehen 4 Oberteil der Maschine wieder montieren 5 Riemen montieren Riemenspannung kontrollieren und korrekt einstellen 6 Riemenabdeckung montieren 8 3 Motoröl wechseln HINWEIS Altöle sind giftig und dürfen nicht in die Umwelt gelangen Kontaktieren Sie gegebenenfalls die lokalen Behörden für Informationen bezüglich der ordnungsgemäßen Entsorgung 1 Heberahmen entfer...

Page 19: ...bfällt und der Treibstoffverbrauch gleichzeitig zunimmt der Ölverbrauch zunimmt das Anlassen des Motors schwerer wird 8 5 Keilriemen und Kupplung überprüfen und tauschen WARNUNG Warnung vor Erfassungs Einzugsgefahr Versuchen Sie niemals den Keilriemen bei laufendem Motor zu überprüfen Ihre Hände könnten zwischen Keilriemen und Kupplung geraten Schwere Handverletzungen sind die Folge HINWEIS Sollte...

Page 20: ...gersinn drehen so dass sich der Keilriemen löst 4 Antriebsräder inklusive V Nut und Innenraum der Schutzabdeckung reinigen 5 Neuen Keilriemen einspannen 6 Motorblock so weit in die hintere Position bringen dass der Keilriemen bei Fingerdruck 10 bis 15 mm nach innen nachgibt und Befestigungsschrauben wieder anziehen 7 Abschließend Keilriemen Schutzabdeckung wieder anbringen 8 5 4 Kupplung überprüfe...

Page 21: ...t der Maschine ausgelegt ist 3 Überprüfen Sie vor dem Anheben die Fixierung des Heberahmens 4 Heben Sie die Maschine zunächst nur wenige Zentimeter an um die Tragfähigkeit zu überprüfen 5 Heben Sie die Maschine in der Folge so behutsam wie möglich in die gewünschte Position 6 Sichern Sie die Ladung ordnungsgemäß für den Transport 10 LAGERUNG Wenn die Maschine längere Zeit 30 Tage still steht 1 Ölt...

Page 22: ...tand überprüfen ein Sensor verhindert den Start wenn der Ölstand zu niedrig ist Sicherstellen dass das Zündkabel der Zündkerze angeschlossen ist Zündkerze überprüfen Vergaser und Luftfilter überprüfen und sicherstellen dass sie sauber sind Motor stoppt Kraftstoffversorgung überprüfen Überprüfen ob der Kraftstoffhahn geöffnet ist Ölstände überprüfen Zustand des Luftfilters überprüfen Motor bringt n...

Page 23: ...f our products illustrations and contents may differ slightly If you notice any errors please inform us Subject to technical changes Inspect the goods immediately after receipt and note any complaints on the consignment note when accepted by the deliverer Transport damage must be reported separately to us within 24 hours Holzmann cannot accept any liability for unnoticed transport damage Copyright...

Page 24: ...osed areas Operation of the machine without functioning or missing mudguards Operation of the machine in hard soil frozen soil and mixed soil containing fragments of Bricks Remove the safety markings attached to the machine Modify circumvent or disable the safety devices of the machine Use of the machine for the transport of persons The improper use or disregard of the versions and instructions de...

Page 25: ...g due to vibration Keep away from edges and trenches and avoid situations where the vibratory plate could tip over Excessive noise can cause hearing damage and temporary or permanent hearing loss Wear hearing protection certified to health and safety regulations to limit noise exposure Do not increase the regulated idle speed of the engine above 3 500 rpm This could result in damage to the machine...

Page 26: ...ided may result in minor or moderate injury NOTICE A safety note designed in this way indicates a potentially dangerous situation which if not avoided may result in property damage Irrespective of all safety regulations your common sense and your corresponding technical suitability training are and will remain the most important safety factor for error free operation of the machine Safe working de...

Page 27: ...ls or abrasives leads to material damage to the surfaces Therefore use only mild detergents for cleaning Observe the safety instructions at the beginning of this manual Clean the machine and remove dirt and dust if necessary If the air filter is dirty blow the filter cartridge from the inside by moving a jet of dry compressed air up and down Continue until all dust has been removed Replace the air...

Page 28: ...5 2 2 Checking the fuel tank level NOTICE Observe the safety regulations for fuel control Filter the fuel during refuelling to prevent foreign particles from entering the combustion chamber Wipe up leaked fuel Procedure 1 Unscrew the tank cap sits on the fuel tank 2 Level check in the form of a visual inspection If necessary top up with petrol with the appropriate octane number RON 95 3 Close the ...

Page 29: ...ith an optimum oil level the engine may not be supplied with sufficient lubrication In the direction of the vibratory plate advance and within a range of one meter around the vibrator nobody but the operator must stand During the compaction and raising of an earthwork the soil should first be compacted about 10 to 15 cm inside the edge two to three times then the edge is compacted If you shake the...

Page 30: ...ration after starting and for restarting a warm engine 3 Move the choke lever to the Closed position only for cold engine 4 Set the throttle lever to half throttle middle position between fast and slow 5 Grasp the starter handle and pull it out slowly The resistance becomes strongest at a certain point This point corresponds to the compression point Let the rope roll back a little from this point ...

Page 31: ... even death Always switch off the machine for conversion adjustment cleaning and maintenance work and secure it against unintentional start up 17 1 Maintenance and servicing plan 17 1 1 Table of Activities What to do When to do how often Check fuel level before each start up Check engine oil level before each start up Control of the operating elements before each start up Check for damaged parts b...

Page 32: ...iter 5 Empty used exciter oil Fill in new exciter oil 20W20 or 15W30 is recommended Quantity approx 200ml Assemble the drain screw again and tighten it 4 Assemble the upper part of the machine again 5 Assemble the V Belt check belt tension and adjust if necessary 6 Assemble the belt cover again 17 3 Engine Oil Change NOTICE Waste oils are toxic and must not be released into the environment If nece...

Page 33: ... the starting of the engine becomes more difficult 17 5 Checking and replacing V belt and coupling WARNING Warning of danger of detection trapping in Never attempt to check the V belt while the engine is running Your hands could get caught between the V belt and the clutch Serious hand injuries may result NOTICE If the vibratory power of the machine regardless of the number of operating hours sudd...

Page 34: ...ective cover 17 6 Checking the coupling Check the coupling at the same time as the V belt With the belt removed check the outside for seizure and the V groove for wear and damage with your eyes Clean the V groove as required The wear of the lining or the shoe should be checked with a running check If the shoe is worn the power transmission will be insufficient and the shoe will slip 17 7 Cleaning ...

Page 35: ... in a well ventilated dry and frost free environment 20 DISPOSAL Do not dispose of your machine in residual waste Contact your local authorities for information on available disposal options If you buy a new vibratory plate or equivalent from your dealer he is obliged in certain countries to dispose of your old machine properly 21 TROUBLESHOOTING WARNING Hot surfaces and rotating machine parts whi...

Page 36: ... de sugerencias Las especificaciones técnicas pueden cambiar sin previo aviso Por favor compruebe el contenido del producto inmediatamente en 24 horas después de la recepción por cualquier daño eventual de transporte o falta de piezas Las reclamaciones de daños de transporte o falta de piezas se deben hacer inmediatamente después de la recepción inicial de la máquina y desembalaje antes de poner l...

Page 37: ...uina motor Cualquier cambio en el diseño de la máquina está prohibido No use la máquina en clima húmedo y en lluvia No use la máquina en un entorno potencialmente explosivo No use la máquina en interiores o lugares cerrados El uso de la máquina sin los dispositivos de seguridad está prohibido No use la máquina en terrenos duros tierra congelada así como suelo mixto que contiene fragmentos de ladri...

Page 38: ...protección auditiva guantes gafas de seguridad zapatos de seguridad ropa de protección ajustada etc Está prohibido trabajar con la máquina en caso de cansancio falta de concentración o bajo la influencia de drogas alcohol o medicamentos Nunca use la máquina en presencia de líquidos o gases inflamables peligro de explosión Realice los trabajos de mantenimiento ajuste y limpieza sólo con el motor ap...

Page 39: ...os vapores de combustibles y disolventes pueden explotar Mantenga siempre el área alrededor del silenciador libre de sustancias extrañas como hojas papel cajas de cartón etc Un silenciador caliente podría encender estas sustancias y provocar un incendio No olvide cerrar la tapa del depósito de gasolina después de repostar Revise regularmente la línea de combustible y el depósito para detectar fuga...

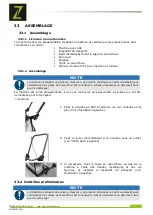
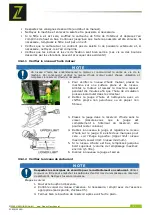
Page 40: ...os corrosivos o abrasivos pueden dañar a la superficie de la máquina Por lo tanto sólo use detergente suave para la limpieza La máquina viene pre montada sólo hay que montar las partes que han sido desmontadas para el transporte Procedimiento 1 Fije el mango al marco de la base utilizando tornillos arandelas y anillos de presión vea la ilustración a la izquierda 2 Fije la palanca del acelerador al...

Page 41: ...uso y llene el depósito de aceite si es necesario 1 Para verificar el nivel de aceite del motor ponga la máquina en una superficie plana y nivelada Apague el motor y deje reposar la máquina durante diez minutos para que el aceite en circulación se pueda acumular en el colector 2 Retire la varilla de medición de aceite y limpie con un paño limpio y sin pelusas o con papel no fibroso 3 Coloque la va...

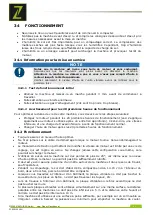
Page 42: ...ación 25 2 Funcionamiento Asegurar siempre un nivel de aceite óptimo Nunca tire del cable de arranque mientras el motor está en marcha Dañaría el motor El mecanismo de tracción para cambiar la velocidad del motor está limitado por un tornillo de ajuste que se ajusta en fábrica Nunca cambie esta configuración por sí mismo podría sobrecargar el motor En ninguna circunstancia use la máquina en pendie...

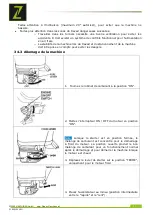
Page 43: ... máquina cuando el motor está caliente 3 Mueva la palanca del estárter a la posición CERRADO sólo para el motor frío 4 Ponga el acelerador en el punto medio posición intermedia entre el rápido y lento Nota No tire del cable de arranque hasta el final y no suelte el cable después de tirar pero deje que se enrolle 5 Sujete el mango de arranque y sáquelo lentamente La resistencia se vuelve más fuerte...

Page 44: ...pondrá en marcha durante el proceso 26 1 Plan de mantenimiento 26 1 1 Controles de mantenimiento Control a realizar Frecuencia intervalo Control del nivel de combustible Antes de cada uso Control del nivel de aceite Antes de cada uso Comprobar el sistema de control Antes de cada uso Comprobar daños en la máquina Antes de cada uso Tornillos sueltos perdidos Antes de cada uso Cambio de aceite del mo...

Page 45: ...parte superior de la máquina de nuevo 5 Montar la correa trapezoidal verifique la tensión de la correa y ajústela si fuera necesario 6 Montar la cubierta de la correa de nuevo 26 3 Cambio del aceite del motor NOTA Los aceites usados son venenosos y no deben ser liberados al medio ambiente Si es necesario póngase en contacto con las autoridades locales para obtener más información sobre la eliminac...

Page 46: ... se vuelve más difícil 26 5 Comprobar y cambiar la correa en V y el embrague ADVERTENCIA Advertencia de peligro de detección atrapamiento de las manos Nunca intente revisar la correa mientras el motor está en marcha Sus manos podrían quedar atrapadas entre la correa y el embrague que puede producir graves lesiones en las manos NOTA Independientemente de la cantidad de horas de funcionamiento reali...

Page 47: ...y vuelva a apretar los tornillos de sujeción 7 Finalmente vuelva a colocar la cubierta protectora de la correa 26 6 Revisión del embrague Con la correa trapezoidal retirada revise el embrague y la polea de la correa en busca de desgaste y daños Inspeccione el lado exterior de la correa y la ranura en busca de desgaste y daños Limpie la ranura según sea necesario Compruebe el desgaste de las poleas...

Page 48: ...asta la posición deseada 6 Fije adecuadamente la carga para el transporte 28 ALMACENAMIENTO Cuando vaya a guardar la máquina durante más de 30 días 1 Drene el combustible y el aceite de los depósitos 2 Quite la bujía vierta en el cilindro unas gotas de aceite de motor Tire de la cuerda de arranque lentamente para que el motor gire varias veces con el fin de distribuir el aceite en la cámara de com...

Page 49: ...sor evita el arranque si el nivel de aceite es demasiado bajo asegúrese de que el cable de encendido de la bujía esté conectado revise la bujía revise el carburador y los filtros de aire y asegúrese de que estén limpios Motor se detiene comprobar el nivel de la gasolina comprobar si la válvula de combustible está abierta comprobar los niveles de aceite verificar el estado del filtro de aire Motor ...

Page 50: ...pendant si vous constatez des erreurs merci de nous en informer Les spécifications techniques sont soumises à changements Merci de vérifier le contenu du produit immédiatement après réception pour un éventuel dommage de transport ou de parties manquantes Les revendications de dommages de transport ou pièces manquantes doivent être émise immédiatement après la réception initiale de la machine et so...

Page 51: ...e N utilisez pas la machine par temps humide et sous la pluie N utilisez pas la machine dans un environnement potentiellement explosif N utilisez pas la machine à l intérieur ou à endroits fermés L utilisation de la machine sans les dispositifs de sécurité est interdite N utilisez pas la machine sur un sol dur un sol gelé ou un sol mélangé contenant des fragments de briques Ne pas utiliser la mach...

Page 52: ...cool ou de médicaments N utilisez jamais la machine en présence de liquides ou de gaz inflammables risque d explosion Effectuez les travaux d entretien de réglage et de nettoyage uniquement lorsque le moteur est arrêté Utilisez uniquement les pièces de rechange et les accessoires recommandés par Zipper Maschinen 32 4 Consignes de sécurité particulières pour le ZI RPE120GYN La machine est conçue po...

Page 53: ...er boîtes en carton etc Un silencieux chaud pourrait enflammer ces substances et provoquer un incendie Ne pas oublier de fermer le bouchon du réservoir de carburant après avoir fait le plein Vérifiez régulièrement la conduite de carburant et le réservoir à la recherche de fuites et de fissures N utilisez pas la machine si le circuit d alimentation en carburant présente des fuites Stocker le carbur...

Page 54: ...sez uniquement un détergent doux pour le nettoyage La machine est livrée préassemblée il ne vous reste plus qu à assembler les pièces qui ont été démontées pour le transport Procédure 1 Fixez la poignée au bâti à l aide de vis de rondelles et de jonc Voir illustration à gauche 2 Fixez le levier d accélérateur à la poignée avec un collier voir l illustration à gauche 3 Si nécessaire fixez le tapis ...

Page 55: ...plane et de niveau Arrêtez le moteur et laissez la machine reposer pendant dix minutes afin que l huile de circulation puisse s accumuler dans le collecteur 2 Retirez la jauge d huile et nettoyez la avec un chiffon propre non pelucheux ou un papier non fibreux 3 Placez la jauge dans le réservoir d huile sans la visser Assurez vous que la jauge est complètement à l intérieur du réservoir elle pourr...

Page 56: ...lement aux moteurs utilisés après un entretien approfondi C est à dire une vitesse inférieure et une charge de travail inférieure à celle du fonctionnement normal Changer l huile du moteur après les 20 premières heures de fonctionnement 34 2 Fonctionnement Toujours assurer un niveau d huile optimal Ne tirez jamais sur le câble de démarrage lorsque le moteur tourne Cela endommagerait le moteur Le m...

Page 57: ...ement de la machine doit être prise en compte pour éviter les dangers 34 3 Allumage de la machine 1 Tournez le robinet de carburant à la position ON 2 Mettez l interrupteur ON OFF du moteur en position ON Note Lorsque le starter est en position fermée le mélange de carburant est concentré pour le démarrage à froid du moteur La position ouverte produit le bon mélange de carburant pour un fonctionne...

Page 58: ...teur soit refroidi 35 ENTRETIEN ATTENTION Ne pas nettoyer contrôler régler ou entretenir lorsque la machine est en marche Les surfaces chaudes et parties tournantes de la machine avec le moteur en marche peut causer des blessures graves ou la mort Arrêtez toujours la machine avant d effectuer des travaux d entretien et assurez vous qu elle ne démarrera pas pendant le processus 35 1 Plan d entretie...

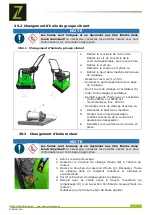
Page 59: ...uve l excitateur huile 20W20 ou 15W30 est recommandée Env 200 ml Remontez la vis de vidange et serrez la 4 Remontez le haut de la machine 5 Montez la courroie trapézoïdale vérifiez la tension de la courroie et ajustez la si nécessaire 6 Remettez le couvercle de la courroie en place 35 3 Changement d huile moteur NOTE Les huiles sont toxiques et ne devraient pas être libérés dans l environnement Si...

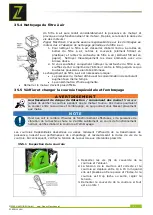
Page 60: ...uile augmente Démarrer le moteur devient plus difficile 35 5 Vérifier et changer la courroie trapézoïdale et l embrayage AVERTISSEMENT Avertissement de danger de détection coincement des mains N essayez jamais de vérifier la courroie pendant que le moteur tourne Vos mains pourraient se coincer entre la courroie et l embrayage ce qui pourrait vous blesser gravement aux mains NOTE Quel que soit le n...

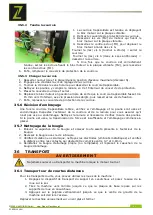
Page 61: ... 7 Enfin replacez le couvercle de protection de la courroie 35 6 Révision d embrayage Une fois la courroie trapézoïdale retirée vérifiez si l embrayage et la poulie sont usés et endommagés Inspectez l extérieur de la courroie et de la rainure pour vous assurer qu il n est pas usé ou endommagé Nettoyez la rainure si nécessaire Vérifiez l usure des poulies Si la poulie est usée la transmission de fo...

Page 62: ... la position souhaitée 6 Régler correctement la charge pour le transport 37 STOCKAGE Lorsque vous stockez la machine pendant plus de 30 jours 1 Vidangez le carburant et l huile des réservoirs 2 Retirez la bougie d allumage versez quelques gouttes d huile moteur dans le cylindre Tirez lentement sur le câble de démarrage afin que le moteur tourne plusieurs fois afin de répartir l huile dans la chamb...

Page 63: ...érifiez le niveau d huile moteur un capteur empêche le démarrage si le niveau d huile est trop bas assurez vous que le fil d allumage de la bougie est connecté vérifier la bougie vérifiez les filtres à carburateur et à air et assurez vous qu ils sont propres Moteur s arrête Vérifiez le niveau d essence Vérifiez si le robinet de carburant est ouvert Vérifiez les niveaux d huile vérifier l état du f...

Page 64: ... in the last chapter of this manual Always take a note of the machine type spare parts number and partname We recommend to copy the spare parts diagram and mark the spare part you need You find the order address in the preface of this operation manual ES Con las piezas de recambio originales de ZIPPER utilizará piezas que están en sintonía con las demás piezas acortando el tiempo de instalación y ...

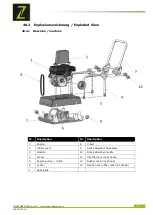
Page 65: ...d View 40 2 1 Maschine machine N Description N Description 1 Engine 8 V belt 2 V Belt cover 9 Shock absorber base plate 3 Handle 10 Shock absorber handle 4 Frame 11 throttle lever not shown 5 Engine pulley clutch 12 Rubber mat not shown 6 exciter 13 Fixation set rubber mat not shown 7 base plate ...

Page 66: ...ZIPPER MASCHINEN GmbH www Zipper Maschinen at 66 ZI RPE120GYN 40 2 2 Motor engine ...

Page 67: ... CARBURETOR 1 15 PLATE PUSH ROD GUIDE 1 52 CARBURETOR 1 16 PLUG SPARK 1 53 CARBURETOR S NOUMENON 1 17 BOLT STUD EX 2 54 STARTING PUMP 1 18 HEAD COMP CYLINDER 1 55 BOLT DRAIN 1 19 BOLT STUD IN 2 56 LEVER ASSY CHOKE 1 20 GASKET CYLINDER 1 57 VALVE FLOAT 1 21 PIN DOWEL 2 58 SPRING VALVE SET 1 22 VALVE COMP 1 59 PIN FLOAT 1 23 ROD PUSH 2 60 FLOAT 1 24 LIFTER VALVE 2 61 GASKET OIL CUP 1 25 NUT HEX 2 62...

Page 68: ...OR 1 108 PIN LOCK 1 84 BOLT FLANGE 2 109 WASHER PLAIN 1 85 FLYWHEEL COMP 1 110 TANK COMP FUEL 1 86 FAN COOLING 1 111 WASHER RUBBER 2 87 PULLEY STARTER 1 112 CONTROL ASSY 1 88 NUT SPECIAL 1 113 SPRING 1 89 SWITCH ASSY ENGINE STOP 1 114 SCREW 1 90 RECOIL STARTER COMP 1 115 BOLT FLANGE 2 91 BOLT FLANGE 7 116 ROD GOVERNOR 1 92 COVER COMP FAN 1 117 SPRING THROTTLE RETURN 1 93 STARTER ASSY 1 118 SPRING ...

Page 69: ...bstoffen Frostschäden in Wasserbehältern Treibstoff über Winter im Benzintank des Gerätes c Ausgeschlossen sind Defekte an Verschleißteilen wie Kohlebürsten Fangsäcke Messer Walzen Schneideplatten Schneideeinrichtungen Führungen Kupplungen Dichtungen Laufräder Sageblätter Spaltkreuze Spaltkeile Spaltkeilverlängerungen Hydrauliköle Öl Luft u Benzinfilter Ketten Zündkerzen Gleitbacken usw d Ausgesch...

Page 70: ...ks leaving fuel in the tank during the winter etc c Defects on wear parts are excluded e g carbon brushes collection bags knives cylinders cutting blades clutches sealings wheels saw blades splitting crosses riving knives riving knife extensions hydraulic oils oil air fuel filters chains spark plugs sliding blocks etc d Also excluded are damages on the machine caused by incorrect or inappropriate ...

Page 71: ... son excluidos por ejemplo escobillas de carbón bolsas de aspirador cuchillas cilindros hojas de corte embragues juntas ruedas hojas de sierra cuñas de división disco incisor extensiones de la cuña de división aceites hidráulicos filtros de aceite aire combustible cadenas bujías bloques de deslizamiento etc d También están excluidos los daños en la máquina causados por un uso incorrecto o inadecua...

Page 72: ... etc c Défauts des pièces d usure sont exclus par exemple balais en charbon sacs d aspirateur lames cylindres lames embrayages joints roues lames de scie cales de division lame inciseur extensions de cale de division huiles hydrauliques les filtres à huile air carburant des chaînes des bougies des blocs coulissantes etc d Sont également exclus les dommages sur la machine causés par une mauvaise ma...

Page 73: ... Quality Management policy Your opinion is essential for further product development and product choice Please let us know about your Impressions and suggestions for improvement experiences that may be useful for other users and for product design Experiences with malfunctions that occur in specific operation modes We would like to ask you to note down your experiences and observations and send th...

Page 74: ...PRODUKTBEOBACHTUNG PRODUCT MONITORING ZIPPER MASCHINEN GmbH www Zipper Maschinen at 75 ZI RPE120GYN ...

Reviews: