17
Use proper safety clothing and devices
when operating the machine (safety
gloves, safety goggles, ear protectors,
safety shoes …)!
The machine may only be operated
outdoors on grassy areas.
If there are some components still hot,
the machine won’t be allowed to be
stored.
4
REMAINING RISKS
•
Danger by sound:
Working without ear protectors can
damage the hearing.
•
Danger by the working area:
Take care of stones and other objects in
the area to be mowed.
Danger of catching of ropes, wires, or
loose trousers legs by the mower blade
•
Danger for the hands (fingers):
Never touch the mowing blades during the
operation. Severe cutting injury!
•
Adverse health effects through vibration
A long, continuous use, or a regular use of
the sickle bar mower by one person may
influence your health: blood circulatory
disturbances (especially of your hands),
joint damages are possible. Therefore:
Make breaks regularily
and w
ear well cu-
shioned gloves to reduce vibration intensi-
ty.
•
After operation the machine has to get
cold. Otherwise, there’s a high burning
hazard!
•
Electrocution when touching the spark
plug socket when engine is running.
You can reduce remaining risks by following all
security, operation and maintenance
instructions.
5
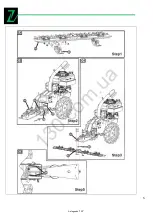
ASSEMBLY
•
Install the height regulator(Fig.C1)
Mount the height regulator1 on the cutting
bar2 as illustrated.
Use the bolt M8x30,washer M8 and locknut
M8 fixing it.
•
Mount the blade holder(Fig.C2)
Lightly grease the mounting bush1 and
insert the blade holder2.
Place the V belt3 around the pulley4.
•
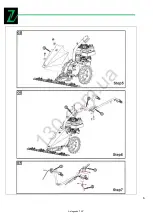
Fix the blade holder(Fig.C3)
Hook the recoil spring1 as illustrated.
Step4.Mount the cutting bar on the blade
holder (Fig.C4)
Place the rocker block1 on the switch block2.
Insert the rocker bolt3 into the rocker block.
Use the bolt M8x20,washer M8 and lucknut
M8 fixing it.
•
Install the shield cover.(Fig.C5)
Place the shield cover1 on the blade holder.
Use the flange bolt M8x20, washer M8,
washer M12 and locknut M12 fixing it as illu-
stratred.
•
Install the handlebar(Fig.C6)
Insert the absorber block1 between the
handle bar2 and Ex-arm-fixer3.
Use bolt M8x70, rubber washer, washer
M8 and locknut M8 fixing it.
•
Install the throttle lever1,cutting clutch2
and forward clutch3 as illustrated(Fig.C7)
Note: The shake of this machine is bery big
on its work, so every bolt or nut must be
tighten especially well.
6
OPERATION SETUP
I M P OR T A N T
Remove spark plug cap before
performing any adjustments or
checks on the machine to prevent
accidental start up of the engine.
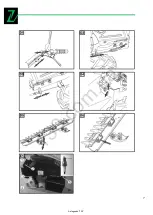
Cutting clutch distance adjustment
If the cutting clutch distance is too short,you
can adjust the cutting clutch line to L(Fig.D1)
or L(Fig.D3) direction.
If the distance is too long, you can adjust to re-
verse direction.
Autogoods “130”
130.com.ua
Summary of Contents for ZI-BM870ECO
Page 5: ...4 Autogoods 130 1 3 0 c o m u a...
Page 6: ...5 Autogoods 130 1 3 0 c o m u a...
Page 7: ...6 Autogoods 130 1 3 0 c o m u a...
Page 8: ...7 Autogoods 130 1 3 0 c o m u a...
Page 23: ...22 Autogoods 130 1 3 0 c o m u a...
Page 24: ...23 Autogoods 130 1 3 0 c o m u a...
Page 25: ...24 Autogoods 130 1 3 0 c o m u a...

