background image

13

REQUIRED

REQUIRED

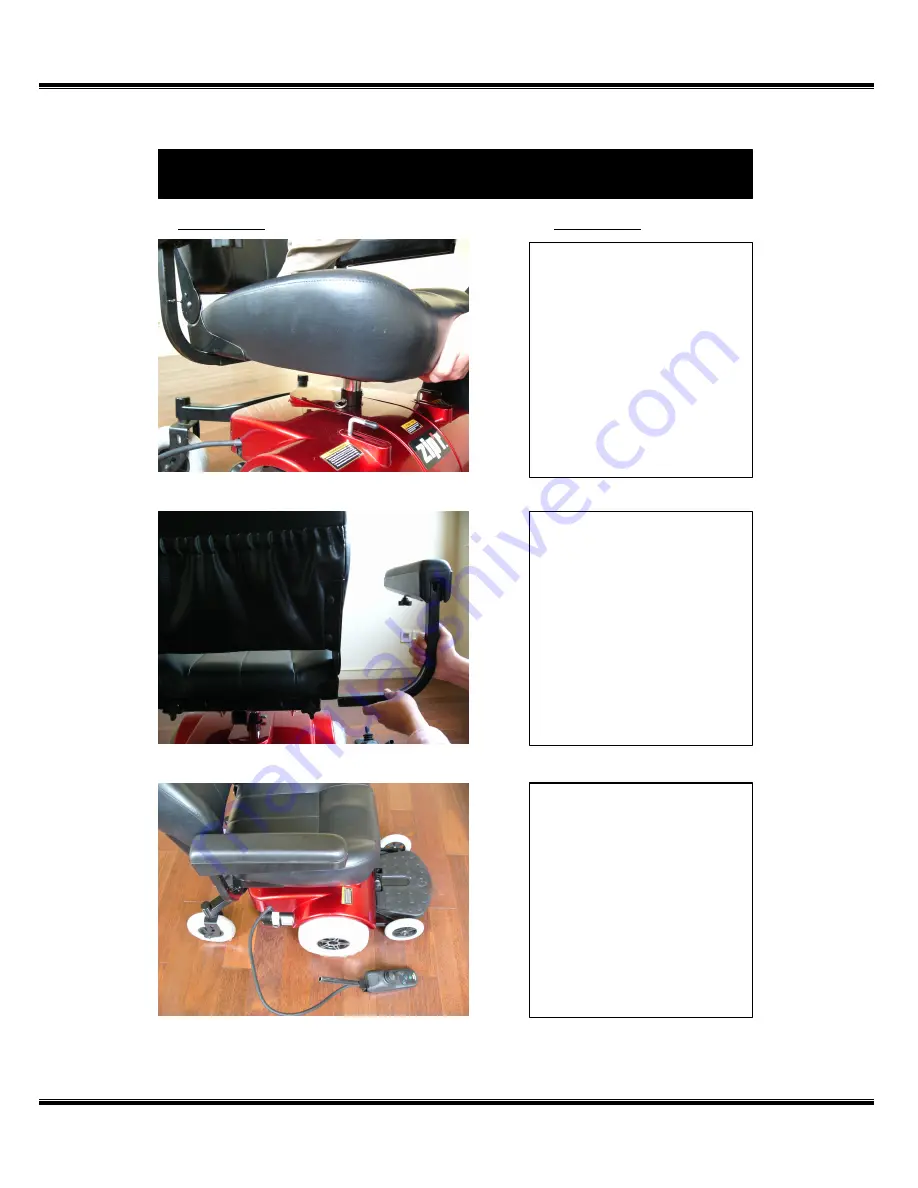
Figure 4

Figure 5

Figure 6

ASSEMBLY CONTINUED

Figure 4

Lift the seat onto the

chrome seat post support

by inserting the metal seat

post (attached under the

seat) into the chrome seat

post support. Test seat by

attempting to rotate – seat

should not be able to rotate

if installed correctly.

Figure 5

Install arm rests by

loosening arm rest set

knob located on the back of

the seat frame and then

inserting the arm rest into

the seat frame. Tighten the

arm rest set knob and

ensure that

 the

set knob is

screwed fully through an

arm rest position hole.

Figure 6

After installing the arm

rests ensure that each arm

rest is securely in place.

After the arm rests are

securely installed you can

then locate and install the

joystick controller – see

figures 7, 8, and 9.

Summary of Contents for PC

Page 1: ...PC Simplicity in Mobility Zip r Mobility LLC North Bend WA 800 760 9107 www zipr com operations manual ...

Page 2: ... you have questions about the safe use and or proper maintenance the please refer to our website www zipr com or contact Zip r directly at 800 760 9107 SAFETY WORD DEFINITION CAUTION Caution indicates a potentially hazardous situation which if not avoided could result in product damage or malfunction DANGER Danger indicates a probably hazardous situation which if not avoided will result in persona...

Page 3: ... ZIP R PC OPERATIONS Pg 20 TROUBLESHOOTING GUIDE Pg 24 PRODUCT CARE MAINTENANCE Pg 25 WARRANTY Pg 27 ZIP R MOBILITY CONTACT INFORMATION 800 760 9107 www zipr com MY AUTHORIZED DEALER _______________________________ DEALER TELEPHONE _______________________________ PRODUCT SERIAL _______________________________ TABLE OF CONTENTS ...

Page 4: ... 12 V x 35 Ah Charger Off board 5A Drive Front wheel Motor specifications 320 W 43 hp 24 V Controller PGDT VSI 50A Brakes Electromagnetic regenerative Seat type Foldable mid back Seat width 19 5 Seat depth 19 Seat back height 18 5 Seat to floor height 18 20 Drive wheel 10 x 3 5 flat free Rear caster wheel 7 5 x 2 flat free Anti tip wheel 6 x 1 3 flat free Body colors Red Blue Maximum climbing incl...

Page 5: ... points when assembling and disassembling your PC Never modify the PC in anyway or use it for a purpose other that intended Never attempt to drive over curbs or obstacles Doing so may cause your PC to turn over Never leave the power button on when entering or exiting the PC Never go up or down or traverse slopes greater than 7 degrees Never stand on flip up footboard Doing so may cause the PC to t...

Page 6: ...ns techniques used in this manual are a starting point for the new wheelchair PC user and should be used only as a basic guide WARNING STABILITY ALWAYS maintain proper positioning in the Zip r PC seat When reaching leaning or transferring it is important to use the casters as a tool to maintain stability and balance Practice reaching leaning and transferring in the presence of a qualified healthca...

Page 7: ...n angle other than square straight ALWAYS approach obstacles slowly and ensure that such obstacles can be safely maneuvered upon Proceed over such an obstacle straight and at a slow and steady speed to ensure that all wheels and casters clear the obstacle NEVER attempt to climb or descend an obstacle that is wet or unstable and never climb or descend an obstacle in reverse ALWAYS use an elevator w...

Page 8: ...mrests for weight bearing purposes Such use may cause the Zip r PC chair to tip WEATHER ALWAYS avoid inclement weather conditions whenever possible Thoroughly dry your Zip r PC chair before storing charging or operating TRANSPORTING ALWAYS use care when lifting portions of your Zip r PC Individual components are heavy and should be moved with caution ALWAYS use care when transporting your Zip r PC...

Page 9: ... is secured to chair frame Ensure that casters are free of debris Ensure all tires are free of cracks and wear Replace if necessary Monthly Inspection Ensure all wheel and caster mounting nuts are secure Ensure casters have proper tension when spun Casters should come to a gradual stop Ensure that any loose hardware on the chair is fastened appropriately Ensure that all electrical components are f...

Page 10: ... level the greater the protection against EMI SAFETY PRECAUTIONS The following are some precautions you can take to reduce the risk of a mobility vehicle being affected by EMI RFI 1 Do not turn on or use hand held personal communication devices such as citizens band radios CB and cellular phones while your vehicle is turned on 2 Be aware of nearby transmitters such as TV or radio stations and try ...

Page 11: ...11 YOUR ZIP R PC Drive wheel Caster wheel Anti tip wheel Joystick Seatback Seat base Footrest Armrest Seat post Motor release levers Charging terminal ...

Page 12: ...inyl seat Figure 2 Adjust your seat post support height by pulling the metal pin choosing the appropriate height and reinserting the pin Figure 3 Twist the two motor release levers such that they are pointing outwards This position engages the motor for operation Twist the levers forward to release the motor into freewheel position as needed ...

Page 13: ... installed correctly Figure 5 Install arm rests by loosening arm rest set knob located on the back of the seat frame and then inserting the arm rest into the seat frame Tighten the arm rest set knob and ensure that the set knob is screwed fully through an arm rest position hole Figure 6 After installing the arm rests ensure that each arm rest is securely in place After the arm rests are securely i...

Page 14: ... frame is fully inserted and then tighten the set knob such that the joystick can not be removed Figure 8 Align the joystick cable underneath the arm rest and feed the cable through the eye twist located on the arm rest Figure 9 After the cable is inserted pinch and twist the eye twist together such that the cable remains attached to the arm rest frame Excess cable can be pushed back into the hole...

Page 15: ...10 In order to adjust the foot rest loosen and remove the adjustment bolt and relocate the foot rest to the appropriate position Reinsert the adjustment bolt and fully tighten Rotate the foot rest up and down to ensure that it is securely installed Figure 11 Your Zip r PC is now fully assembled and ready for operation Please fully read the operations section of this manual prior to operating the Z...

Page 16: ... contain lead and lead compounds NEVER allow any of your tools and or battery cables to contact both battery terminal s post s at the same time An electrical short may occur and serious personal injury or damage may occur Always wear rubber gloves when installing removing batteries REMOVING INSTALLING BATTERIES REQUIRED BATTERIES AND CHARGING Step 1 Remove the joy stick controller from the seat ar...

Page 17: ...r ofhe scooter and label each battery connection as follows with a piece of tape rear negative black rear positive red front positive red front negative black This will assist in ensuring that the battery cables will be installed correctly when reinstalling the batteries Step 5 Loosen and remove each battery cable from the battery terminals ensure that the labeled tape remains on the red and black...

Page 18: ...he replacement rear battery Ensure that the positive red cable and the negative black cable for the front battery are installed only on the replacement front battery Always replace both front and rear batteries never just replace one battery BATTERIES AND CHARGING CONTINUED Step 6 Using the battery handles remove each battery from the Zip r PC Reinstall replace batteries in the reverse order of th...

Page 19: ...atteries when the wheelchair is outside NEVER sit on the wheelchair while recharging the batteries ALWAYS charge new batteries before initial use or battery life will be reduced NEVER use a charger not approved or supplied by Zip r Mobility 1 Attach the battery charger connector to the charger port on the front of the joystick 2 Plug the chargers s AC power cord or extension into the grounded 110 ...

Page 20: ...o one of the armrests and is connected to the motors and batteries inside the PC shroud The VSI Controller consists of the following 1 battery condition meter 2 maximum speed indicator 3 on off button 4 horn button 5 speed decrease button 6 speed increase button 7 joystick 8 off board charger socket See the next page for a detailed description of each button or meter ZIP R PC OPERATIONS 1 2 3 4 5 ...

Page 21: ...er allow the joystick to return to the neutral position then turn on the controller Maximum Speed Indicator This meter indicates the maximum speed that the controller is currently set WARNING Unless faced with an emergency situation do not use the on off button to stop the chair This will cause the Zip r PC to stop abruptly Always turn the power off when you are stationary to prevent unexpected mo...

Page 22: ...board charger socket is located at the lower front section of the VSI Controller The off board charger current should not exceed 5 amps Other VSI Controller Functions Sleep Mode The VSI controller is equipped with a sleep mode feature Sleep mode shuts off the main power if the joystick is not moved in any direction for a preset period of time The battery lights on the keypad indicate sleep mode by...

Page 23: ... Pull the joystick to the full rearward position until the VSI beeps 5 Release the joystick There will be a long beep 6 The VSI is now locked Unlocking your PC VSI Controller 1 Press the on off key and power on the VSI The maximum speed indicator should move from side to side 2 Push the joystick to the full forward position until the VSI beeps 3 Pull the joystick to the full rearward position unti...

Page 24: ...batteries need charging or there is a bad connection to the batteries Check the connections to the batteries If the connections are good try charging the batteries 2 The left motor has a bad connection Check the left motor connection 3 The left motor has a short circuit to a battery connection Contact an authorized Zip r Provider 4 The right motor has a bad connection Check the right motor connect...

Page 25: ...t an authorized Zip r Provider if a malfunction results WARNING Never use a rubber conditioner on the tread area of the tires doing so may cause the tires to slip and your Zip r PC to skid Tires and Wheels Use a rubber conditioner on the tires sidewalls NEVER ON THE TREAD to help preserve them All wheel bearings are prelubricated and sealed thus they require no subsequent lubrication General Guide...

Page 26: ...is Ensure all tires are free of cracks and wear Replace if necessary Monthly Inspection Ensure all wheel and caster mounting nuts are secure Ensure casters have proper tension when spun Casters should come to a gradual stop Ensure that any loose hardware on the chair is fastened appropriately Ensure that all electrical components are free of corrosion Replace if corroded or damaged Ensure all labe...

Page 27: ... components and or full products for repair or replacement such costs are the responsibility of the purchaser FIVE YEAR LIMITED WARRANTY For five 5 years from the date of purchase Zip r Mobility will repair or replace at our option to the original purchaser free of charge any of the following parts found upon examination by an authorized representative of Zip r Mobility to be defective in material...

Page 28: ...prior written authorization from Zip r Mobility LLC IMPLIED WARRANTIES Implied warranties including those of merchantability and fitness for a particular purpose are limited to one 1 year from the date of purchase and to the extent permitted by law Any and all implied warranties are excluded This is the exclusive remedy Liabilities for consequential damages under any and all warranties are exclude...

Page 29: ...29 NOTES ...

Reviews: