background image


As you begin using your rollator walker during daily activities, you will probably encounter 
situations which you will need some practice. Simply take your time and you will soon be in 
confident control as you maneuver through doorways, on and off elevators, up and down ramps. 

2SHUDWLQJWHFKQLTXHVXVHGLQWKLVPDQXDOVKRXOGRQO\EHXVHGDVD³EDVLF´JXLGHDVHDFK

Truss 

XVHULVVROHO\UHVSRQVLEOHIRULQGLYLGXDOVDIHW\DQGWKHVDIHW\RIRWKHUVZKHQXVLQJD=LS¶U

Truss Walker. 


Provided below are some precautions, tips, and other safety considerations that will help you 
become accustomed to operating the rollator walker safely. 

WARNING! Do not use a strong corrosive cleaner on the products surface! 


WARNING! Do not leave your rollator walker outside in rainy conditions! 


MANDATORY! Prior to sitting down on the seat, lock both brakes to prevent the 

rollator from sliding! 
 

MANDATORY! Do not hang any weighted items on any part of the frame as it may 

cause the rollator to become unstable! 
 
PRE-RIDE SAFETY CHECK:


Get to know the feel of your rollator walker and its capabilities. We recommend that you perform 
a safety check before each use to make sure your rollator walker operates smoothly and safely.


Perform the following inspections prior to using your rollator walker: 

x

  Check to ensure that the rollator walker is fully unfolded with the frame securely locked 

into position.


x


Check to ensure that the castor wheels are secured.


x


Check the brakes to ensure they operate properly.


x


Check the condition of the tires. Make sure they are not damaged or excessively worn.


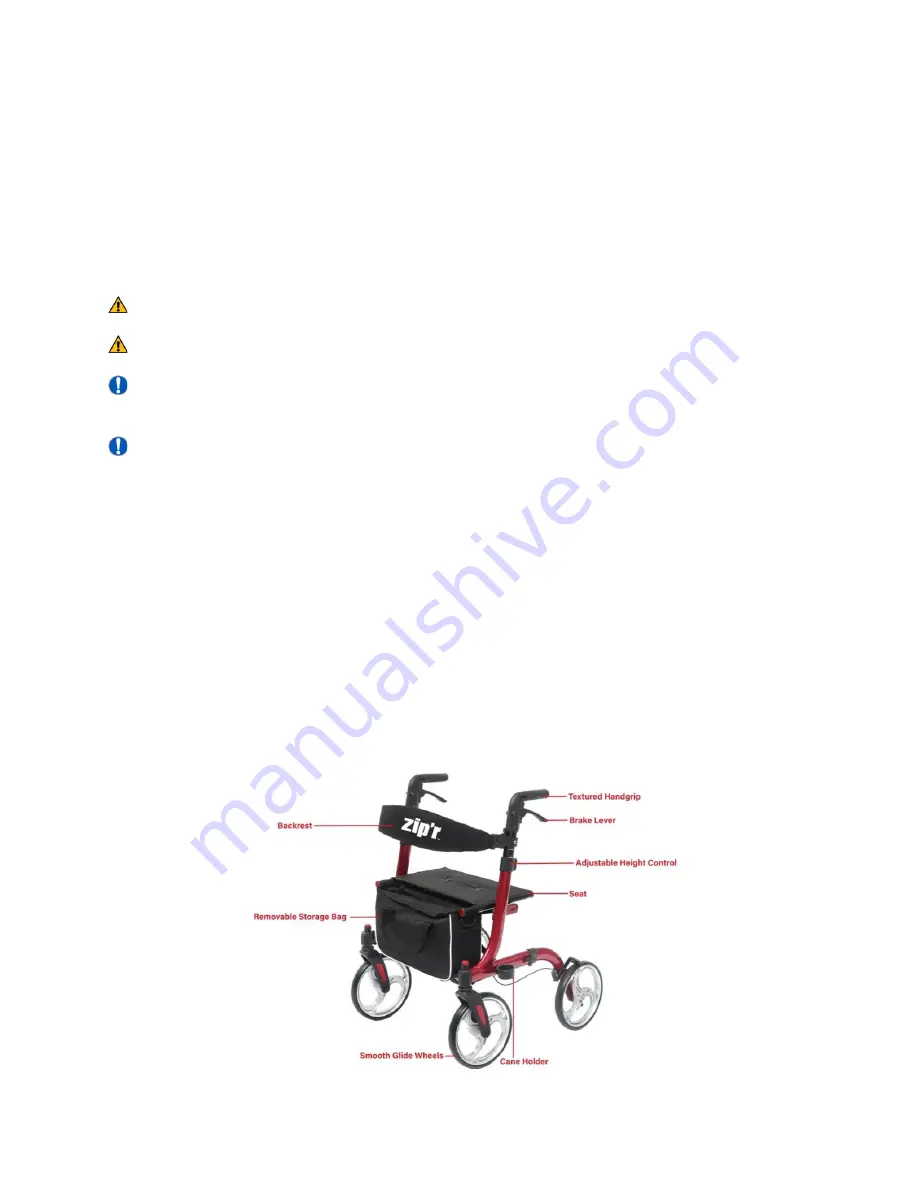
Your Rollator Walker 

7KH=LS¶U

Truss rollator walker consists of the following major components listed in the diagram 

below. 


Summary of Contents for Truss

Page 1: ......

Page 2: ...g to operate the product This advice aims to avoid possible injury to the user or bystanders and avoid damage to the rollator or surrounding property 127 7KLV RZQHU V PDQXDO LV FRPSLOHG IURP WKH ODWHV...

Page 3: ...or use as a walking aid meant to assist users while walking If a large amount of force is placed on the rollator walker even when the brakes are locked in position the rollator may move Always exercis...

Page 4: ...de in rainy conditions MANDATORY Prior to sitting down on the seat lock both brakes to prevent the rollator from sliding MANDATORY Do not hang any weighted items on any part of the frame as it may cau...

Page 5: ...ng the rear leg of the rollator into the mainframe You will hear a click when inserted afterwards secure the rear leg to the mainframe by screwing the two pieces into place using the provided bolt Fig...

Page 6: ...utton located on each side of the rollator Ensure that the height is locked 3 Your elbows should be bent slightly when griping the grip at 15 20 degrees Brake Operation Adjustment x Squeeze both brake...

Page 7: ...cloth can be used to clean the seat and backrest ensuring that the backrest and seat are dry prior to sitting on your rollator PROHIBITED Do not apply rubber conditioner on the tire tread this may cau...

Page 8: ...m fork and frame LS U ZLOO UHSODFH WKH GHIHFWLYH UROODWRU RU PDLO UHSODFHPHQW SDUWV Customers will need to contact their own Repair Service Technicians for any mechanical work to be done due to ZDUUDQ...

Page 9: ...imitations on how long an implied warranty lasts or exclusion of limitation of incidental or consequential damages All warranty claims must be accompanied by proof of purchase order number and product...

Reviews: