997-532-000-1, Issue 1
March 2006
15
EN54 & ISO 7240 2-8 Zone Conventional Fire Panel - Installation & Configuration Manual
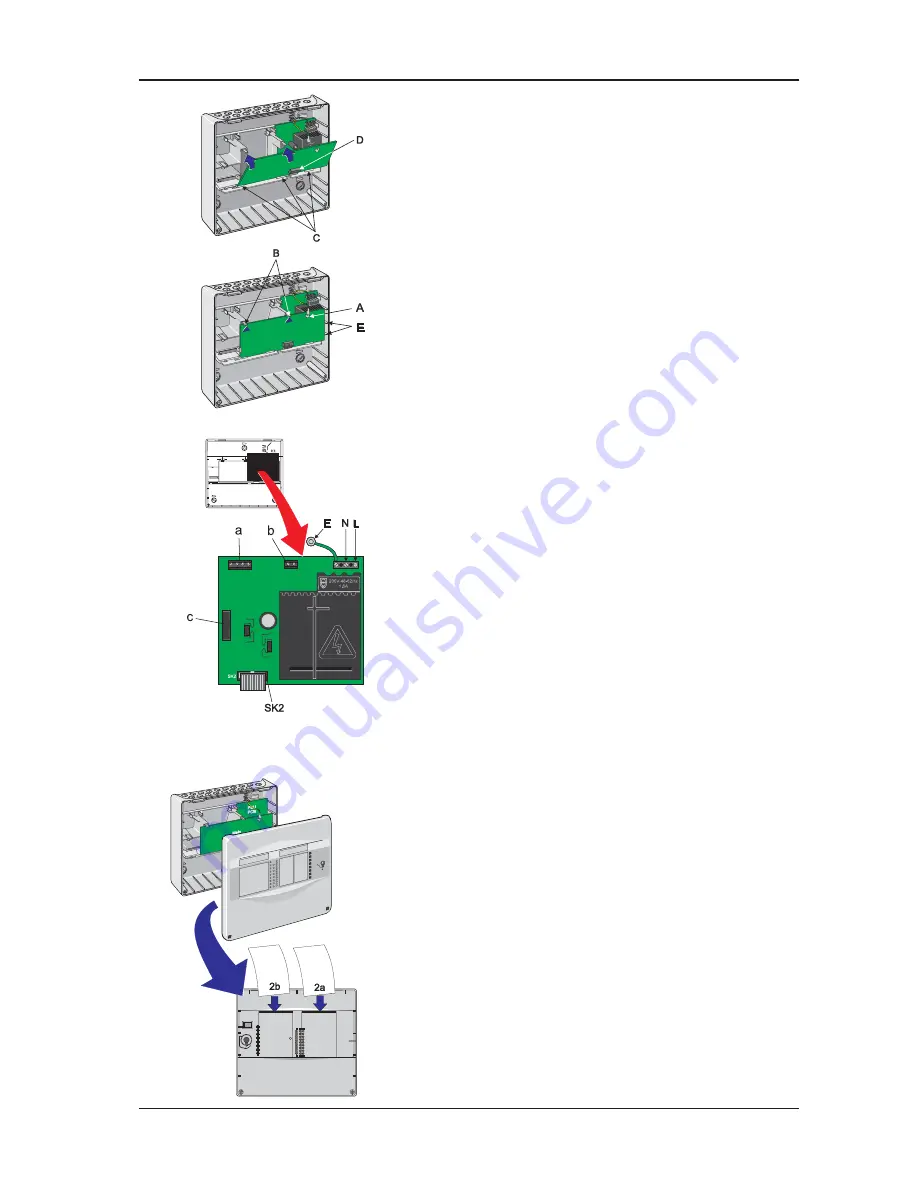
Refitting the Main PCB
The procedure for refitting the Main PCB is the reverse
of the removal procedure but note the following points:
When offering the Main PCB to the three locating tabs
(C) make sure that:
i
Make the ribbon cable connection at socket connector
SK4 (D) and re-connect the earth lead to the blade
connector (A).
ii
The ribbon cable is correctly located within the rebate
on the bottom edge of the Main PCB.
iii The PCB is correctly aligned with the rebates in the side
wall ribs (E) before gently pushing it home - confirmed by
audible clicks from the PCB-retaining clips (B).
Note:
For simplicity, the lettering of key items remains
the same as for the removal process.
5.2
PSU PCB
The PSU PCB provides all power requirements for the
panel when in quiescent and alarm conditions.
The mains supply live (L) and neutral (N) wiring is brought
into the panel and terminated at the Mains Termination
Block (MTB) located in the top right-hand corner of the
PCB. Refer to
Section 6.4 Powering the Panel
for details
on terminating the mains wiring at the MTB and the mains
safety earth at the earth post (E) in the back box.
The PCB is fitted with wiring connectors for:
a. Two sounder output circuits
b. One 24Vdc auxiliary output circuit.
c. Up to two, optional-fit 8-way Relay PCB(s).
Power and signal connection to the Main PCB is via the
16-way ribbon cable connector (SK2).
5.3
Label Inserts
The following paper text inserts are supplied for:
•
Zonal Fire/Fault information
•
Panel status.
To fit the text inserts proceed as follows:
1
Carefully remove all text inserts from the kit and select
the appropriate language. Discard the rest.
2
Make sure the moulded cover is removed from the
back box. With the rear face of the cover towards you:
a. The zonal text insert should be fed into the right-hand
(viewed from the back) entry slot and pushed all the way
down until all text is correctly displayed in the window.
b. To fit the panel status indication text insert use the left-
hand entry slot (viewed from the back) and push it
down until all the text is correctly displayed.
Summary of Contents for EN54
Page 41: ......


