P/N 501-1631ZE-1-06 • REV 06 • ISS 11MAR14
3 / 4
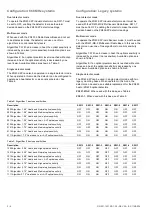
Table 4: [1] SW1 settings for single detector mode with ZR401-3 and ZR401-MS-2 bases
Mode
SW1-1
SW1-2
SW1-3
SW1-4
SW1-5
SW1-6
SW1-7
Optical only
ON
OFF
OFF
ON
OFF
OFF
OFF
Heat only
ON
OFF
OFF
OFF
ON
OFF
OFF
[1] This configuration complies with EN 54-7 and EN 54-5 standards (class A1).
Table 5: SW1 settings for single detector mode with a ZR401-1 mounting base
Mode
SW1-1
SW1-2
SW1-3
SW1-4
SW1-5
SW1-6
SW1-7
ZR430 Optical compatibility
ON
OFF
OFF
ON
OFF
OFF
ON
ZR420 Heat compatibility
ON
OFF
OFF
OFF
ON
OFF
ON
Installation
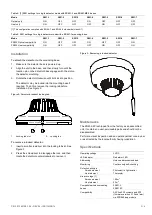
To attach the detector to the mounting base:
1. Make sure the detector base is powered up.
2. Align the unit to the base, and then slowly turn until the
location pin on the detector base engages with the slot on
the detector moulding.
3. Rotate the detector clockwise until it clicks into position.
The detector may be locked into the mounting base if
required. To do this, remove the locking tab before
installation. See Figure 2.
Figure 2: Detector breakout locking tab
1.
Locking tab slot
2.
Locking tab
To remove a locked detector:
1. Insert a small screwdriver into the locking tab slot. See
Figure 3.
2. Press the screwdriver to disengage the lock, and then
rotate the detector counterclockwise to remove it.
Figure 3: Removing a locked detector
Maintenance
The ZR432-2P is shipped from the factory as an assembled
unit; it contains no user-serviceable parts and should not be
disassembled.
Perform a visual inspection and an operational test once a year
or as directed by the local authority having jurisdiction.
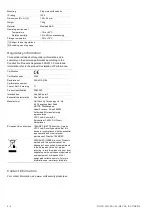
Specifications
Operating voltage
3 VDC
LED indicator
Red alarm LED
Addressing
Unique address embedded
Monitoring
Continuously self-checking
Detection principle
Smoke element
Heat element
Photoelectric light scatter
Thermistor
Area coverage [1]
Smoke element
Heat element
100 m
2
50 m
2
Compatible wireless mounting
bases
ZR401-1
ZR401-3P
Compatibility
All Ziton ZP2 systems and ZP3
(firmware versions 3.12 and later)
via ZPR868 loop module
1
2


