background image

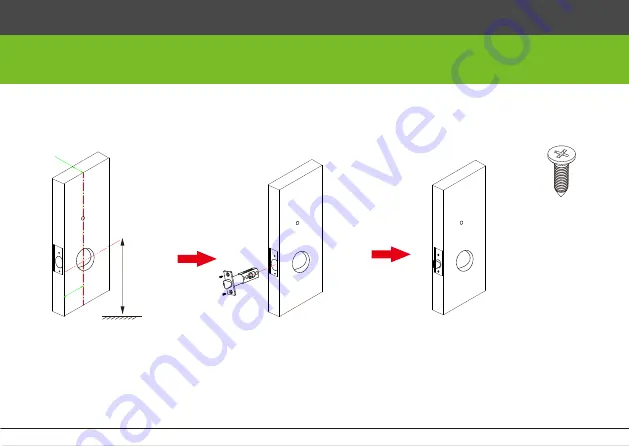
1) Align the template along the vertical center line of the


  latch(D) at the desired handle height, and tape it to 

the 

door.

2) Mark the holes first, 

and 

then start drilling. 


1

.

Drill holes on the door.


2

.

Install the latch (D).

E

c

enterlineofthe

handle

h

desired handle

height

 Installation


5

Note

Installing the mortise(D) on the door 

by inserting screws(E).

30~60mm

60mm

Summary of Contents for AL10B

Page 1: ...Installation Instruction AL10B AL20B Version 1 1...

Page 2: ...Installation Diagram Single Latch Illustrated by the case of AL20B 1 B A C D E F G H C I J K L M...

Page 3: ...A G F K B D C I 2 Packing List N H 1pcs E 4pcs J 2pcs L 1pcs M 2pcs...

Page 4: ...M4 20 PM4 30 PM4 40 KM4 25 KM4 35 KM4 45 KM3 5 7 5 7 5 56 7 5 7 5 64 7 5 7 5 72 30 38mm 39 46mm 47 54mm 3 Note To ensure proper functioning of the device only use the mounting hardware package for you...

Page 5: ...repare the corresponding mounting hardware package 2 Check door opening direction F F F F D D D D 30 38 56 20 10 25 39 46 64 30 10 30 47 54 72 40 10 40 H Spindle Length mm J Screw Length mm M Screw Le...

Page 6: ...red handle height and tape it to the door 2 Mark the holes rst and then start drilling 1 Drill holes on the door 2 Install the latch D E center line of the handle h desired handle height Installation...

Page 7: ...le H on the door 6 H B C 3 3 Attach outdoor unit B to door by putting it through door holes 3 2 Insert spindle H into the clutch 3 1 Put gasket C on outdoor unit B Clutch correct position The triangle...

Page 8: ...K M L 7 I C B C J L M 4 1 Put mounting plate I on gasket C 4 2 Inserting screws J to secure the out door unit 5 3 Secure indoor unit K to outdoor unit B by inserting screws M and screw L 5 1 Connect t...

Page 9: ...is idle the front handle can be turned but the door will remain locked 2 When you are inside the door turn the handle upward to lock the deadbolt for more security When you go out verify your ngerpri...

Page 10: ...Mechanical Key And Change Handle Direction How To Use Key Changing Handle Direction Hexagon Screw N Hexagon Screw N 2 Pull handle away from lock 1 Use wrench N to re move screw 3 Insert mechanical ke...

Page 11: ...se keep the mechanical keys in a safe place 4 To power on the lock four alkaline AA batteries not included are required Non alkaline and rechargeable batteries ARE NOT RECOMMENDED 5 Do not remove batt...

Page 12: ...rademark of ZKTeco or a related company All other product and company names mentioned are used for identification purposes only and may be the trademarks of their respective owners All specifications...

Reviews: